
photo from https://stories.wf.com/pony-express-riders-young-fast-fearless/
In this tutorial, we are going to be setting up a site mailer.
I think where a lot of devs go wrong with site mailers is trying to make one for an application instead of making a mailing service that thier application can use.
That's why in this tutorial we are going to set up a site mailer that can be used by any application.
This means that the contact form for your portfolio can also be used as the feedback form for your projects.
Once you have one of these set up you can do amazing things with your website, such as sending payment receipts to a user's email and informing a blogger of new followers.
What does this tutorial teach?
We are going to set up a contact form that sends what users enter into a form to a specific email using express, node mailer, react as a basic front end.
Why use react?
You can do the major functionality of this app without a front end framework. React is only going to be the form handling portion but it does provide the ability to scale if you want to do something more complex with a site mailer.
prerequisite software
1.node.js this is a must for every javascript related thing that happens outside a browser.
2.create-react-app you can only do the back end functionality without this but because this is going to help you to do more robust things with this tutorial, we are using it.
3.vscode you can use any text editor you want but I will be using vscode, this means it will be easiest to follow if you are too.
4.git cli for keeping versions and changes.
Prerequisite knowledge
basic javascript.
curiosity about express and node.js
(optional) bash commandline
getting started
go to the directory where you keep your projects and begin by making a new folder, called mail-service
mkdir mail-service
cd into the directory
cd mail-service
make a new npm project by initializing a package.json
npm init -y
the -y means we want to create this without asking questions.
Open the project.
code .
In the package.json we have the basic setup. Let's install the npm packages.
npm i express morgan dotenv nodemailer
express is a minimal framework for setting up server-side applications.
morgan is an http request logger, this will allow us to see the status of our request without making a function
dotenv is a package to save environment wide variables keeping sensitive information off of github. we will use it to hide emails and passwords.
node-mailer this is all the helper methods to make our service send emails.
Make a server.js file to house our server
touch server.js
at the top add the back-end imports.
const express = require('express')
const app = express()
require('dotenv').config()
const morgan = require('morgan')
const nodemailer = require('nodemailer')
const port = 4444
at the bottom add the app.listen to give our back end a definite port.
app.listen(port, () => {
  console.log(`app is live on ${port}`)
})
in the middle of those, make our app use morgan so that we get a better idea of how our app is behaving.
app.use(morgan('dev'))
Now have our app use express.json() to make sure everything gets to our backend in proper type.
app.use(express.json())
Start the app on the commandline.
nodemon server
If everything went right and you have all the packages installed, you should have a file and terminal looking like this.

Now we want to add git, for brevity I won't do this in writing.
The outline of this app goes like this.
Make one working route to send an email, make a frontend to use that route with a form.
Let's start by making a folder.
mkdir routes
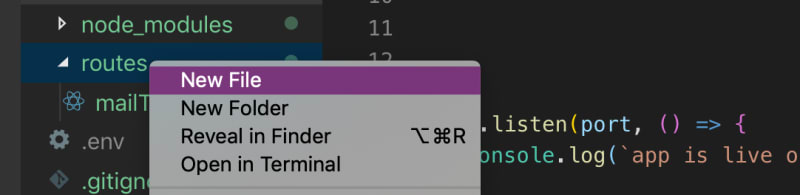
Right click the routes folder we will make a sendToMe.js

Add express and nodemailer to this file like so.
const express = require('express')
const sendToMeRouter = express.Router()
const nodemailer = require('nodemailer')
Add a console.log to that file so that we can make sure we are reaching the file from the server.js
console.log("from sendToMe")
sendToMe.js
export the Router() at the bottom of the file.
module.exports = sendToMeRouter
in the server.js have the app use that route file like this.
app.use('/sendtome', require('./routes/sendToMe'))
turn the server back on and see if the console.log shows up.
nodemon server
Now we can build out the mailer's functionality.
To do this we need to make an email address that this will use.
With Gmail, you have to use the turn on less secure apps to do this.
You can use an email you already have but please be careful not to publish your password.
Now, in your google account home, in the top left corner, go to security.

Scroll down until you reach less secure apps.

The alternative to this is figuring out how to enable your site to use Oauth in your app, that will just be another thing.

You should receive an email shortly from google saying that you enabled less secure apps.
Make a .env file
touch .env
Now we need to add the email and password to the .env file and app wide variable.
THE_EMAIL="super secret dont show anyone!!!"

THE_PASSWORD="super secret dont show anyone!!!"
.env
We are set up to make the transport object and the mailing functions in the sendToMe.js file.
const transport = {
  //all of the configuration for making a site send an email.

  host: 'smtp.gmail.com',
  port: 587,
  secure: false,
  auth: {
    user: process.env.THE_EMAIL,
    pass: process.env.THE_PASSWORD
  }
};
Now make the transporter function
const transporter = nodemailer.createTransport(transport);
  transporter.verify((error, success) => {
    if(error) {
      //if error happened code ends here
      console.error(error)
    } else {
      //this means success
      console.log('users ready to mail myself')
    }
  });
Let's add another function to make this work on a post request.
sendToMeRouter.post('/', (req,res, next) => {
    //make mailable object
    const mail = {
      from: process.env.THE_EMAIL,
      to: 'your.email@gmail.com',
      subject: req.body.subject,
      text: `
      from:
      ${req.body.name}

      contact: ${req.body.email}

      message:

      ${req.body.text}`
    }
// error handling goes here.
  });
finish with some error handling.
transporter.sendMail(mail, (err,data) => {
      if(err) {
        res.json({
          status: 'fail'
        })
      } else {
        res.json({
          status: 'success'
        })
      }
    })

//still inside the .post request the next line should be });
You can test this in post man but remember that you have to have text, email, name, and subject defined in order to get this to work and enable cors app wide.
Ok now we get to my favorite part, the react app.
While still inside the project directory on the command line create-react-app
create-react-app client
Go to the package.json and connect the express app to the react app with a proxy like so.
//dont forget to add the comma after the curly bracket because it's json.
},
  "proxy": "http://localhost:4444/"
You will need to run the back and the front end at the same time.
on the back end
nodemon server
On in the client folder.
cd client && npm start
This should take you to the ordinary boiler-plate react.
Let's add axios to the client folder.
in client directory on the command-line
cd client && npm i axios
Remove all the code between the div tags.
Your app function should look like this.
function App() {
  return (
    <div className="App">

    </div>
  );
}
Now make a form with 3 inputs and a textarea
<form>
        <input type="text" placeholder="" name="" value={} onChange={} />
        <input type="text" placeholder="" name="" value={} onChange={} />
        <input type="text" placeholder="" name="" value={} onChange={} />
        <textarea name="" id="" cols="30" rows="10"></textarea>
      </form>
Dont panic! Our app will run again when we fill in the value and onChange attributes
We will have the useState hooks keep the string for us.
We need to import axios.
At the top.
import React, {useState} from 'react';
import axios from 'axios'
Inside the app function.
const [inputs, setInputs] = useState({email: '', name: '', subject: '', description: ''})
Now to make the handleChange and the handleSubmit's
const handleChange = e => {
    const {name, value} = e.target
    setInputs(prev => ({...prev, [name]: value }))
  }
  const handleSubmit = e => {
    e.preventDefault()
    // post request goes here.
  }
Add the place holders, name, value and onChange attributes so that our app isn't crashed anymore, add the onSubmit action to the form and a button. I've also added br tags.
<h1>feed back form. </h1>
      <form onSubmit={handleSubmit}>
        <input type="text" placeholder="email" name="email" value={inputs.email} onChange={handleChange} />
        <br />
        <input type="text" placeholder="name" name="name" value={inputs.name} onChange={handleChange} />
        <br />
        <input type="text" placeholder="subject" name="subject" value={inputs.subject} onChange={handleChange} />
        <br />
        <textarea name="description" placeholder="tell us about your experience" value={inputs.description} onChange={handleChange} cols="30" rows="10"></textarea>
<br />
        <button>submit</button>
      </form>
It's time for us to add the axios post request to /sendtome route inside the handleSubmit and configure the object so that everything is received properly.
The new handleSubmit will look like this.
const handleSubmit = e => {
    e.preventDefault()
    //destructure from inputs
    const {email,name,subject,description} = inputs
    axios.post('/sendtome', {
      //make an object to be handled from req.body on the backend.
      email,
      name,
      subject,
      //change the name to represent text on the backend.
      text: description
    })
  }
Let's give it a try.
If you copied and pasted all the code snippets it will work.
There you have it.
I'll be doing one on how to set up mailschimp to start your own news letter which gives much more beautiful emails than the plain text one you see here.
If you know anyone that this could help or just want to support me as a fellow tech enthusiast, please share and follow my posts.

Latest comments (6)
Can you please provide Github Repo if available
Great tutorial, easy to follow and well written. Unfortunately I encounter a
POST localhost:3000/sendtome 404 (Not Found)
Uncaught (in promise) Error: Request failed with status code 404
at createError (createError.js:16)
at settle (settle.js:17)
at XMLHttpRequest.handleLoad (xhr.js:69)
Is there any way to address it?
Thanks for sharing !!
You are welcome not a problem, I love sharing what I do.
Great tutorial.
Thanks!!
I’m glad you got it working without any problems!!!