Decided to go back and re-visit my post on installing Win10 IoT Core on a Raspberry Pi 3 using OSX (without using IoT Core Dashboard). Updated to use the latest versions of: OSX, IoT Core, online resources, etc.
Using mostly the same devices as last time:
- Raspberry Pi 3 model B
- 7” Touchscreen
- 15” Macbook Pro running OSX High Sierra (10.13.6)
- Satechi Multi-Port Adapater V2 (USB-C)
Image Preparation
Microsoft has some docs about using dism instead of Dashboard.
Similar to last time, we need to obtain an IoT Core image (an ffu)and then convert it to an img usable with dd (found on OSX, Linux, etc.).
- Locate IoT Core Build:
- Try this link
- Should that not work, from the IoT Core download page under “Latest Windows 10 IoT Core Builds” there should he a “For RaspBerry Pi 2 & 3”
- Download the iso (at the time of writing
17134.180410-1804.rs4_release_amd64fre_IOTCORE_RPi.iso) to a Windows machine - Double-click iso to mount it and run
Windows_10_IoT_Core_for_RPi.msiinside - Click through installer to install files to
C:\Program Files (x86)\Microsoft IoT\FFU\RaspberryPi2\. - Download ffu2img.py (docs)
- Ensure you’re using Python 2.7 and convert the image:
python ffu2img.py <path>/flash.ffu [output_filename]
The image conversion should take a minute or two and result in a flash.img file in the same location as the ffu (if you omit output_filename).
The ffu2img repository also contains a py3 script for python 3, but I didn’t try it.
Write Image to SD Card and Boot
This time the raspberrypi.org Mac instructions work without issue.
- My SD card is /dev/disk4
- I made sure to unmount (not eject) all
disk4volumes (in Disk Utility select a volume and check Device. One or more may saydisk4sX) - Write the img with
sudo dd bs=1m if=PATH/flash.img of=/dev/rdisk4 conv=sync(takes around 5 minutes) - In Disk Utility (or by running
df) verify several partitions were created (/dev/disk4s1, disk4s2, and disk4s5) on the SD card - Eject all the volumes, insert SD card back in the Raspberry Pi, and power on
IoT Core Setup
As it happens, I didn't have a USB keyboard on hand to get the device on the wifi.
Using an ethernet cable to connect the device directly to my laptop, I obtained the device's link-local address from the bottom-left of the touch screen. The device's admin portal is now accessible by pointing my laptop browser at
http://169.254.236.118:8080(default username/password isAdministrator/p@ssw0rd).
This time I came preparred, but I suspect the same gymnastics would work.
Connect the Pi via ethernet, got a DHCP address (192.168.2.39), and pointed a browser at 192.168.2.39:8080 (default username/password is same as before). The rest is basically the same:
In the left panel, selecting Connectivity-> Network , you can configure the wifi AP:

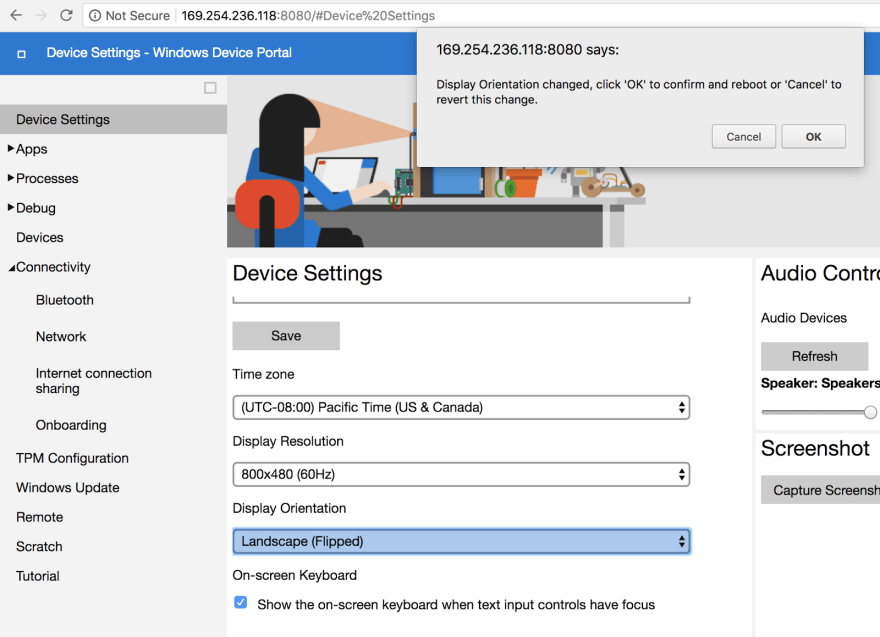
Initially the display was upside-down (assuming the HDMI port is “up” as when using this touchscreen case). To fix this, in the left panel pick Device Settings and towards the bottom in Display Orientation select Landscape (Flipped):

Now to finally get started on that long over-due project.


Top comments (1)
What a helpful tutorial to the point.
You might be interested in the course about Windows 10 IoT Core development on the Raspberry Pi that we just published. It is free until the end of March at
udemy.com/getting-started-with-win...
Cheers!