
This article is originally published on My Blog
In this article, we're going to build a CLI using Typescript and a framework called OCLIF. We'll make it interactive so that it's really easy to pick up and use for the first time.
Introduction
Note: In this part, I'm going to explain how a CLI is structured. Feel free to skip if you already know this.
Before we continue let's take a look at how a CLI is constructed. I'm going to use the npm CLI here as an example. We usually call the npm command like this:
npm install --save package_name
A complete CLI is usually made of four parts:
-
Command: This is the first word that we type when using a CLI in this case, it's the word
npm. -
Sub-Command: This is an optional word that comes after the command. In this case, it's the word
install. -
Flags: This is one of the ways to send an option to the CLI. It is started with the dash (
-) symbol. In this case, it's the--saveor a shorter version of it, the-S. The flag can also contain a value; when it needs a value it will be added like this:--foo=baror-f=bar. -
Arguments: This is the other way to send an option to the CLI. The difference from using flags is that the argument doesn't start with a dash and must be added in the correct order. In this case, it's the
package_name- you might notice the package_name argument is the first one to be added. If you call it, likenpm install foo package_name, then the install process will getfooas it's package_name.
Now that's clear, let's get started with the actual project!
Getting Started
We are going to need two NPM libraries for our core functionality. The first one is called OCLIF, which stands for Open CLI Framework. This library provides us with a complete workflow of building a CLI. The other library we need is called Inquirer, this will help us make the CLI interactive and user friendly.
There are two ways to create a new project with OCLIF.
The first is by installing it globally, then running the command like this:
yarn global add oclif
oclif multi pizza-cli
The other way is to simply use npx, like this:
npx oclif multi pizza-cli
Note: We are calling the oclif command with
multias an argument, this will tell oclif to create a multi command CLI. Think of it like thenpmcommand where you can pass in subcommands likenpm install,npm uninstall, etc.
OCLIF also supports creating a single command CLI. Something like the ls command, where it only has one functionality
This command will give us a few questions, which will impact how the project scaffold will be laid out
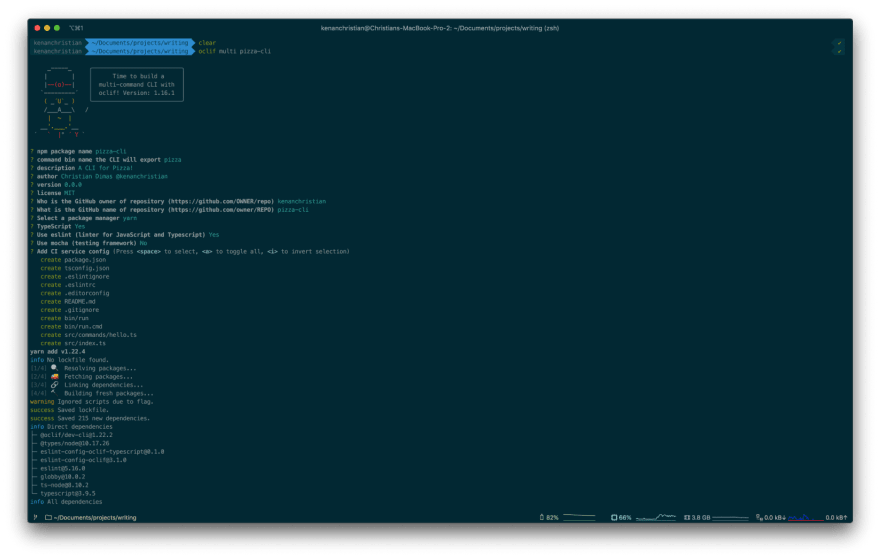
Most of the questions are self-explanatory and will be added to your package.json file. Two questions that you should note:
- NPM Package Name: This will be used when you are publishing the CLI to NPM.
- Command bind name the CLI will export: This is the command that you type on the Terminal to use this CLI like npm, ls, etc.
After the scaffolding process is completed, move to your project directory and open it in your code editor (I'll be using VSCode in this article):
cd pizza-cli
code .
Project Structure
The project structure will look like this:
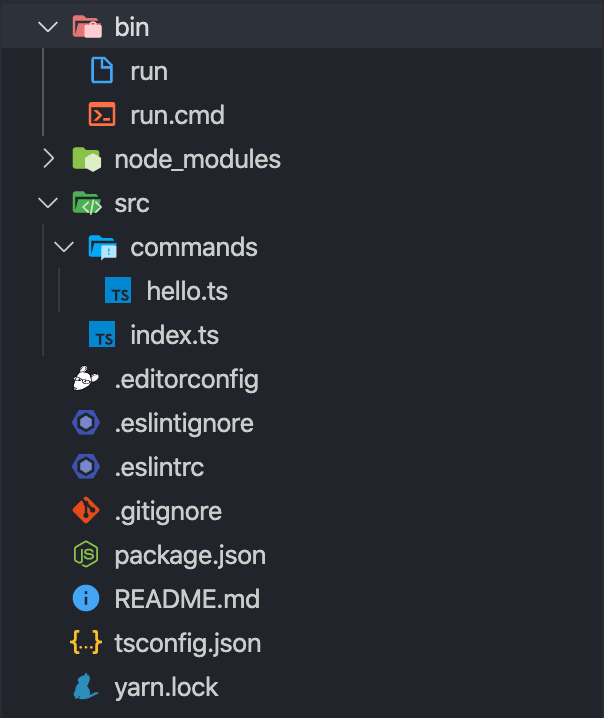
As you can see, you already have a file inside the command folder called hello.ts. This file is the only thing we need to have a hello command.
Let's try it out! Back in your terminal, type this:
./bin/run hello # This will call the hello subcommand
You can also run:
./bin/run --version   # This will show the cli version
./bin/run --help      # This will show a generated help for the CLI
Cool! You just created your first CLI!
Now, let's see what's inside the hello.ts file:
Your hello.ts file will look something like the snippet above. Let's look at a couple of interesting things:
- Description and Examples: This will show up when you run the help subcommand, and is used to provide more info for the user that's using it.
- Flags: This is where you define all your available flags for the subcommand. This will be parsed as JSON in the code.
- Args: This is where you define all your available arguments. One thing to note here is that the order of the argument matters because it will affect how the CLI is used.
- Run method: The run() method is the one that's executed when you call the CLI. There are no parameters to this method but we can get all the arguments and flags by using the this.parse() method, as you can see at line 23.
Now that we've understood the content of the file. Let's modify it a little, so that it matches our needs.
First, let's change the filename from hello.ts to create.ts, and the Class name from Hello to Create. This will change the subcommand from hello to create, and we can call it like this:
./bin/run create.
Now let's modify the description and examples to look like this:
Next, we add some more flags and arguments. It should look like this:
The last step is updating the run() method so we can see what the args and flags look like. The updated run() method should look like this:
With everything updated, the whole file should look like this:
Now, when you go back to the terminal, you can call the command like this:
./bin/run create 2 -t=pepperoni -c=thin -x
Or if you prefer the more verbose way, you can also do this:
./bin/run create 2 --toppings=pepperoni --crust=thin --extraSauce
You will see all the flags and arguments that we passed in formatted as a nice JSON object that's easy to work with.
Now that we have all the core functionality implemented, it's time to make it more interactive!
Making It Interactive
To make the CLI more interactive and user friendly, we'll need an additional NPM package called Inquirer. You can install it like this:
yarn add inquirer
yarn add -D @types/inquirer
After that's installed, let's modify our run method to look something like this:
In line 1 we're importing the prompt() method from inquirer, then in the run() method, instead of using this.parse() to get all the arguments and flags that are passed in, we call the prompt() method.
The prompt() method takes an array of questions that the user is asked when they run the CLI subcommand. The most basic question contains a type and message key, for the full options that you can use in the question please go here.
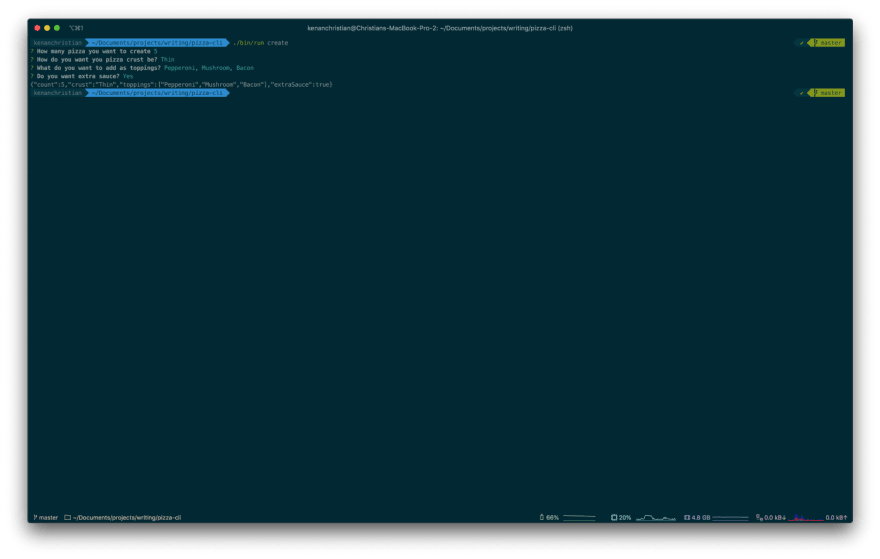
With everything now set up, now you can execute the CLI like this:
./bin/run create
Now, instead of adding all the arguments and flags when executing the CLI, it will ask you interactively for the data that it needs.
Congratulations! You just built your first, super user-friendly, interactive CLI!
Further Improvements
In this part of the article, I want to discuss some improvements that, in my opinion, will make the CLI better.
Make the interactive prompt optional
This might sound a bit weird. Why would I make the optional prompt optional when it has a better user experience than the usual CLI?
My argument is that for a power user who's already familiar with the CLI it's actually faster to just add all the arguments and flags they need, instead of going through the interactive prompt.
To do this, we need to modify the run() method slightly, and make it look like this:
I'm moving the prompt process to a new method, and in the run method, we are checking the arguments and the flags. If it exists then we use that - but if not, we run the prompt process.
With this implementation, the user now has two ways of using the CLI.
Adding color and loading bar
The next improvement I want to make is to make the CLI nicer to look at and use. Firstly, by adding color to the this.log method, so it's not just white. Secondly, by showing a loading bar when a process is running to give a better user experience.
To do those, we need to install two packages. We need chalk, for adding color to the this.log and we need cli-progress to show a loading bar.
We can install it like this:
yarn add cli-progress chalk
yarn add -D @types/cli-progress @types/chalk
With these packages installed, let's update our code again:
First, I introduce a new method called makePizza().
This is just to simulate a process running.
Inside that method, I'm calling a sleep() method. This is just a simple helper method to make sure the process doesn't finish too quickly.
Then use the chalk package to add color to our logging is actually pretty simple, we just need to import the color method that we need. In this case, we are using yellow, green, and cyan. Then we can just wrap the text with that method. As Simple as that, we get a colored log!
The next thing we do is add the loading bar.
First, we import the SingleBar and Presets from cli-progress.
Then, on line 20, we initialize the loading bar and giving it a custom format. On line 24 we call the progressBar.start(length, startFrom) method, this is used to set the loading bar length and start value.
To simulate a process, we loop for each pizza to make a topping, to increment the loading bar value by one. With all of this now set up, our CLI looks like this:
Pretty cool!
To learn more about all of the things that we've used, visit the links below. Thanks for reading this far and see you in the next article!
Resources:
OCLIF: https://oclif.io/
Inquirer: https://github.com/SBoudrias/Inquirer.js/
Chalk: https://github.com/chalk/chalk
CLI-Progress: https://github.com/AndiDittrich/Node.CLI-Progress
Project Repo: https://github.com/kenanchristian/pizza-cli

Top comments (4)
Thank you for sharing this! At first, I thought, it would not contain all the bits i wanted, but in the end, you had nearly all!
I wanted: command line args, interactive questions, loading and styling.
The only thing I do want additionally is to have a shell like enviornment,
so that someone could start my cli and then insert the command he or she wants to run. But since this was not the topic of your Blogpost, it's not your problem :)
Thank you again!
Hey Ben, I just saw your comments on this post. I'm glad that this helps! :)
Can you share more detail about the shell-like environment you're looking for? Maybe I can write a future post on how to do what you need.
I know that it's already 3 months after you've posted the comment, but just in case you still need any help feel free to reply :)
Yes, thank you for replying!
I mean the following with shell-like Environment:
Imagine the git command. It has multiple subcommands, like 'commit' and 'push'.
Now imagine the nodejs REPL mode.
Now combine both and you get something like this:
$> git (drops you into the interactive git command line environment)
git > commit -m"My Message" (run the command and pass all params to this subommand)
The Idea of this whole thing is:
I want to give my cli to inexperienced users, who do rather follow interactive 'instructions on screen' instead of digging through man-pages or cli --help output.
Also, my cli could be stateful in this manner, it could ask you to log in first, save the login token and then put you in some sort of 'Home' menu with mutliple 'commands' which can be executed in the context of this login.
Have a nice day!
Benjamin
Got it, thanks for the clear explanation!
That's an interesting idea you got.
I'm not quite sure how to build something REPL like (I'll look around for sure!).
But for your use case, I do have an alternative in mind
Because you planned to give your CLI to inexperienced users, what if instead of allowing them to type in the command, you give them a multiple-step prompt just like what I write above with a slightly different approach
Create the CLI as a single type. So it will not have subcommand, simply
git(I'll be using git as an example for this)So when they type:
$ > git
Then they will be presented with the subcommand available (commit, push, etc). Let's say the user chooses
committhen the next step you can ask the user to add the messageIf they choose
pushthen you can just run the selected action, and not show any next stepWill this be enough for your use case?
I can write a follow-up to this article about the "stateful" CLI, and also publishing the CLI (currently the user needs to have NodeJS installed to get it installed). If you're interested! :)
Cheers,
Chris