Hello again my fellow artisans!!
In this article, I will go through the step-by-step process of how you can automate your Laravel app deployment on a VPS, for free of course.
Setting the scene...
I am a part of a small team working on a Laravel project which is deployed on a VPS. Each of our team members will work on a particular task and when it's ready for production there is always a need for someone access to the server to deploy each change that is being pushed to our GitHub repo.
This become a very repetitive and unpleasant task for all of us and a solution was needed within our scale and budget, that's when we turned to the mighty Github Actions to automate our workflows.
Let's dive into the simplified version of our workflow setup guide.
Assumptions
In this guide, I assume you have the followings points in check.
You have a configured Linux server that is capable of running a Laravel application and Git is installed on it.
You have a Laravel application Github repository. If you don't have one you can follow the first 2 sections on my previous post here free-serverless-laravel-deployment.
How it works
On typical workflow a developer will create a new branch for a given task and make a pull request to the main/master branch or make the changes on the main/master branch it self (not advisable) and do a push.
Both pull request and push are events on a given branch we can subscribe to with Github Actions. Therefor we can define a set of instructions that should be carried out when ever the given events happen on our repository. These instructions might be running our Tests, Builds, and Deployments.
Create deployment script
The first thing we will do is create a deployment script that will contain all the necessary commands to deploy and run our application.
In the root directory of your application create a folder called .scripts.
Inside the .scripts directory create a file called deploy.sh with the following content.
Refer to comments on the scripts to know what we are doing on each line.
Create a workflow
A Github action workflow is a set of instructions that consists different jobs and steps that can be triggered on events we mentioned above.
Workflows for a repository are stored inside .github/workflows in the root directory of your applications.
create a file called deploy.yml inside .github/workflows folder with the following content.
Commit the newly created files
Now we have created all the necessary files for our automation let's commit them with the following commands.
$ git add deploy.sh deploy.yml
$ git commit -m "Deployment automation"
Create deployment branch and push to Github
If you notice on our deploy.sh and deploy.yml files we have referred to a branch called production. we will use this branch to add commits that are production-ready with a push or pull request.
Create this branch for your repository with the following git command and push them to GitHub.
$ git checkout -b production
$ git push -u origin production
Setting up ssh key
It's time to set up the connection between our server and Github's.
To do this we first need to generate a new ssh key pair on our server.
Run this command on your server to generate the ssh keys.
$ ssh-keygen -t rsa -b 4096 -C "email@example.com"
When prompt to enter a file name and passphrase, just press enter and accept the defaults.
This will create 2 ssh keys, public and private inside your home directory .ssh/ folder.
And now add your newly generated ssh private key to the ssh-agent with the following commands.
$ eval "$(ssh-agent -s)"
$ ssh-add ~/.ssh/id_rsa
And let's add our public key to the authorized_keys file on our server with the following command.
$ cat ~/.ssh/id_rsa.pub >> ~/.ssh/authorized_keys
Copying ssh keys to Github
Our above setup will allow:-
1. Github Actions to authenticate itself to our server and run our deploy.sh script.
For this to work, we have to let Github know how to authenticate to our server.
As we prepared our ssh key above will provide it to GitHub alongside the server HOST, the ssh PORT, the ssh private KEY, and the USERNAME of our server.
To do this go to your Github account on your browser and open your repository.
Click on setting like shown below
And on the sidebar menu click on secrets
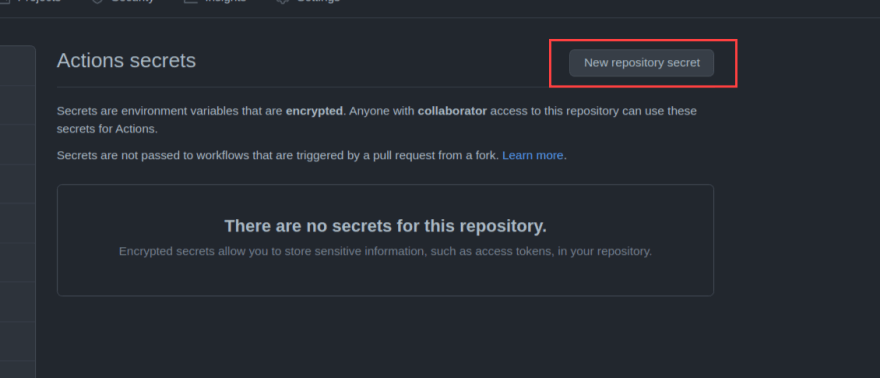
On the Action Secret page, click on add a new repository secret.
On the new secret page, add the following keys one by one.
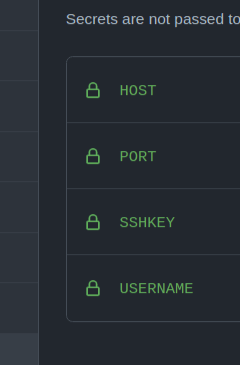
HOST
The HOST secret is your server IP address, put in the HOST keyword in the name field and your server IP address in the value field.
PORT
The PORT secret is your ssh port. use the PORT keyword in the name and 22 in the value to use the default ssh port.
SSHKEY
The SSHKEY secret is the private ssh key we generated on our server. normally you wouldn't share your private ssh key with anyone but since we are doing automation it's required.
Use the SSHKEY keyword for the name field.
To copy your private key value go to your server and run the following command.
$ cat ~/.ssh/id_rsa
This will print your private ssh key on your terminal, copy it and past it inside the value field.
USERNAME
The last secret would be the USERNAME you want to authenticate with.
To get this you can run whoami on your server and get the value. Then use the USERNAME keyword for the name field and past in the value.
when you are done you should have your secrets looking something like this
2. Our server to authenticate to Github and fetch the latest commits on our repository.
In order to Github allow access to our server we have to provide the ssh public key we generated earlier.
if we have multiple repositories we can provide the public key at the account level, but if it is just one repository we can provide it in the repository and allow access only to that one repository on our account.
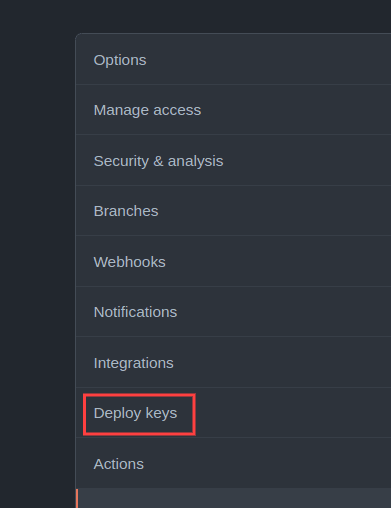
To do that go to your repository settings again and click on Deploy keys
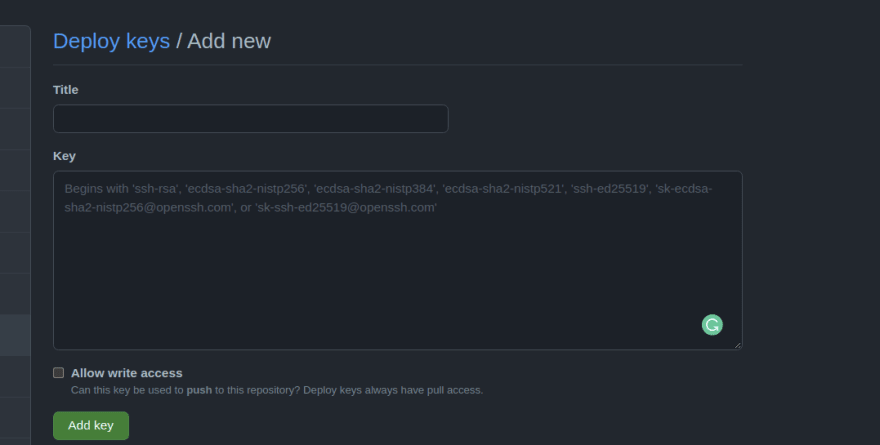
Add deploy keys..
Give it a title that helps you remember the server, like PROD_SERVER.
And for the key field value go to your server and print your public key with the following command and copy it.
$ cat ~/.ssh/id_rsa.pub
Don't check to allow write access and just click on add key button.
The last thing would be to change our remote origin on our server to use SSH instead of HTTPS and do a fetch to get the new commits on the server
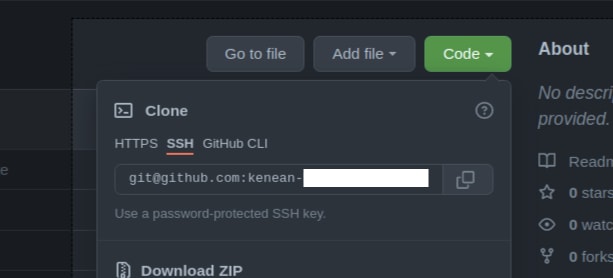
To do that go to your Github repository and click on the code button and copy the link on the ssh tab.
Then on your server go to your deployed application directory, most commonly inside /var/html/www and run the following command.
git remote set-url origin git@github.com:USERNAME/REPOSITORY.git
git fetch
replace the URL with the one you copied.
Give your deploy.sh script execution permission
sudo chmod +x ./REPOSITORY/.scripts/deploy.sh
There you have it, my friends, you have now a Laravel application deployment automation. create a test commit and push it to your production branch to see the magic happen.
You can go crazy with it by adding in more workflows for your test builds, staging environments, etc…





Oldest comments (9)
Thanks for your post. I have created two workflows one for staging one for prod. When I run $ git fetch
git@github.com: Permission denied (publickey).
fatal: Could not read from remote repository.
Please make sure you have the correct access rights
and the repository exists.
stackoverflow.com/questions/133635...
@precampio as @hammykl20 pointed out you need to add github to the ssh known_hosts list like the following:
ssh-keyscan -t rsa github.com >> ~/.ssh/known_hostsHowever, this is not enough as you have to also add your public key
id_rsa.pubto your github account by going to your account's settings, clicking on "SSH and GPG keys," and then clicking "New SSH key."Then just to be safe I would run the following two commands:
eval "$(ssh-agent -s)"ssh-add ~/.ssh/id_rsathank you for this post, following it helped me set my continuous deployment using laravel and github actions, however some small things are missing in this guide.
For example you need to grant execution permissions on your server for the ./.scripts/deploy.sh in order for it to be able to execute
Thank you for pointing that out, its updated now.
When I run following command replacing with my repo ssh key on my vps:
git remote set-url origin git@github.com:USERNAME/REPOSITORY.gitit give
fatal: No such remote 'origin'error.Can you please help me in this? do I need to login with github credentials?
A note to myself and whoever facing similar issues
If deploying a new repo, first need to clone it on server using (make sure both ssh keys have been added on github):
git clone git@github.com:USERNAME/REPOSITORY.gitcloning will auto set origin to current repo but you can check once using below command:
git remote -vIn case no origin found, then add origin using:
git remote set-url origin git@github.com:USERNAME/REPOSITORY.gitas you may need to make some permission changes (such as inside storage directory or .script directory) so ignore permission changes tracking using below command else your next action will fail:
git config core.fileMode falseThis is a very helpful article that I use as a reference and keep visiting over and over. However, I leave this note comment as a future reference and help for myself and others.
Because the Laravel app uses
npmto build its assets and thus also thedeploy.shscript on the server, then thedeploy.ymlneeds to indicate that the github action server also needsnpmto build the assets. So to thedeploy.ymlfile you need to add the following:And if you are using
nvmon the server to install node then maybe you need to add the following to thedeploy.shscriptThanks mate..