
In this post, we’ll learn to use basic React Native animations while creating a RN project that has an animated search bar. To do this, we’ll use the react-native-animatable package.
In most applications, animations are repetitive swipes, slides, bounces, and so on; react-native-animatable provides preconfigured animated components that you can use without rewriting commonly-used animations yourself. The package provides a standard set of easy-to-use animations and declarative transitions for React Native.
You can see a simulation of what we’re going to create below:

Creating a View for Search
In the first step, we create a view for the search component. The code for the search view and the CSS styling are given below:
https://medium.com/media/fff2ab3d61c506d32360fc30cf02bace/href
We use the above to create a view with a search bar component. You can use your own CSS styling to create different designs for your own search bar. As a result, you’ll get a search bar that looks like this:

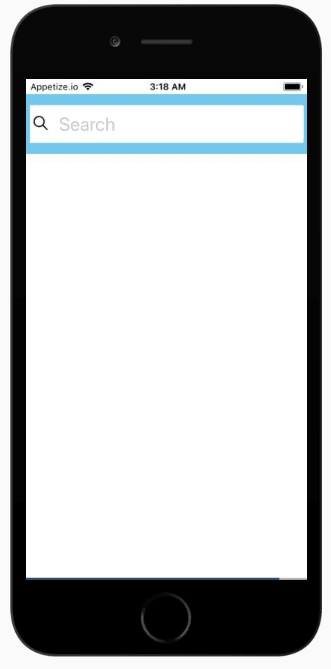
Add Icons and Search placeholder
In this step, we’ll add the search icon to our search bar so that users will know the search bar’s function. Here, we also add a placeholder “Search” to our search bar text field.
You can use the following piece of code to add an icon and placeholder to your search bar. The code on line number 13–19 below is what we add to the previous view to get our result as follows:
https://medium.com/media/aa73aa83ddab1697ffaf241174379b39/href
Hence, you can see the result with a magnify search icon and “Search” placeholder in our search bar below. These elements should make it clear to users what the purpose of this bar is.
The next revolution in mobile development? Machine learning. Don’t miss out on the latest from this emerging intersection. Sign up for weekly updates from our crew of mobile devs and machine learners.
Adding your first animation
Next, we’ll add our first animation to the search bar. For that, we need to install the react-native-animatable package into our React Native project. To do that we can simply use NPM or yarn.
In your project console:
npm install react-native-animatable — save
or
yarn add react-native-animatable
Now, to use the above package, we need to import the react-native-animatable package to our project view.
We can do so by using the following piece of code:
https://medium.com/media/1873dd39ca61907464226b647e401055/href
To animate the search bar we must use the createAnimatableComponent composer similar to the Animated.createAnimatedComponent. The common components View, Text, and Image are pre-composed and exposed under the Animatable namespace.
https://medium.com/media/34968eb9f152a0940a10b67bfb9e2dbf/href
After the import, we’ll need to update the search view with the Animate wrapper. If you have your own component that you wish to animate, simply wrap it with an Animatable.View as follows:
https://medium.com/media/083c034ffaf98799629e06c1244ac528/href
We should see the result as shown in the following simulation:

Adding mock-up data for the result
In this step, we need to add mock-up data for our search bar result. The instances and modules we need to import from the react-native package are given below. You can simply copy the following code:
import { View, Text, StyleSheet, TextInput, FlatList, Keyboard} from 'react-native';
Then, we seed data by creating an array named listItems and fill the array with a mock-up list of data. You can use your own array list as needed.
https://medium.com/media/411333f406db848b4d61149db9a08293/href
Here, we add a FlatList component imported for the react-native package to our view with our data list array listItems. You can do that by using the code in the following snippet:
https://medium.com/media/dc1daf52394b79027e5a122e27a0eecf/href
Hence, you get the following result, as shown below:

Focus search bar
In this step, we modify the search bar to produce a focused view of the search bar. Therefore, when a user clicks on the search bar it is highlighted to separate it from the rest of the components in view so that it becomes easy and efficient to use.
For that, first, we need to create a state to handle our search bar state. You can do so by using the following piece of code:
https://medium.com/media/d3c5f664cc640b6f45845645af3ea862/href
Then, we add CSS styles to our FlatList component result by checking the search bar state to see if it’s true or false. You can use the following piece of code for this purpose:
https://medium.com/media/2bde8c4ecf04577aa6ba6f2e417ab092/href
As a result, you will see the following result in simulation:

Handle focus to search bar by keyboard
In this step, we handle the search bar focus element using the keyboard component from our react-native package.
First, import the keyboard component from the react-native package as follows:
https://medium.com/media/34968eb9f152a0940a10b67bfb9e2dbf/href
Then, we add the keyboard listener to handle the focusing of the search bar so that each time a key is pressed on the keyboard, the search bar is focused or highlighted. The following piece of code can be used to do this:
https://medium.com/media/3873cc5ccb373cae506d12d45281175f/href
We should get the following result:

Changing icon when search bar is focused
This is a simple and final step in which we change the search bar icon to a backward arrow when focused. The backward arrow brings users back out of the focused search bar and into the main view.
You can implement this by adding the following piece of code to your view:
https://medium.com/media/84af740a5d3756b4d09f431a7e4d86af/href
Finally, we can see our final search animation made using the react-native-animatable package below:

Recap
In this tutorial, we learned how to use basic animations in our React Native project using the react-native-animatable package. The steps are very simple and easy to understand. We also looked at a simple implementation of handlers to focus on the search bar. Using the same package, you can also create other types of animations like swipes, bounces, etc. You can view the live demo on snack.
https://medium.com/media/e0629ef4d281159c9c5f1d1017ee9ae1/href
Looking for new ways to elevate your mobile app’s user experience? With Fritz, you can teach your apps to see, hear, sense, and think. Learn how and start building with a free account.
Editor’s Note:Join Heartbeat on Slack and follow us onTwitter andLinkedIn for the all the latest content, news, and more in machine learning, mobile development, and where the two intersect.
https://medium.com/media/05616eaceabf5537ffbda5b6811c367c/href

Top comments (0)