
So you’ve used Docker, deployed a service or two, maybe even ran some production application using Docker-Compose. Now your audience has grown and you need to support an increasing demand on your server.
Or like me, you just work in #devops. One of the most critical tools of DevOps today is the Kubernetes platform, a way to manage and scale our containerized deployments to “the cloud”.
What is “the cloud”?
“The cloud” is an abstract colloquialism to describe a range of different services, platforms, and ideologies with the goals of storing and serving data on the internet. That could mean your cloud backup provider who is storing your data with Amazon’s AWS S3 or Google’s GCP Cloud storage, or how Netflix serves and delivers its vast content library.
A cloud is a representation of some number of machines (servers, virtual machines, ect) which are communicating together over the internet in cooperation of some task. A slightly more technical term we’ll use from now on is “cluster”. A cluster, in particular, refers to some group of machines.
What does Kubernetes do?
Well, a lot.
But, one of the main things Kubernetes does is maintain clusters for us. Kubernetes is a platform for managing the lifecycle of a group of machines, virtual or not. When you compare that capability with a cloud provider that can give you “unlimited” compute at any time, that gives us a way to scale up our apps or services when they are in high demand, but then turn off and remove those extra servers when they are no longer needed, saving a lot of headaches and of course, money 💰.
There’s also a bunch of other great features such as rolling deployments, and rolling back deployments.
How does Kubernetes work?
Kubernetes Cluster
Kubernetes is a platform made of many micro-services that work together to create and manage the cluster of machines that will soon run our application.
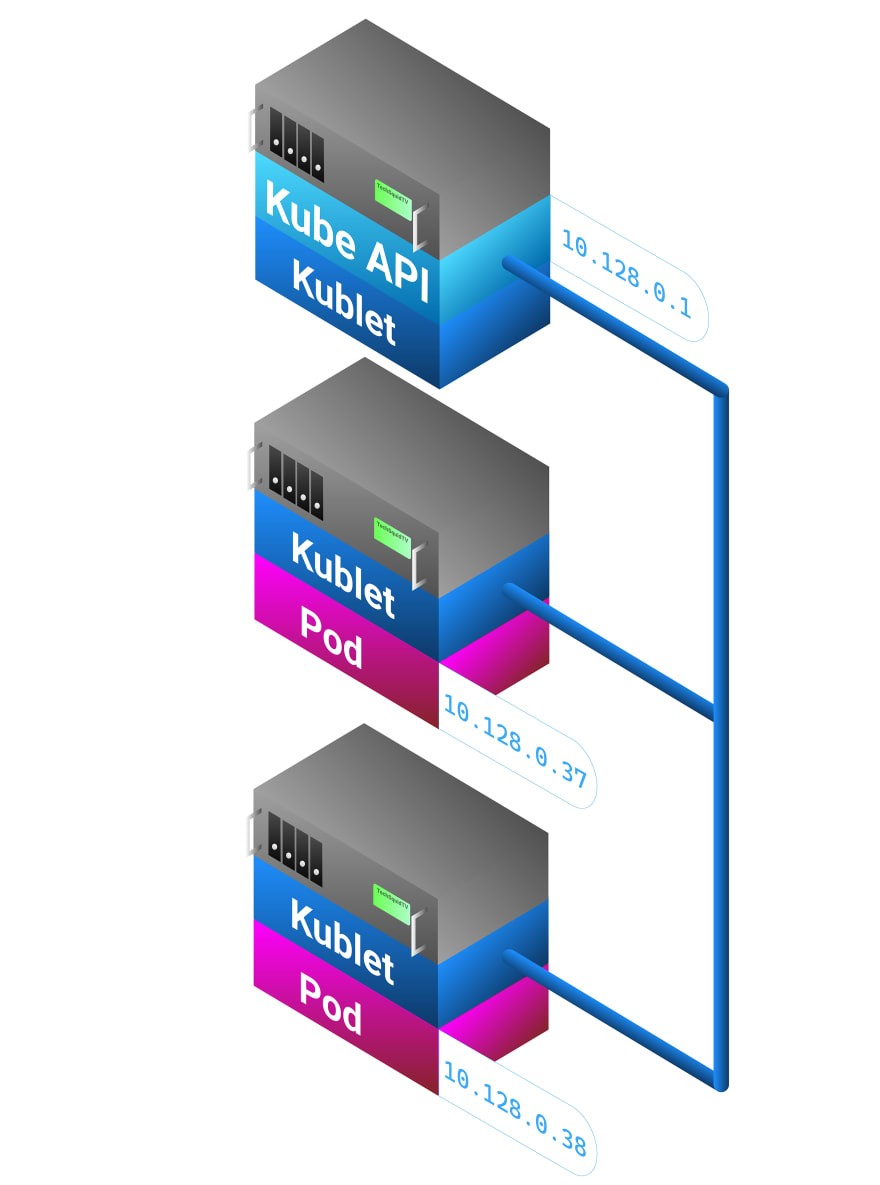
Master Node and the API service
The main service of the platform is the Kubernetes API, with which each node in the cluster will communicate with.
The node(s) in the cluster running the API service are typically referred to as “master” nodes, while any other node is referred to as a “worker” node.
This API is also how we as administrators will interact with the cluster and issue command and deployments, etc. However, we don’t usually deal with the API directly (but we could), we usually use a CLI tool called “kubectl”.
If you are familiar with Docker, this should be familiar. Docker also operates in a Client-Server relationship using APIs.
Worker Nodes
The other nodes in the cluster, “worker” nodes are responsible for reacting to events from the API service and reporting back their status, and ultimately will run our containerized applications.
Typically, you do not self-manage the hardware for a Kubernetes cluster, instead you work with a cloud provider. Working with a cloud provider who can supply a large number of machines means we can request and pay for only as many of these worker nodes as we need, and remove them from the cluster when demand goes down.
On each node in a cluster, you will find an agent installed called “kublet”. The “kublet” agent will self-register with the API server and become a part of the cluster as soon as it is online. This two-way communication between the Node and the API service allows the API to maintain state, so if a node were to go offline it can be detected and replaced.
While the API service manages and maintains the worker nodes, the worker nodes are maintaining their own components called pods and if any pod were to fail, the worker node would “self-heal” by replacing the pod.
Pods
We mentioned above that worker nodes ultimately run our containerized applications, they do so by creating and maintaining “pods”. Pods are the smallest deployable unit in Kubernetes and their lifecycle is handled by the node on which it is running.
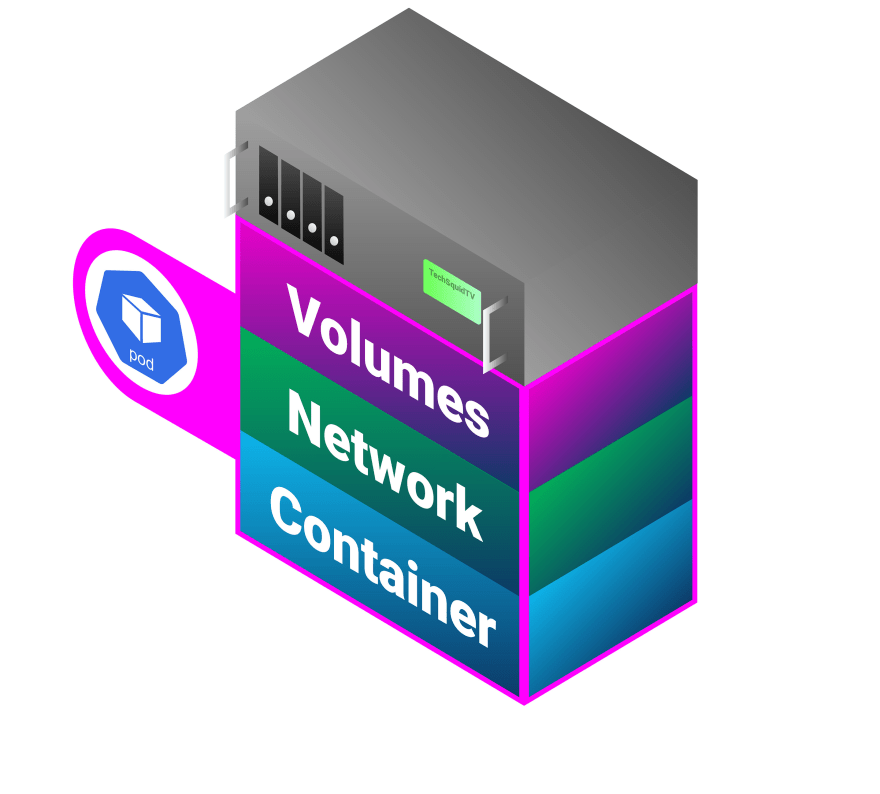
In Kubernetes we don’t interact with Docker directly, everything we deal with is purely Kubernetes API and the Docker stuff happens behind the scenes. Pods also manage their own networking and any attached volumes individually.
If the pod, or container within, crashes or fails, the node should automatically attempt to rebuild the pod.
Deploy a sample app to the cloud with Kubernetes
In the video above we go a little deeper in-depth on Kubernetes and write our own configuration file which we use to deploy a sample application to our Kubernetes cluster.
Sample deploy.yaml config file:
apiVersion: apps/v1 # for versions before 1.9.0 use apps/v1beta2
kind: Deployment
metadata:
  name: echoserver-deploy
spec:
  selector:
    matchLabels:
      app: echoserver
  replicas: 3 # tells deployment to run 3 pods matching the template
  template:
    metadata:
      labels:
        app: echoserver
    spec:
      containers:
      - name: echoserver
        image: gcr.io/google-samples/node-hello:1.0
        ports:
        - containerPort: 80
The instructions for configuring your cluster will vary slightly depending on the cloud provider you choose.
Once we have a cluster configured and are authenticated with kubectl, we apply our configuration file.
kubectl apply -f ./deploy.yaml
The Kubernetes API service will now work to mirror the state of this config file by issuing commands to worker nodes to stand up 3 pods containing the container specified.
Run “get deployments” to watch the status of the deployment. Once 3/3 have completed (in this case), we are nearly done.
kubectl get deployments
To expose our internally deployed service to the outside internet, we must forward the port from our containerized service to the outside port on the node.
kubectl expose deployment/echoserver-deploy --type="NodePort" --port 80
If at this point you run the get services command, you should see both the Kubernetes API service and the service we have just deployed.
kubectl get services
Now, if you visit the IP address of any of your nodes at the port specified you should see your live service.
🎉
With your service now live on each node, it’s time to place these services behind a load balancer. But, that will be a tutorial for part2!

Top comments (0)