Scenario: You’ve just been onboarded as a junior system administrator at a small tech company. Your task? Set up a shared project workspace for a new development team, manage users and permissions, prepare logs, and automate a few maintenance tasks. You’ll walk through everything using essential Linux commands.
Let’s get into it. One task, many tools. 💪
📑 Table of Contents
- Step 1: Organizing the Workspace
- Step 2: Creating and Managing Files
- Step 3: User and Group Setup
- Step 4: Managing Permissions
- Step 5: Fine-Grained Access with ACLs
- Step 6: Finding and Searching Files
- Step 7: Archiving and Compression
- Step 8: Scheduling Maintenance Jobs
- Step 9: Help Along the Way
- Summary
- Final Thought
🗂 Step 1: Organizing the Workspace
First, let's create the folder structure for the project.
mkdir -p /projects/devteam/logs
cd /projects/devteam
pwd
✅ mkdir creates the project directories.
✅ cd moves into the workspace.
✅ pwd confirms your current path.
You’ll list your files often, so:
ls -l
✅ ls -l shows detailed contents (permissions, ownership, size, etc).

📝 Step 2: Creating and Managing Files
Let’s make some placeholder files.
touch README.md notes.txt dev.log
✅ touch creates empty files. Now let’s write a quick note.
echo "Welcome to the DevTeam workspace!" > README.md
cat README.md
✅ cat displays file content. Need to view just part of a large log?
head -n 3 dev.log
tail -n 3 dev.log
✅ head and tail help preview file tops and bottoms.
You can also use wc to count lines, words, and characters:
wc -l notes.txt
Remember the files we've created are empty. You may try the following cmds to enter mock text for testing.
yes "Dev Log Entry" | head -n 20000000 > dev.log
This writes
Dev Log Entrytodev.log20 million times. Please do not try tocatthis file!If you want to enter text manually. You may try:
cat > notes.txt << EOF
This allows more control.

👥 Step 3: User and Group Setup
Now, let’s add some team members.
sudo groupadd devs
sudo useradd -m -G devs alice
sudo useradd -m -G devs bob
✅ groupadd creates a group.
✅ useradd creates users and adds them to the devs group.
Set their passwords:
sudo passwd alice
sudo passwd bob
Need to promote Alice to sudo?
sudo usermod -aG wheel alice
✅ usermod modifies user groups.

🔐 Step 4: Managing Permissions
Now that the team exists, let's adjust access to the project folder.
sudo chown -R root:devs /projects/devteam
sudo chmod -R 2775 /projects/devteam
✅ chown sets group ownership.
✅ chmod 2775 allows group read/write/execute and preserves the group via SGID (2).
Add the sticky bit to logs so only owners can delete their files:
sudo chmod +t /projects/devteam/logs

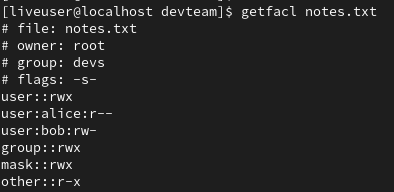
🧝 Step 5: Fine-Grained Access with ACLs
Bob needs write access to notes.txt but Alice should only read.
sudo setfacl -m u:bob:rw notes.txt
sudo setfacl -m u:alice:r-- notes.txt
getfacl notes.txt
✅ setfacl customizes file access.
✅ getfacl reviews who has what permissions.
🔍 Step 6: Finding and Searching Files
Let’s locate the README.md file and check its contents.
find /projects -name README.md
grep "DevTeam" README.md
✅ find helps locate files.
✅ grep searches for specific patterns or words.

📦 Step 7: Archiving and Compression
You want to back up the workspace before launch:
sudo tar -cvf devteam_backup.tar /projects/devteam
sudo gzip devteam_backup.tar
✅ tar archives files.
✅ gzip compresses them.

You could also try other formats:
sudo bzip2 notes.txt
sudo xz README.md
I had to do a bit of research on why I received this message. If you receive this please do additional research to resolve because I am explaining this through my own interpretation of what I read.
My understanding is xz zip flags executable files with
setuidorsetgidbecause as you know these files may be run with elevated privileges based on the uid or gid and this presents a security risk. So let's remove thexpermissions fromREADME.mdand see if we are able to zip it.
sudo chmod ugo-x README.md
I received the same message. So, let's try removing the
sgidbit. I noticed thatSin the group permissions and the error tells me the issue, [insert uncomfortable laugh], but live, learn, linux...

sudo chmod g-s README.md
sudo xz README.md
sudo chmod g+s README.md
I was able to zip the file successfully and reapply the
sgidbit. I left it asrwbecause it is a README.md, there is not a need for it to be executable.
To decompress:
gunzip devteam_backup.tar.gz
bunzip2 notes.txt.bz2
unxz README.md.xz

⏱️ Step 8: Scheduling Maintenance Jobs
You want to archive logs every night and delete them at the end of the week.
Schedule a one-time test with at:
echo "tar -czf logs.tar.gz /projects/devteam/logs" | at 22:00
atq  # List jobs
atrm 1  # Remove job #1 if needed

Set up a recurring cron job:
crontab -e
Add this line to run a script every day at midnight:
0 0 * * * /usr/local/bin/archive_logs.sh
✅ at handles one-time jobs.
✅ crontab handles recurring jobs.
at,cron,crontabare a bit too lengthy to cover in an already lengthy article, but here's another article I wrote covering them if you are curious: Linux Timecop
📘 Step 9: Help Along the Way
Never forget the man command. It’s your best friend:
man chmod
man tar
You likely don't need a lot of coverage about
man, but if you are interested in additional documentation tools, here's another article discussingman,info,tldrandwikit: Linux Documentation Tools
✅ Summary
You’ve just:
- Created a directory structure
- Managed users and permissions
- Applied ACLs and special bits
- Searched, archived, compressed
- Scheduled automated tasks
All using beginner-friendly Linux commands in a real-world scenario.
✍️ Final Thought
If you're just starting your Linux journey, this scenario gives you a full-circle experience of what a real-world task may look like, from setup to automation. Try these commands in a VM or test environment, and you’ll quickly build confidence!

Top comments (0)