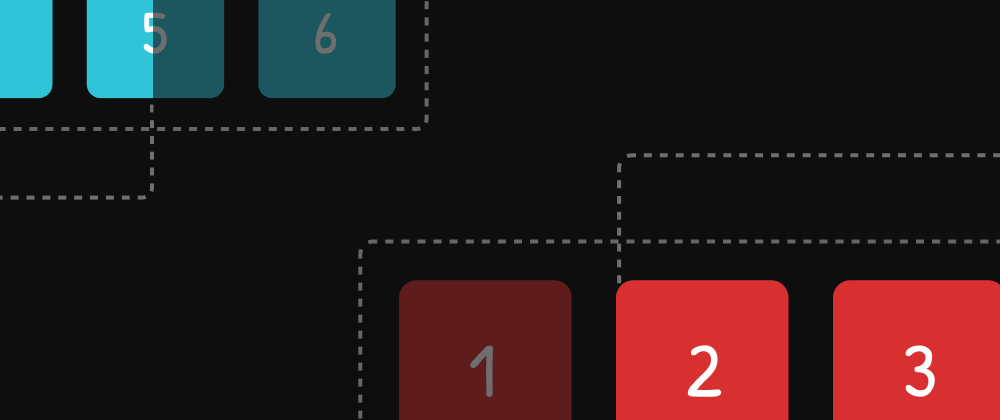
Instead of going through a complex third-party library docs, I tried to figure out how to build a "multi-card" carousel from scratch.
For the final code, check my GitHub repo.
If you want to see a real-world example, I used the logic of this approach (inspired by a Thin Tran's tutorial) in one of my recent projects: sprout-tan.vercel.app.
1. Understanding the structure
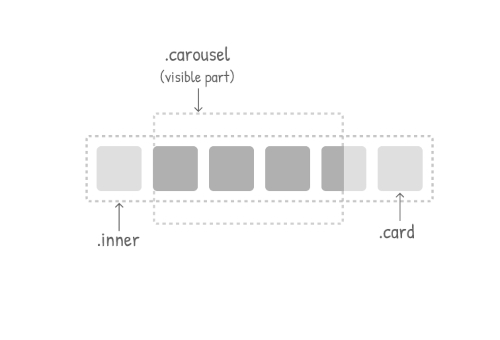
This is the underling structure of the demo above:
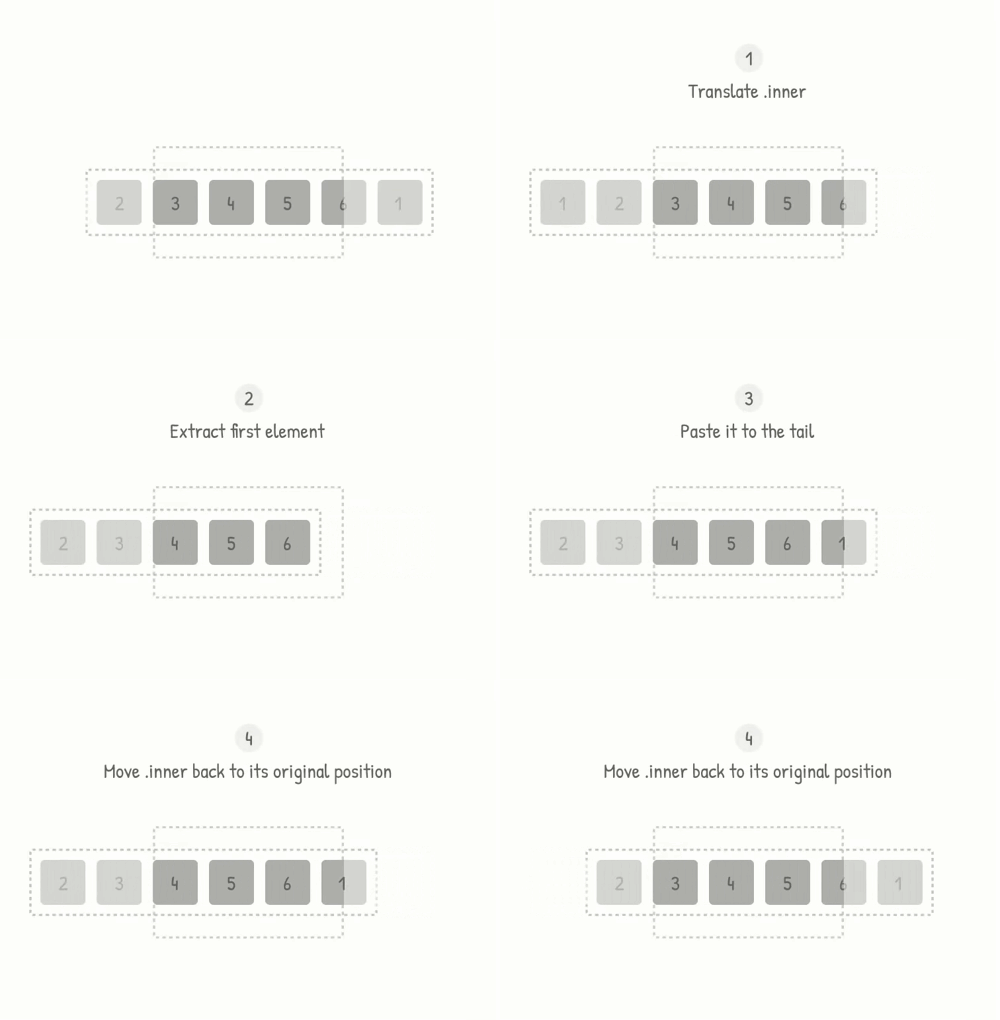
But let's see how it actually works:
Though in this .gif every step has an animated transition, this is just to make it easier to visualize all 4 steps:
- Translate the
.innerwrapper. - Extract the first item.
- Paste it to the tail.
- Move
.innerback to its original position.
In the actual implementation, only step #1 will be animated. The others will happen instantly. This is what give us the impression of an infinite/continuous navigation loop. Can't you see it? Stick with me 😉
2. Building the carousel structure
Let's start with this basic component:
<template>
  <div class="carousel">
    <div class="inner">
      <div class="card" v-for="card in cards" :key="card">
        {{ card }}
      </div>
    </div>
  </div>
  <button>prev</button>
  <button>next</button>
</template>

<script>
export default {
  data () {
    return {
      cards: [1, 2, 3, 4, 5, 6, 7, 8]
    }
  }
}
</script>
This is exactly the structure from section 1. The .carousel container is the frame within which the cards will move.
3. Adding styles
...

<style>
.carousel {
  width: 170px; /* ❶ */
  overflow: hidden; /* ❷ */
}

.inner {
  white-space: nowrap; /* ❸ */
}

.card {
  width: 40px;
  margin-right: 10px;
  display: inline-flex;

  /* optional */
  height: 40px;
  background-color: #39b1bd;
  color: white;
  border-radius: 4px;
  align-items: center;
  justify-content: center;
}

/* optional */
button {
  margin-right: 5px;
  margin-top: 10px;
}
</style>
Explanation:
❶: With a fixed width we make sure new items will be appended outside of the carousel's visible area. But if you have enough cards, you can make it as wide as you want.
❷: Using the propertyoverflow: hidden;will allows us to crop those elements that go outside of.carousel.
❸: Preventsinline-blockelements (orinline-flex, in our case) from wrapping once the parent space has been filled. See white-space.
Expected result:
4. Translating the .inner wrapper (step 1)
<template>
  ...
  <button @click="next">next</button>
</template>

<script>
export default {
  data () {
    return {
      // ...
      innerStyles: {},
      step: ''
    }
  },

  mounted () {
    this.setStep()
  },

  methods: {
    setStep () {
      const innerWidth = this.$refs.inner.scrollWidth // ❶
      const totalCards = this.cards.length
      this.step = `${innerWidth / totalCards}px` // ❷
    },

    next () {
      this.moveLeft() // ❸
    },

    moveLeft () {
      this.innerStyles = {
        transform: `translateX(-${this.step})`
      }
    }
  }
}
</script>

<style>
/* ... */

.inner {
  transition: transform 0.2s; /* ❹ */
  /* ... */
}

/* ... */
</style>
Explanation:
❶: The
$refsproperty lets you access your template refs.scrollWithgives us the width of an element, even if it's partially hidden due to overflow.
❷: This will dynamically set our carousel "step", which is the distance we need to translate our.innerelement every time the "next" or "prev" buttons are pressed. Having this, you don't even need to specify the width of your.cardelements (as long as they're all the same size).
❸: To move the cards we'll be translating the whole.innerwrapper, manipulating itstransformproperty.
❹:transformis the property we want to animate.
Expected result:
5. Shifting the cards[] array (steps 2 and 3)
<script>
// ...

  next () {
    // ...
    this.afterTransition(() => { // ❶
      const card = this.cards.shift() // ❷
      this.cards.push(card) // ❸
    })
  },

  afterTransition (callback) {
    const listener = () => { // ❹
      callback()
      this.$refs.inner.removeEventListener('transitionend', listener)
    }
    this.$refs.inner.addEventListener('transitionend', listener) // ❺
  }

// ...
</script>
Explanation:
❶:
afterTransition()takes a callback as an argument that's going to be executed after a transition in.inneroccurs.
❷: TheArray.prototype.shift()method takes the first element out of the array and returns it.
❸: TheArray.prototype.push()method adds an element at the end of the array.
❹: We define the event listener callback:listener(). It will call our actual callback and then remove itself when executed.
❺: We add the event listener.
I encourage you to implement the prev() method. Hint: check this MDN entry on Array operations.
6. Moving .inner back to its original position (step 4)
<script>
// ...

  next () {
    // ...

    this.afterTransition(() => {
      // ...
      this.resetTranslate() // ❶
    })
  },

  // ...

  resetTranslate () {
    this.innerStyles = {
      transition: 'none', // ❷
      transform: 'translateX(0)'
    }
  }

// ...
</script>
Explanation:
❶: It resets
.inner's position after shifting thecards[]array, counteracting the additional translation caused by the latter.
❷: We settransitiontononeso the reset happens instantly.
Expected result:
7. Final tunings
At this point, our carousel just works. But there are a few bugs:
-
Bug 1: Calling
next()too often results in non-transitioned navigation. Same forprev().
We need to find a way to disable those methods during the CSS transitions. We'll be using a data property transitioning to track this state.
data () {
  return {
    // ...
    transitioning: false
  }
},

// ...

next () {
  if (this.transitioning) return

  this.transitioning = true
  // ...

  this.afterTransition(() => {
    // ...
    this.transitioning = false
  })
},
-
Bug 2: Unlike what happens with
next(), when we callprev(), the previous card doesn't slide-in. It just appears instantly.
If you watched carefully, our current implementation still differs from the structure proposed at the beginning of this tutorial. In the former the .inner's left side and the .carousel's left side aligns. In the latter the .inner's left side starts outside the .carousel's boundaries: the difference is the space that occupies a single card.
So let's keep our .inner always translated one step to the left.
// ...
mounted () {
  // ...
  this.resetTranslate()
},

// ...

moveLeft () {
  this.innerStyles = {
    transform: `translateX(-${this.step})
                translateX(-${this.step})` // ❶
  }
},

moveRight () {
  this.innerStyles = {
    transform: `translateX(${this.step})
                translateX(-${this.step})` // ❷
  }
},

// ...

resetTranslate () {
  this.innerStyles = {
    transition: 'none',
    transform: `translateX(-${this.step})`
  }
}

// ...
Explanation:
- ❶ and ❷: Every time we execute
moveRight()ormoveLeft()we are reseting all thetransformvalues for.inner. Therefore it becomes necessary to add that additionaltranslateX(-${this.step}), which is the position we want all other transformations occur from.
8. Conclusion
That's it. What a trip, huh? 😅 No wonder why this is a common question in technical interviews. But now you know how to ―or another way to― build your own "multi-card" carousel.
Again, here is the full code (stars ⭐ mean a lot to me 🫶). I hope you find it useful, and please feel free to share your thoughts/improvements in the comments.
Thanks for reading!
Bonus ✨: Thanks to Matt Jenkins, you can now check an updated version that uses the Composition API with the Setup Syntax.


Top comments (11)
Hellouu i'm trying to center the cards modifying the step value but when i'm scrolling it gets lagged, idk why
Here is the example
imgur.com/a/qbrGe7V
It could be useful for you to re-enable the reset transition by commenting this line:
Also, increase the transition duration:
That way you can see what happens after you tweak translation values.
Thank you so much!
Many thanks for the tutorial Luis, it was really useful. Just wondering what would be your aproach when you have cards with different widths.
I'm basically trying to do a chip group with Vue 3:
vuetifyjs.com/en/components/chip-g...
While testing your approach everything works fine but the two bugs that I find is that the first card is allways cut-off from the container, and the transitions are kinda weird.
Will really appreciate your feedback, and thanks in advance !
Hey, Jorge 👋 I'm pleased to read it was useful to you.
If the order of the cards is important to your project, I think you can initially shift the array so the first element becomes the second one.
Regarding the animations, did you tried using different CSS transition properties? In production I would probably try something slower. Or what do you mean by "the transitions are kinda weird"?
Finally, you would probably need both the width of the hidden card and the with of the one next to it to calculate the
.innertranslation. Not sure. Did you solved it yet?Thanks a lot for your reply. So I downloaded your code and tried it and the main problem is with the static width of the cards. If you don't have a static with on every card you will see that the transitions when you go "prev" or "next" looks strange. The carousel will make the animation and right after that it will add the next element to the inner container visible pushing the others. I cam to that conclusion because I just change your cards to a variable width and have exactly the same problem with the carousel I'm trying to code.
Also, I noticed when testing your code that as soon as you load the component the first card that you see in the carousel is the number "2" card not the number "1" is this correct ?
Really hope you can give me a hand here since I find your explanation super useful but just want it to make it work with that variable width approach.
Can you develop a little bit more about "you would probably need both the width of the hidden card and the with of the one next to it to calculate the .inner translation".
Really appreciated Luis !
Hi, thank you so much for elaborating step by step! However, when the quantity of the carousel items is less than the number of items that are showing -- e.g. mine is showing 3 per view, but has 4 in quantity) -- whenever the carousel is looping, the last item is shown like appearing instantly (not sliding), is this expected?
And when the quantity is 3 (and should showing 3 per view), it always take the last item shown and put it at the start so there's a 1 item gap. So it's only showing 2 (when it's should show 3 but it shows 2 with 1 gap at the end), like the entire carousel is translatedX(-${this.step})
do you have any suggesting how to tackle this? I feel like it's given because of the small quantity of total items compares to quantity of items shown. cmiiw
This is the most descriptive carousel tutorial I've ever read!
This was so helpful! However, I am getting some flickering (on images only) right after resetTranslate fires -- any ideas on how to fix this?
I had the same flickering problem in Nuxt3 with . So I replaced nuxt-img with backgroundImage in styles and it's fine. But I haven't really checked what's causing it.
You can also try to add css to image:
backface-visibility: hidden;
-webkit-backface-visibility: hidden;
-moz-backface-visibility: hidden;
-ms-backface-visibility: hidden;
That's strange. Did you see the flickering happening in the demo?