A quick weekend project writeup. Loungeware is a community-developed Warioware-style game, with contributions of art, code, and music from the GameMaker community. The game features user-submitted images of a character known as Larold.

 space@space_bake
 Introducing Loungeware, a Warioware-style collaboration game made by the #gamemaker community
#GameMaker #GameMakerStudio2 #gamedev #indiedev @YoYoGames00:12 AM - 04 Aug 2021
Previously, Larolds were submitted as .png files sent over Discord, which had to be handled through a multi-step process:
- Ensure images were 200x200px
- Ensure images stuck to a 2-color palette (no Anti Aliasing)
- Collect contributor name and other metadata into an array in the code
- Copy the image into a frame of the sprite, ensuring the sprite's image index matches the metadata array
- Separately copy the image and metadata over to the website repository for the online gallery/credits
The process, though simple, is times-consuming and error-prone, so I desired to automate it. To do so, I'm going to use Airtable, which allows me to create a web-based form for users to submit images and other data; and Firebase functions, to both process and store the processed images.
Airtable
Airtable is an online service that's a combination of a spreadsheet and a database. It lets you create databases that you can query with an API. It can also create submission forms, which is what we're after here.
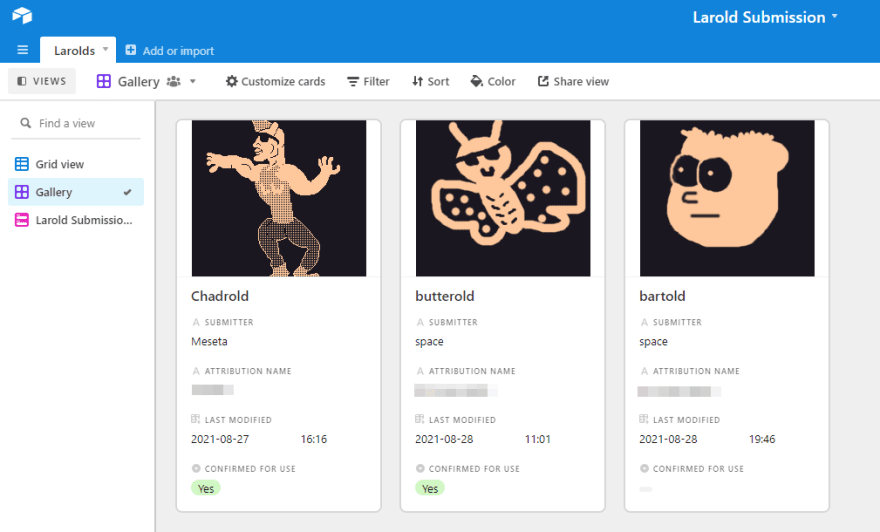
I create a simple database for Larold submissions, this is the Grid View (i.e. spreadsheet view) of the data, showing the columns that I've set up.
Once this is set up, I can create a new public Form that allows users to submit data into the database. While the data and grid view are private, the public form can be used by users to post their new Larold submissions. Those familiar with Google Docs will see that this is very similar to Google Forms
A nice view, which only admins get to see, is the Gallery view, which shows a larger view of the image.
API access to Airtable
Automation wouldn't be possible without programatic access to the data. My reason for picking Airtable is its easy-to-use API for accessing the data.
First we must generate an API key via my account settings

Next, I can try out fetching the data via HTTP request, using Postman!
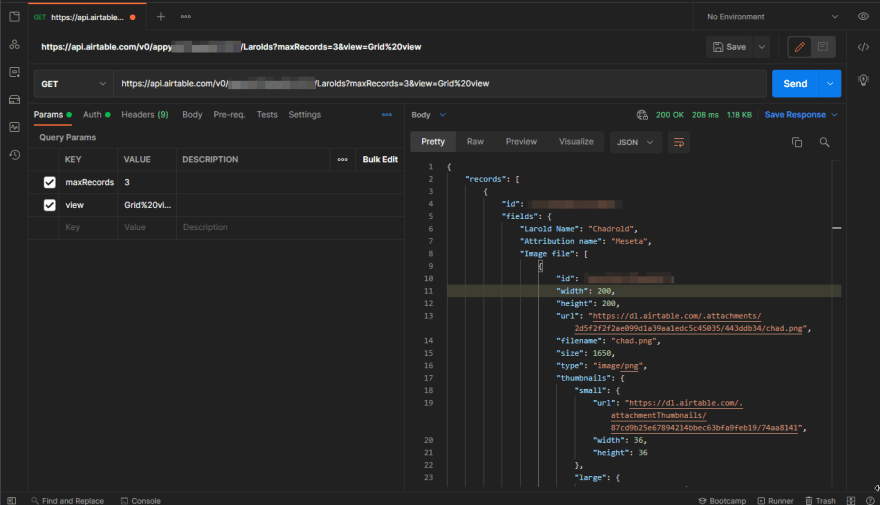
From the screenshot above, it can be seen that records in the database come out as JSON structures in a records array, with the full field name as the key; with the uploaded images available as a public URL on Airtable's CDN.
Processing the images
Because some of these images are not the right dimensions or right colours, we're going to process the images. I've been a long-time user of Imagemagick, a command-line image processing tool. Fortunately Firebase function's execution environment actually has Imagemagick installed in it, meaning we can use it to process images (in fact, the environment includes ffmpeg too!). I use a firebase function, which when triggered, will do the following things:
- Fetch the latest data from Airtable
- Sync the data to Firestore so that the metadata is available to the website for the gallery
- Process the images if required, and then store them in Cloud Storage so the data is available to the gallery
- Generate a sprite strip containing all of the Larold images on one PNG image
- Return the sprite strip and metadata json as a .zip file
Step 1: Fetch the latest data from Airtable
To make things easier, I'm using the official Airtable npm package to access the API. When
Using the Airtable package, setting up access is relatively straightforward:
const functions = require("firebase-functions");
const Airtable = require("airtable");

Airtable.configure({
  endpointUrl: "https://api.airtable.com",
  apiKey: functions.config().airtable.api_key,
});
const base = Airtable.base(functions.config().airtable.base);

async function doSync() {
  const records = await base("Larolds").select({
    view: "Grid view",
  }).all();
}
Here, I'm using firebase's functions.config() to fetch secrets from the environment to avoid hard-coding sensitive values in the code. Once this is set up, base("Larolds").select().all(); fetches all the records (handling pagination for us). The result is a structure of records that can be iterated over.
Step 2: Sync with Firestore
I'll skip Firestore setup (there are other guides for that!) Because I'm synchronizing all the records, unfortunately I have to do a slightly awkward thing of fetching all records out of a Firestore collection, checking their modified dates, and then writing any changes back. This is awkward because Firestore isn't particularly well suited for situations where you always update all the records at once. In reality, I should be writing all this data to a single firestore document to optimize for access costs. However, for a low-traffic site, I will go with individual documents for now, and update later if necessary:
const records = await base("Larolds").select({
    view: "Grid view",
  }).all();

  functions.logger.info("Got larolds from airtable", {count: records.length});

  const existingDocuments = await laroldStore.listDocuments();
  const existingData = Object.fromEntries(existingDocuments.map((doc) => [doc.id, doc.data]));

  // Update image
  const laroldData = await Promise.all(records
      .filter((record) => (record.get("Image file").length > 0 && record.get("Confirmed for use") == "Yes"))
      .map(async (record, idx) => {
        const image = record.get("Image file")[0];
        const id = image.id; // use the image unique ID as id
        const modified = record.get("Last modified");

        // Check if updated
        let doc;
        if (!existingData[id] || existingData[id].modified != modified) {
          const imageUrl = image.url;
          const {warnings, destination} = await processImage(imageUrl, image.filename, id);
          doc = {
            id: id,
            name: record.get("Larold name"),
            attribution: record.get("Attribution name"),
            submitter: record.get("Submitter"),
            imageUrl,
            modified,
            idx: idx+1,
            warnings,
            destination,
          };
          await laroldStore.doc(id).set(doc);
        } else {
          doc = existingData[id];
        }

        return doc;
      }));
  const updatedIds = laroldData.map((doc) => doc.id);
  functions.logger.info("Updated larolds in store", {updatedIds});

  // Remove old ones
  const deleteDocs = existingDocuments.filter((doc) => !updatedIds.includes(doc.id));
  const deletedIds = deleteDocs.map((doc) => doc.id);
  await Promise.all(deleteDocs.map((doc) => doc.delete()));
This big chunk of of a script fetches all the records from Airtable, and from Firestore, iterates over them, and figures out which documents need updating (and updates them), which ones are stale (and deletes them), and also returns the data as an object to be returned in the zip.
Note there's a line const {warnings, destination} = await processImage(imageUrl, image.filename, id); in the code above which is covered in the next step. The reason this code is inside this if check is to avoid having to process an image that was already processed.
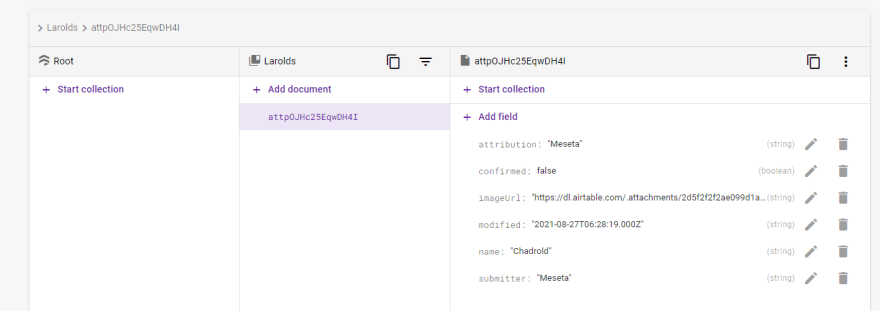
The results can be seen with Firebase's excellent local emulators, which allow testing functions and firestore locally:
Step 3 Process image
Processing the image will use ImageMagick via the https://www.npmjs.com/package/gm, the details for this are covered in an official Firebase tutorial. Unfortunately ImageMagick itself is a little hard to learn to begin with due to there being a lot of outdated, and frankly quite hard to follow instructions, combined with gm being also outdated and not good documentation. Luckily my familiarity of ImageMagick combined with some digging around the source code helped me figure this one out.
The image processing is split into three further steps, we need to:
- Generate a palette image, which is needed to re-map any "unauthorized" colors to the limited two-color palette that Larold images must use.
- Count the number of colors in the image so that warnings can be generated, so we can alert the artist that their images are wrong, should they wish to update them
- Resize and remap the image and upload to a bucket.
Step 3.0 Generate palette image
We only need to do this once, and I actually encountered a race-hazard trying to do this, because two iterations will try to generate the palette at the same time) so I've had to wrap it in a mutex (via the async-mutex npm package)
async function drawPalette() {
  const palettePath = "/tmp/palette.png";

  await paletteMutex.runExclusive(async () => {
    try {
      await fs.access(palettePath);
    } catch (error) {
      await new Promise((resolve, reject) => {
        gm(2, 1, "#1A1721FF")
            .fill("#FFC89C")
            .drawPoint(1, 0)
            .write(palettePath, (err, stdout) => {
              if (err) {
                reject(err);
              } else {
                functions.logger.info("Created palette file", {palettePath, stdout});
                resolve(stdout);
              }
            });
      });
    }
  });

  return palettePath;
}
This function asks gm/imagemagick to draw a 2x1 pixel PNG file containing the colors #1A1721 and #FFC89C the two authorized colors of larolds.
Step 3.2 Count the number of colors
gm/imagemagick's identify() function will quickly read out how many actual colors used in the image, and return it
async function countColors(file) {
  return new Promise((resolve, reject) => {
    gm(file).identify("%k", (err, colors) => {
      if (err) {
        reject(err);
      } else {
        resolve(colors);
      }
    });
  });
}
Step 3.3 Process it
The following function pulls these pieces together, and uses axios to fetch the image from URL, writes to temporary files, does the resize and remap conversion, uploads to bucket storage, and returns any warnings generated
async function processImage(url, originalFilename, id) {
  const tempFileIn = `/tmp/${id}_${originalFilename}`;
  const tempFileOut = `/tmp/${id}.png`;

  // get file
  const res = await axios.get(url, {responseType: "arraybuffer"});
  await fs.writeFile(tempFileIn, res.data);
  functions.logger.info("Got file", {url, tempFileIn});

  // check colors
  const colors = await countColors(tempFileIn);

  // make palette
  const palettePath = await drawPalette();

  // do conversion
  await new Promise((resolve, reject) => {
    gm(tempFileIn)
        .resize(200, 200, ">")
        .in("-remap", palettePath)
        .write(tempFileOut, (err, stdout) => {
          if (err) {
            reject(err);
          } else {
            functions.logger.info("Processed image", {tempFileOut, stdout});
            resolve(stdout);
          }
        },
        );
  });

  // upload
  const destination = `larolds/${id}.png`;
  await bucket.upload(tempFileOut, {destination});

  // assemble warnings
  const warnings = [];
  if (colors != 2) {
    warnings.push(`Incorrect number of colors (${colors}) expected 2`);
  }

  await fs.unlink(tempFileIn);
  // await fs.unlink(tempFileOut); // might use this for cache

  functions.logger.info("Uploaded image", {destination, warnings});
  return {
    warnings,
    destination,
  };
}
Strictly speaking this should be broken out to more functions to be cleaner.
Step 4: Generate sprite strip
Finally, once all images are processed, and safely uploaded to the bucket, we can generate the sprite strip.
This code will take in a data structure created by Step 2, and either pull down the image from bucket storage, or conveniently find the processed output file that was left in the tmp folder
async function makeComposite(laroldData) {
  // ensure images are downloaded
  const localPaths = await Promise.all(laroldData.map(async (doc) => {
    const localPath = `/tmp/${doc.id}.png`;
    try {
      await fs.access(localPath);
    } catch (error) {
      functions.logger.info("Downloading image", {destination: doc.destination});
      await bucket.file(doc.destination).download({destination: localPath});
    }
    return localPath;
  }));

  // montage
  const buffer = new Promise((resolve, reject) => {
    localPaths.slice(0, -1)
        .reduce((chain, localPath) => chain.montage(localPath), gm(localPaths[localPaths.length -1]))
        .geometry(200, 200)
        .in("-tile", "x1")
        .toBuffer("PNG", (err, buffer) => {
          if (err) {
            reject(err);
          } else {
            resolve(buffer);
          }
        },
        );
  });

  // cleanup
  await Promise.all(localPaths.map((localPath) => fs.unlink(localPath)));

  return buffer;
}
A fun thing done here is the use of slice and reduce to assemble the method chain needed to montage the images together. The code would normally be this for a three-image montage: gm(image2).montage(image0).montage(image1), and for some reason it puts the image in the argument of gm() to the right. So to handle arbitrary length chains, we can loop over the values:
let chain = gm(localPaths[localPaths.length -1]);
for (let i = 0; i < localPaths.length-1; i++) {
  chain = chain.montage(localPaths[i]);
}
Which can be simplified using reduce:
localPaths.slice(0, -1).reduce((chain, localPath) => chain.montage(localPath), gm(localPaths[localPaths.length -1]))
Step 5: Generate zip
Handling zip files uses the jszip npm library, which conveniently can asynchronously return a zip inside a nodebuffer, which Firebase Function's express.js runtime can return directly.
  // generate composite and zip
  const zip = new JSZip();
  zip.file("larolds.json", JSON.stringify(laroldData, null, 2));

  if (laroldData.length > 0) {
    const compositeBuffer = await makeComposite(laroldData);
    zip.file(`larolds_strip${laroldData.length}.png`, compositeBuffer, {binary: true});
  }

  functions.logger.info("Done sync", {laroldData});
  return zip.generateAsync({type: "nodebuffer"});
And done! I've deliberately not included the full source file as it's quite large, but hopefully the above code examples are useful to someone who wants to also use gm/imagemagick inside firebase functions to process images from Airtable. I've found the execution to require slightly more RAM than the default 256MB that Firebase functions are set up with, it's currently running happily at 512MB RAM, but may need to be bumped up for handling larger images.
The current usage is to simply download the zip file when needed, but in a future iteration, we may have CI/CD download this zip file and commit them into the repo for every merge into main branch, to make this even more automated.





Oldest comments (0)