
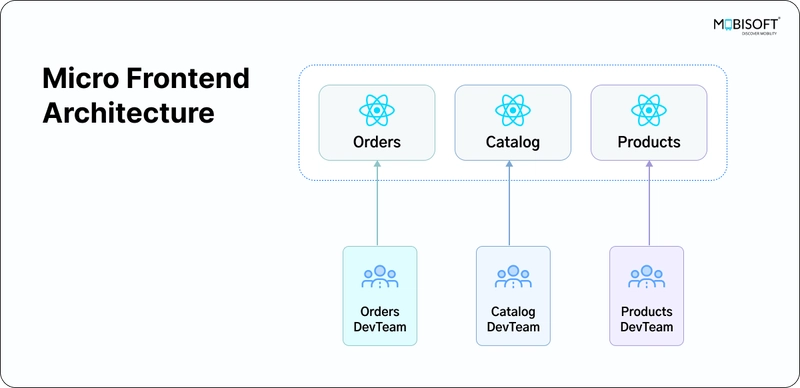
Why Micro-Frontends?
Micro frontend architecture is becoming increasingly popular due to its performance benefits and the ability to reduce developer dependencies. By breaking down a monolithic frontend into smaller, independent micro-applications, teams can work on different parts of a project simultaneously, improving scalability and maintainability.
What You Will Learn in This Tutorial
In this guide, we will walk through the process of setting up a micro-frontend architecture using React and Vite. You will learn:
- How to configure Module Federation with Vite.
- How to create a remote micro-frontend that exposes components.
- How to dynamically reuse a remote component in a host application.
Project Use Case: E-Commerce Application
For this tutorial, we will use an e-commerce application as an example. The host application (home app) will consume and display a Featured Products List from the Products Micro-Frontend. This approach showcases how a fully functional component can be shared across multiple applications without duplicating code.
By the end of this tutorial, you will have a clear understanding of how to structure a micro-frontend application with React and Vite, making your micro frontend architecture more flexible and scalable.
Setting Up the Microfrontend Project
Create the Main Directory
mkdir micro-frontend-project

cd micro-frontend-project
Create two separate Vite projects:
- Products (Remote App) → Micro-frontend exposing a component.
- Host (Main App) → Application consuming the remote component.
Setting Up the Remote Products Feature
Step 1: Create the Products Project
npm create vite@latest
- Enter project name: products
- Select React
- Select TypeScript

Step 2: Install Module Federation Plugin
cd products

npm install @module-federation/vite
Step 3: Implement Product List Feature
1. Create Product List Page:
Create src/pages/ProductsList/ProductsList.tsx to display featured and all products.
import { useEffect, useState } from "react";
import { ProductListItem } from "../../components/ProductListItem/ProductListItem";
import { IProduct } from "../../interfaces/IProduct";
import "./ProductsList.css";
import FeaturedProductsList from "../../components/FeaturedProductsList/FeaturedProductsList";


export const ProductList = () => {
 const [products, setProducts] = useState<IProduct[]>([]);


 useEffect(() => {
   fetchProducts();
 }, []);


 const fetchProducts = async () => {
   try {
     const productsResponse = await fetch("https://dummyjson.com/products");
     const productsResponseJson = await productsResponse.json();
     setProducts(productsResponseJson.products);
   } catch (error) {
     console.log("error", error);
   }
 };


 return (
   <div className="product-list-container">
     <h2>Products</h2>
     <FeaturedProductsList></FeaturedProductsList>
     <h2 className="heading">All Products</h2>
     <div className="products-list">
       {products.map((item) => (
         <ProductListItem product={item}></ProductListItem>
       ))}
     </div>
   </div>
 );
};
Here, we are using a dummy API for the product list.
2. Create Product List CSS:
Create src/pages/ProductsList/ProductsList.css
.products-list {
 display: grid;
 grid-template-columns: repeat(auto-fit, minmax(300px, 1fr));
 grid-auto-rows: minmax(250px, auto);
}
.product-list-container {
 height: 100vh;
 width: 100%;
 text-align: flex-start;
}
3. Create Product Interface:
Create src/interfaces/IProduct.ts
export interface IProduct {
 title: string;
 description: string;
 price: string;
 images: string[];
}
4. Create Product Card Component:
Create src/components/ProductListItem/ProductListItem.tsx
import { IProduct } from "../../interfaces/IProduct";
import "./ProductListItem.css";


interface ProductListItemProps {
 product: IProduct;
}


export const ProductListItem = (props: ProductListItemProps) => {
 const { product } = props;
 return (
   <div className="product-card">
     <div className="product-image-container">
       <img src={product.images[0]} className="product-image"></img>
     </div>
     <h3>{product.title}</h3>
     <h2>{`$ ${product.price}`}</h2>
     <h6>{product.description}</h6>
   </div>
 );
};
5. Create Product Card CSS file:
Create src/components/ProductListItem/ProductListItem.css
.product-image {
 width: 120px;
 height: 120px;
}
.product-card {
 background-color: white;
 border-radius: 4px;
 box-shadow: rgba(100, 100, 111, 0.2) 0px 7px 29px 0px;
 padding: 8px;
 margin: 8px;
 min-width: 285px;
}
.product-image-container {
 display: flex;
 justify-content: center;
}
6. Create Featured Product List Component:
Create src/components/FeaturedProductsList/FeaturedProductsList.tsx
import { useEffect, useState } from "react";
import { IProduct } from "../../interfaces/IProduct";
import { ProductListItem } from "../ProductListItem/ProductListItem";
import "./FeaturedProductsList.css";


const FeaturedProductsList = () => {
 const [featuredProducts, setFeaturedProducts] = useState<IProduct[]>([]);


 useEffect(() => {
   fetchProducts();
 }, []);


 const fetchProducts = async () => {
   try {
     const productsResponse = await fetch('https://dummyjson.com/products?limit=10&skip=10&select=title,price,images,description');
     const productsResponseJson = await productsResponse.json();
     setFeaturedProducts(productsResponseJson.products);
   } catch (error) {
     console.log("error", error);
   }
 };


 return (
   <div>
     <h2 className="heading">Featured Products</h2>
     <div className="featured-product-list">
       {featuredProducts.map((item) => (
         <ProductListItem product={item}></ProductListItem>
       ))}
     </div>
   </div>
 );
};


export default FeaturedProductsList;
7. Create Featured Product List CSS file:
Create src/components/FeaturedProductsList/FeaturedProductsList.css
.featured-product-list {
 display: flex;
 flex-direction: row;
 overflow-x: scroll;
}
8. Use the Products page in the App file:
import './App.css'
import { ProductList } from './pages/ProductsList/ProductsList'


function App() {


 return (
   <>
    <ProductList></ProductList>
   </>
 )
}


export default App
- Update
App.cssdefault CSS: Update only root css
#root {
 max-width: 1280px;
 padding: 2rem;
 height: 100vh;
}
10. Update port in the package.json:
...
"scripts": {
   "dev": "vite --port 3000",
   "build": "tsc -b && vite build",
   "lint": "eslint .",
   "preview": "vite preview --port 3000"
 },
...
Step 4: Configure Module Federation
Update vite.config.ts
import { federation } from "@module-federation/vite";
import react from "@vitejs/plugin-react";
import { defineConfig } from "vite";
import { dependencies } from "./package.json";
export default defineConfig(() => {
 return {
   build: {
     target: "chrome89",
   },
   plugins: [
     federation({
       filename: "remoteEntry.js",
       name: "products",
       exposes: {
         "./featured-products":
           "./src/components/FeaturedProductsList/FeaturedProductsList.tsx",
       },
       remotes: {},
       shared: {
         react: {
           requiredVersion: dependencies.react,
           singleton: true,
         },
       },
     }),
     react(),
   ],
 };
});
filename: "remoteEntry.js": Specifies the entry file for the microfrontend, which other applications can access.
name: "products": Defines the unique identifier for this microfrontend.
This allows other microfrontends (hosts) to import the FeaturedProductsList component.
"./featured-products": This is how the module will be imported remotely.
"./src/components/FeaturedProductsList/FeaturedProductsList.tsx": The actual file that gets exposed.
Setting Up the Host Application
Step 1: Create the Host Project
npm create vite@latest
- Enter project name: host
- Select React
- Select TypeScript
Step 2: Install Module Federation Plugin
cd host

npm install @module-federation/vite
Step 3: Implement Home Page
1. Create Home Page:
Create pages/home/Home.tsx
import React, { Suspense } from "react";


const FeaturedProducts = React.lazy(
   // @ts-ignore
   async () => import('products/featured-products'),
);


const Home = () => {
 return (
   <div>
     <h2>Home</h2>
     <Suspense fallback="loading...">
       <FeaturedProducts />
     </Suspense>
   </div>
 );
};


export default Home;
Imported Featured Products from Products (Remote app)
2. Update
App.tsx
import "./App.css";
import Home from "./pages/home/Home";


function App() {
 return <Home></Home>;
}


export default App;
3. Update App.css default CSS:
Update only root css
#root {
 max-width: 1280px;
 padding: 2rem;
 height: 100vh;
}
Step 4: Configure Module Federation
Update vite.config.ts
import { defineConfig } from "vite";
import react from "@vitejs/plugin-react";
import {federation} from "@module-federation/vite";
import { dependencies } from './package.json';


// https://vite.dev/config/
export default defineConfig({
 build: {
   target: 'esnext',
   minify: false
 },
 plugins: [
   federation({
     name: "app",
     remotes: {
       products: {
         type: 'module',
         name: 'products',
         entry: 'http://localhost:3000/remoteEntry.js',
         entryGlobalName: 'remote',
         shareScope: 'default',
       },
     },
     filename: "remoteEntry.js",
     shared: {
       react: {
         requiredVersion: dependencies.react,
         singleton: true,
       },
     },
   }),

   react(),
 ],
});
- remotes: Specifies the remote applications (microfrontends) that will be loaded dynamically.
- products: The key that identifies the remote application.
- type: 'module': Indicates that the remote entry is an ES module.
- name: 'products': The unique name of the remote application.
- entry: 'http://localhost:3000/remoteEntry.js': The remote entry file URL where the microfrontend is hosted.
- entryGlobalName: 'remote': Specifies a global namespace for the remote module.
- shareScope: 'default': Ensures dependency sharing across microfrontends.
- shared: Specifies shared dependencies across microfrontends to avoid duplicate React versions.
Final Steps: Run Both Applications
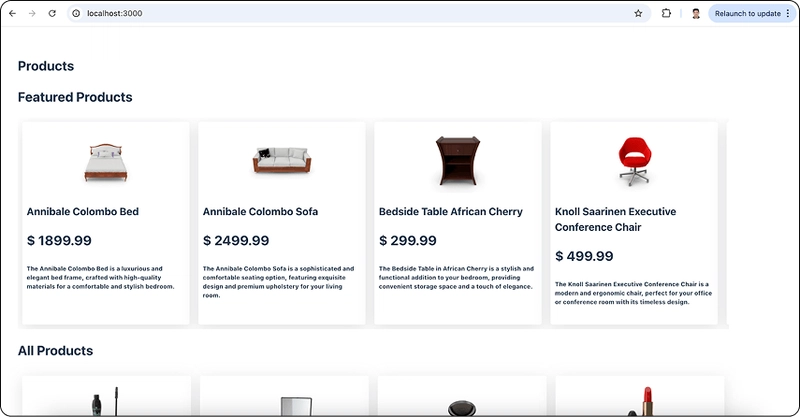
Run the Remote App (Products)
cd products

npm run dev
On http://localhost:3000/, you can see the featured products and a list of all products.
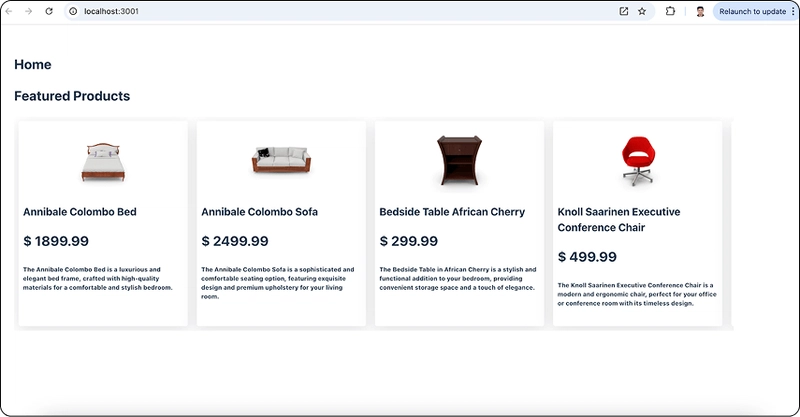
Run the Host App
cd host

npm run dev
Now, the Host Application dynamically loads the Featured Products Component from the Products Micro-Frontend using vite module federation
This repository contains the code for the tutorial: “React Micro Frontend Architecture – An in Depth Tutorial With Example“, published by Mobisoft – Web Application Development Company, Houston.
Feel free to download a sample example I’ve created from GitHub to get started.
Conclusion
Micro-frontend architecture is revolutionizing front-end development by enabling teams to work independently on different parts of an application while ensuring seamless integration. In this tutorial, we explored how to set up a micro-frontend architecture using React, Vite, and Module Federation, allowing components to be dynamically shared across multiple applications.
By implementing a Products Micro-Frontend and a Host Application, we demonstrated how to reuse a fully functional component (Featured Products List) without duplicating code.
This approach makes frontend development scalable, modular, and efficient, reducing dependencies between teams and improving performance. With micro-frontends, applications can be developed and deployed independently, making them easier to maintain and extend over time.

Source Link: React Micro Frontend Architecture – An in Depth Tutorial With Example

Top comments (0)