We covered setting up Percy with Cypress previously and thought it would be interesting to have a 1:1 comparison with Applitools in the same repo. Both the solutions are well known in the visual testing space and have great integrations with Cypress. Throughout the guide we will make frequent comparisons between Applitools and Percy while sharing subjective opinions in comments.
Any guide is lackluster without reproducible code, so here is the full repo. The branch prior to the changes can be checked out at before-cy-applitools. The changes in the guide can be found in this PR.
- Install Applitools locally
- Local configuration
- Sign up
- Implement a test
- Test in CI
- Pull request integration
- Final thoughts
Install Applitools locally
yarn add -D @applitools/eyes-cypress
Applitools has a one-time convenience Cypress setup as well; it applies usual plugin changes to cypress/plugins/index.js, cypress/support/index.js and cypress/support/index.d.ts
npx eyes-setup
Subjective opinion: Applitools may need a line or two of more setup in comparison to Percy (at
cypress/support/index.jsadd a line :import '@percy/cypress'), but the CLI setup command makes things painless.
Local configuration
Create a file applitools.config.js at the project root. All configuration is done here. In this project we are using dotenv and a gitignored .env file to keep the secrets secure.
// ./applitools.config.js

// we want to be able to use the secure environment variable via dotenv
// https://www.npmjs.com/package/dotenv
require("dotenv").config();

module.exports = {
  // Think of this as parallelization
  // If you have a free account, then concurrency will be limited
  testConcurrency: 1,

  // we are using the environment variable we will set in the .env file
  apiKey: process.env.APPLITOOLS_API_KEY,

  // If we have multiple projects such as App-A, App-B,
  // batchName property is used to differentiate between them at the Applitools dashboard
  batchName: "React Hooks in Action",

  // 4 browsers x 3 viewports = 12 configs
  browser: [
    { width: 800, height: 600, name: "chrome" },
    { width: 1024, height: 600, name: "chrome" },
    { width: 1920, height: 1200, name: "chrome" },
    { width: 800, height: 600, name: "firefox" },
    { width: 1024, height: 600, name: "firefox" },
    { width: 1920, height: 1200, name: "firefox" },
    { width: 800, height: 600, name: "safari" },
    { width: 1024, height: 600, name: "safari" },
    { width: 1920, height: 1200, name: "safari" },
    { width: 800, height: 600, name: "edge" },
    { width: 1024, height: 600, name: "edge" },
    { width: 1920, height: 1200, name: "edge" },

    // mobile browser conveniences are also available
    // { deviceName: 'Pixel 2', screenOrientation: 'portrait' },
    // { deviceName: 'Nexus 10', screenOrientation: 'landscape' }
  ],
};
Subjective opinions:
The 3-line yml configuration for viewports looks simpler on the Percy side.
With Percy, the browser choices and project config are done at the web UI vs local in Applitools.
For Percy, it can be jarring to accomplish half the config locally, albeit simple, half of it on the web UI.
Applitools' local configuration approach is neat, keeps all config together.
The height config is not there in Percy, we are not sure if it matters. We looked at https://screensiz.es/ to get generic heights and made the configuration 1:1 with the Percy project.
Overall, Percy is easier to get started, but lends some config to the web UI. Applitools keeps the config together, is less simple to configure but it is more customizable; for instance we would not be able to leave out some of the above 12 configs with Percy if we wanted to apply some cost savings on snapshots.
Sign up
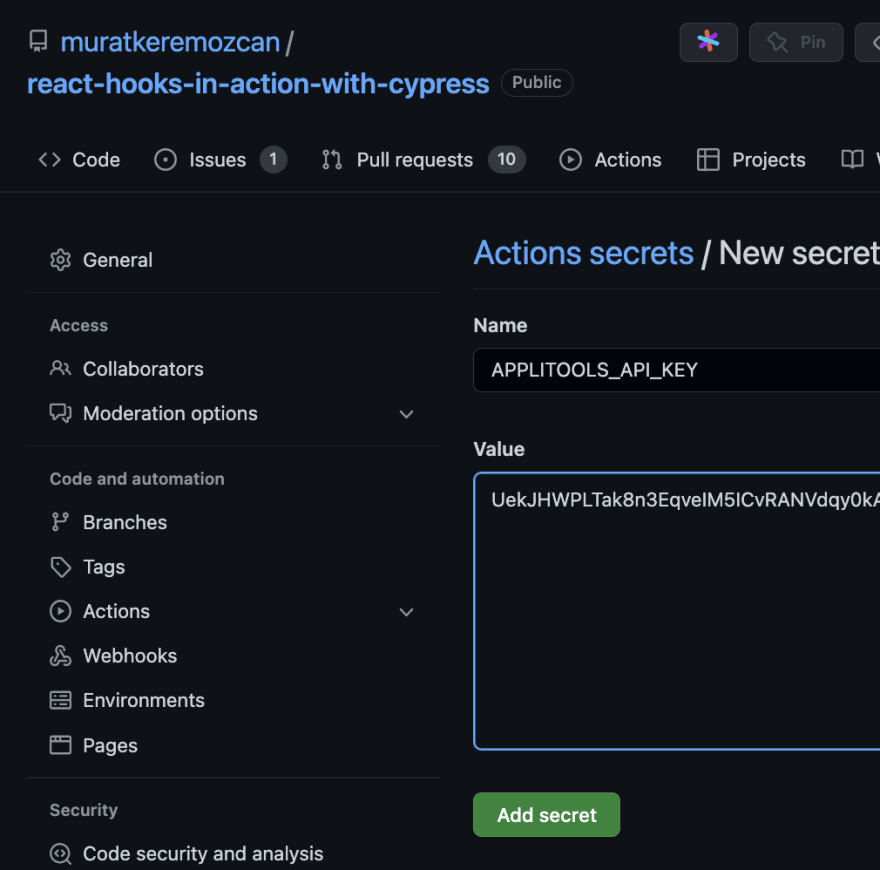
Sign up here. Once logged in, head over to My API key, and copy it to the .env file at the project root.
Also add APPLITOOLS_API_KEY to CI environment variables.
Environment variables comes with the rule of 3; local var, repo var, and the final one for the yml. Remember to add APPITOOLS_API_KEY to cypress-e2e-tests job.
Although not relevant to Applitools, the Percy spec is a Cypress spec, and needs this variable. Add to
cypress-percy-visual-testsas well.
# .github/workflows/main.yml
env:
  CYPRESS_RECORD_KEY: ${{ secrets.CYPRESS_RECORD_KEY }}
  LAUNCH_DARKLY_PROJECT_KEY: ${{ secrets.LAUNCH_DARKLY_PROJECT_KEY }}
  LAUNCH_DARKLY_AUTH_TOKEN: ${{ secrets.LAUNCH_DARKLY_AUTH_TOKEN }}
  APPLITOOLS_API_KEY: ${{ secrets.APPLITOOLS_API_KEY }}
Subjective opinion: Sign up with Applitools is a bit more painless compared to Percy, since we do not have to wait for a verification email before proceeding.
Implement a test
Visual tests can be added to any spec. The spec that makes the most sense in the app's e2e test suite is cypress/integration/ui-integration/user-context-retainment.spec.js because we can verify the user's avatar with visual diffing.
Here is the main idea of visual tests:
- Record a default snapshot and compare that default with the new, in subsequent test executions. We have to accept the initial snapshot once.
From then on, new snapshots matching the default get auto-accepted.
Non-matching new snapshots prompt a notification on the web interface; we either have to reject or accept this new baseline. If we reject, it is a defect. If we accept we have a new base line and the cycle continues.
The big selling point of visual snapshot services is the AI; the AI is trainable over time and we can train it to ignore petty snapshot diffs we might not care for. Be mindful that given a snapshot name, we can train the AI to be really bad by accepting any diff. Therefore we need to take care not to thumbs up valid failures. We can reset the training by changing the snapshot name, viewport, or any part of the code.
Here is how visual testing looks in a spec.
// cypress/integration/ui-integration/user-context-retainment.spec.js

describe(
  "User selection retainment between routes",
  { tags: "@ui-integration" },
  () => {
    before(() => {
      // APPLITOOLS (1)
      // Each test should open its own Eyes for its own snapshots
      cy.eyesOpen({
        appName: "hooks-in-action",
        testName: Cypress.currentTest.title,
      });

      cy.stubNetwork();
      cy.visit("/");
    });

    it("Should keep the user context between routes", () => {
      cy.fixture("users").then((users) => {
        cy.get(".user-picker").select(users[3].name);
        cy.contains("Users").click();

        cy.wait("@userStub");
        cy.url().should("contain", "/users");
        cy.get(".item-header").contains(users[3].name);

        // APPLITOOLS (2)
        // full page test
        cy.eyesCheckWindow({
          tag: "User selection retainment between routes",
          target: "window",
          // if fully is true (default) then the snapshot is of the entire page,
          // if fully is false then snapshot is of the viewport.
          fully: false,
          matchLevel: "Layout",
        });
        // partial page test
        cy.eyesCheckWindow({
          tag: "user details with custom selector",
          target: "region",
          selector: '[data-cy="user-details"]',
        });

        // PERCY
        // full page test
        cy.percySnapshot("User selection retainment between routes");
        // partial page test
        // using custom command for selector focus
        cy.getByCy("user-details").percySnapshotElement(
          "user details with custom selector"
        );
      });
    });

    afterEach(() => {
      // APPLITOOLS (3)
      cy.eyesClose();
    });
  }
);
Subjective opinion: Applitools requires a
beforeandafterto open and close eyes. Percy has an edge there, not requiring extra code to accomplish the main task. Applitools visual test command appears a bit more verbose, but it is certainly more customizable. Percy does not support partial page / selector test out of the box, although a custom command is possible your experience may vary. In the real world, the Percy custom command for partial-page tests has been a hit or miss at our company Extend.
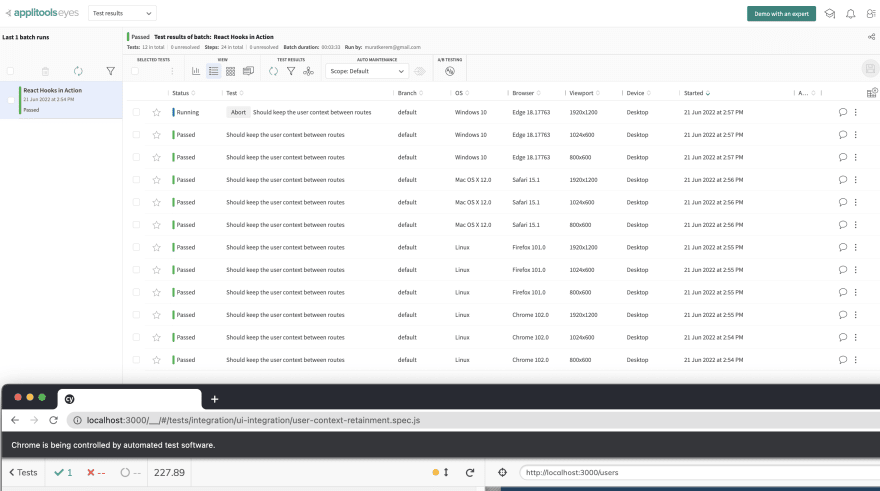
Let's try that out with yarn cy:open-e2e. In the repo this command does all the legwork of starting the api, the ui and the tests. Select the test user-context-retainment and run it. We will see the above 3 calls to Applitools in the Cypress runner.
You may notice that the test takes over 200 seconds to finish (without a good indication on the Cypress UI except for the test not seeming to stop), because it is recording 12 + 12 combinations of visual diffs. The only way to make this faster is to get a paid account and crank up testConcurrency in applitools.config.js.
Subjective opinion: when executing visual tests locally with Percy, we have to set a CLI level environment variable
export PERCY_TOKEN=***and run an elaborate commandyarn percy exec -- cypress run --spec 'cypress/.... With Applitools, being able to see the execution in Cypress open mode is nice, albeit the initialaftertest duration can be jarring before the user knows about the fact that snapshots are being evaluated at the cloud. The visual test recording speed is standard with Percy, irrelevant of the account type, and the amount of viewports x browsers. Applitools makes up for this with a paid option where the concurrency of cloud snapshot evaluations can be increased.
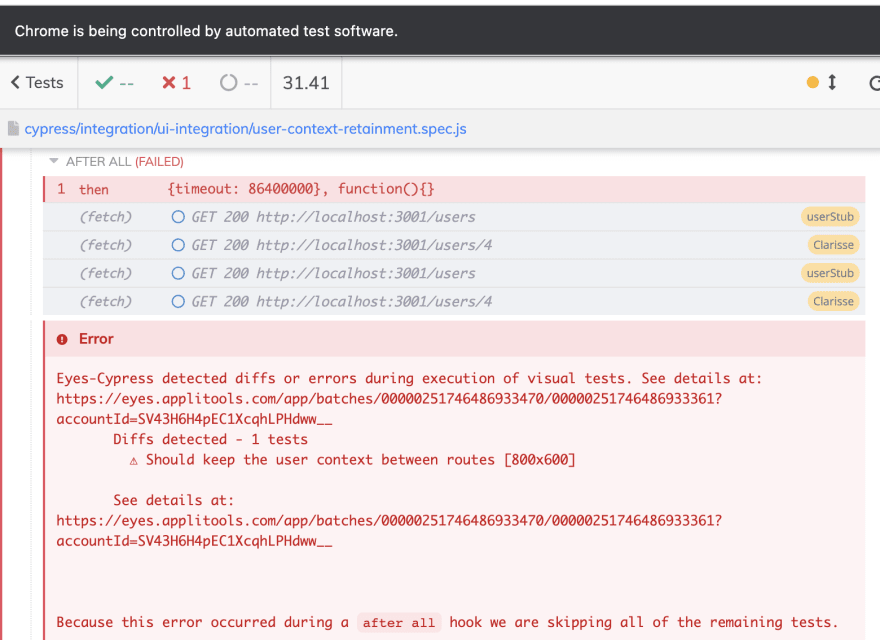
Let's reduce the configurations in applitools.config.js to get faster feedback. We expect 2 snapshots now, with 800 width in chrome; a full window one and another for the selector. Close Cypress runner, restart the test and you might get a failure as the below.
Subjective opinion: Being able to see a test failure when a visual test fails is nice with Applitools. For Percy, snapshot diagnostics are purely on the web interface side.
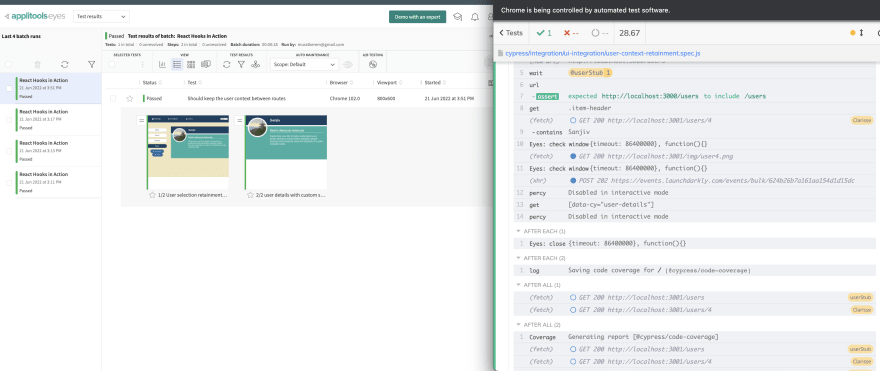
Let's go to the web interface and tell the AI the diffs are good by giving them a thumbs up, and saving our new baseline on the upper right.
Subjective opinion: With Applitools, we missed the
Approve Allbutton that Percy has, because having to go throughndiffs and thumbs up each one can be a pain. On the other hand we like the Save baseline button. It seems like a redundant thing to do to both approve the change and save the snapshot - which Percy does in one step with the approval - but over our long term use with Percy, we have had to re-approve snapshots we had approved before although they did not have new diffs. The Save baseline button gives us hope that perhaps Applitools makes this maintenance a bit better. We would have to try it internally and see how it behaves in the real world, over a long time period.
After having approved the snapshots and saved the new baselines, rerun the Cypress test. We should get a green local test, and 2 snapshots; a full screen and a selector-focused one.
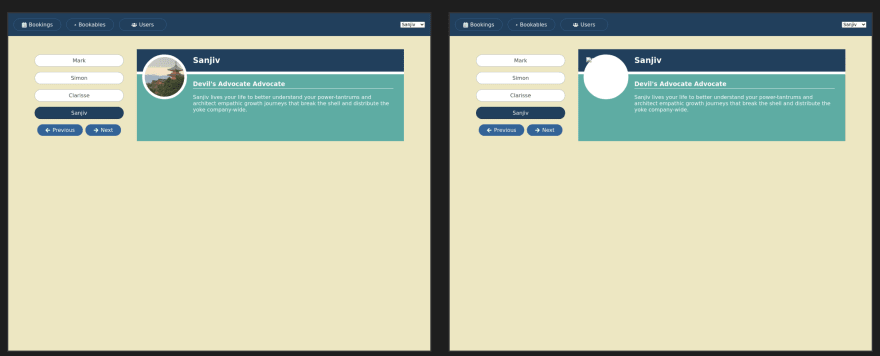
Let's run another test, this time we want to stop the API so that there is no image. Simply stop the yarn dev script, and only start the UI with yarn start . The app is launched on localhost:3000 and the image appears broken. Below is a before and after.
Once the test is executed, Applitools confirms the broken image by detecting the visual diff, and now the variance needs to be reviewed. We reject this alteration and the fail the build.
Subjective opinion: Although we like Percy web app's UX better because it is simpler and easier to use (we love dark mode) , being able to match the local behavior of Applitools to the web app is great developer experience.
Test in CI
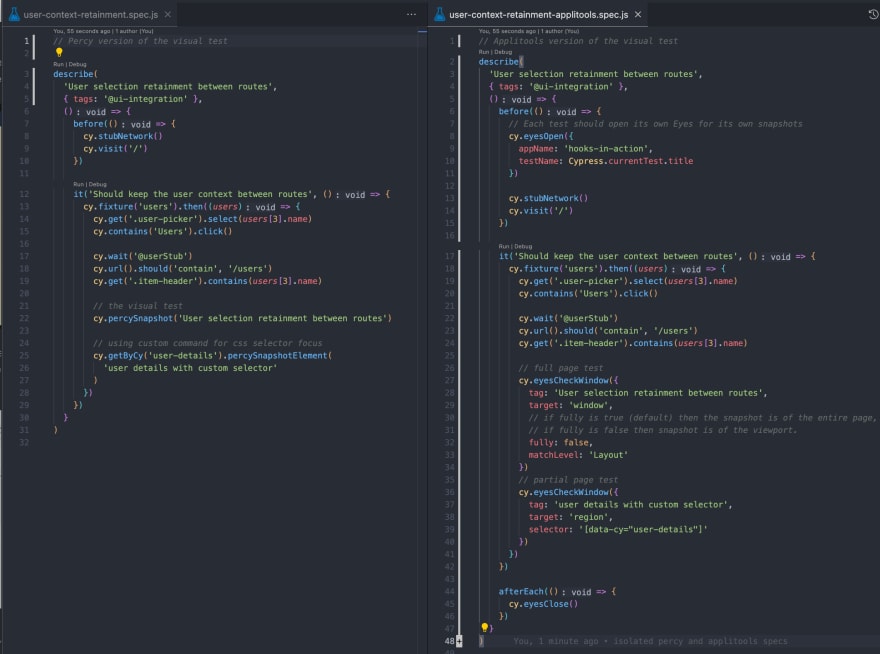
There is no additional setting with Applitools for CI. When we push the PR, the CI runs and visual tests execute no different to a local run. However, we want to avoid any headache with Percy and CI, so it is a good idea not to have both visual testing in the same spec. Here is a side by side comparison of Percy and Applitools versions:
Subjective opinion: The no-CI config is big win on the Applitools side. With Percy, we have to have a separate GitHub Action job to run the same specs with a visual test approach. On the code side, obviously less code to do the same thing with Percy (left) is more attractive.
Pull request integration
Following the docs nav to Admin (upper left) > Teams > Integrations tab. Github integration is only available for paid accounts.
Subjective opinion: having a GitHub integration for free accounts is a plus on the Percy side.
Final thoughts
Overall Applitools is strong on configurability while Percy is strong on simplicity. The UX is leaner and easier to use on Percy side, while on Applitools the UX is busier in comparison, but it has improved much over the years. Percy certainly has less code, not having to "open" and "close" eyes and being able to fire off the main command is a big win. For local developer experience, Applitools is the winner; being able to execute the tests with Cypress open mode vs elaborate CLI commands is huge win. Failing an actual visual diff in the test runner, vs the visual failures being only on the web UI in Percy's case, is also a win for Applitools. For CI, not having to configure any yml makes Applitools the winner there as well. Another win is for being able to take snapshots of sub-sections of the UI via selectors; this feature is built-in to Applitools while with Percy it has to be custom command that is not sure to work everywhere in the real world.
This is the extent of the comparison that can be made between the tools in an open source application. We believe that the most significant decision maker would be a long term trial (4-8 weeks) of both tools in an internal app, side by side. This would help evaluate which tool has the better AI allowing for less maintenance with visual testing, which is the biggest deterrent for technically savvy teams incorporating the test strategy into their portfolio.






Oldest comments (2)
Thank you for sharing your insights on setting up Cypress and Applitools with GitHub Actions. I recently came across a blog post titled 'Running Tests In Cypress With GitHub Actions,' which provides a comprehensive guide on utilizing Cypress with GitHub Actions. It covers various aspects, including test setup, configuration, and best practices. I found it really helpful, especially for teams looking to streamline their testing processes. If anyone is interested in exploring alternative approaches or wants to dive deeper into running tests with Cypress and GitHub Actions, I recommend giving it a read. It complements the insights shared here and offers additional perspectives. Keep up the great work with your blog, and thanks again for sharing this valuable comparison!
Check out dev.to/muratkeremozcan/ci-cd-strat... as well.