It started out as a curiosity and then turned into a solution that's live on production. For the record, I always recommend following the path of least resistance. If a React component library around Mapbox like react-map-gl works for you, stick with it! It has certainly served me well in the past.
It's just this one little feature of obtaining the user's current location never worked for me? Nothing would happen when opening the example on their demo site and in my applications, my map would freeze after clicking the Geolocate button?
I couldn't find a solution, so I decided to try a different library on the basis of having one particular feature working.
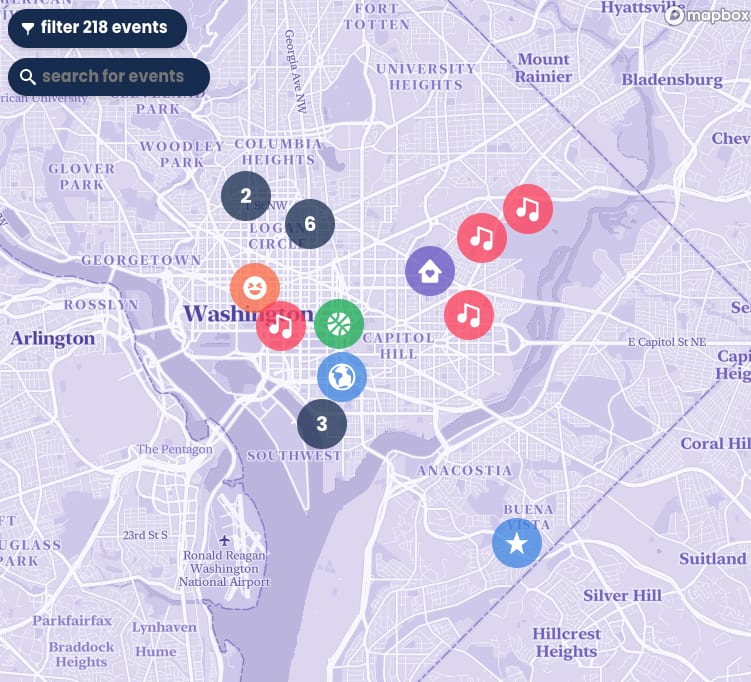
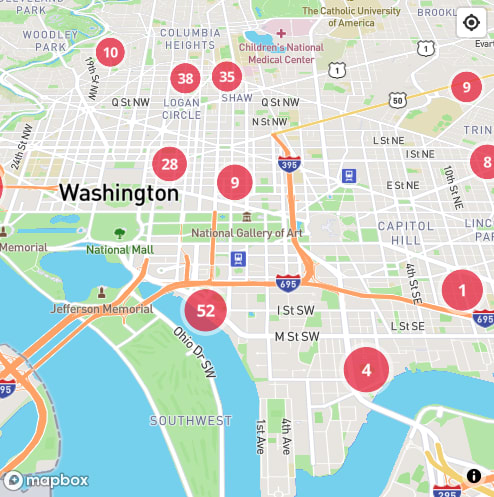
Above: a screenshot of the solution used on production for dcmusic.live
The simple cluster map that I had already implemented didn't seem like too-too-much to recreate and I was curious about how this would go down. So. If you are also curious about implementing this non-React-friendly library in your project, read on.
Github repo:
 naomigrace
/
nextjs-with-mapbox-gl-js
Tutorial for integrating Mapbox GL JS with Next.js
Note that the
accessToken will not work for you as I have refreshed it before posting this article. To get your own token, create a Mapbox account.
Covering
- Installation
- Adding a map
- Adding a Geolocate Control
- Adding Clusters
- Customize cluster styles
- Adding a popup
1. Installation
Install mapbox-gl
npm install mapbox-gl --save
Insert mapbox's styles
Add this to the <Head> of your page or pages/_template.js if all of your pages utilize a map.
<link href='https://api.mapbox.com/mapbox-gl-js/v1.12.0/mapbox-gl.css' rel='stylesheet' />
2. Adding a map
Mapbox displays the code snippet below to add to our site
var mapboxgl = require('mapbox-gl/dist/mapbox-gl.js');

mapboxgl.accessToken = 'YOUR_ACCESS_TOKEN';
  var map = new mapboxgl.Map({
  container: 'YOUR_CONTAINER_ELEMENT_ID',
  style: 'mapbox://styles/mapbox/streets-v11'
});
Switch the var's to const's and slap an id'd div in our pages/index.js file.
Now we have something like this:
pages/index.js
import Head from "next/head";
import styles from "../styles/Home.module.css";
const mapboxgl = require("mapbox-gl/dist/mapbox-gl.js");

mapboxgl.accessToken =
  "YOUR_ACCESS_TOKEN";
const map = new mapboxgl.Map({
  container: "my-map",
  style: "mapbox://styles/mapbox/streets-v11",
});

export default function Home() {
  return (
    <div className={styles.container}>
      <Head>
        <title>Create Next App</title>
        <link rel="icon" href="/favicon.ico" />
        <link
          href="https://api.mapbox.com/mapbox-gl-js/v1.12.0/mapbox-gl.css"
          rel="stylesheet"
        />
      </Head>

      <main className={styles.main}>
        <div id="my-map" />
...
Run it with npm run dev, and we find ourselves with an error.
TypeError: Cannot read property "getElementById" of undefined.
Our const map is trying to find the #my-map div on a page that doesn't exist yet. Let's define map only after the page has been mounted.
While we're here, create a pageIsMounted variable which we'll use when adding our clusters layer... later.
const [pageIsMounted, setPageIsMounted] = useState(false)

...

useEffect(() => {
    setPageIsMounted(true)
      const map = new mapboxgl.Map({
        container: "my-map",
        style: "mapbox://styles/mapbox/streets-v11",
      });
}, [])
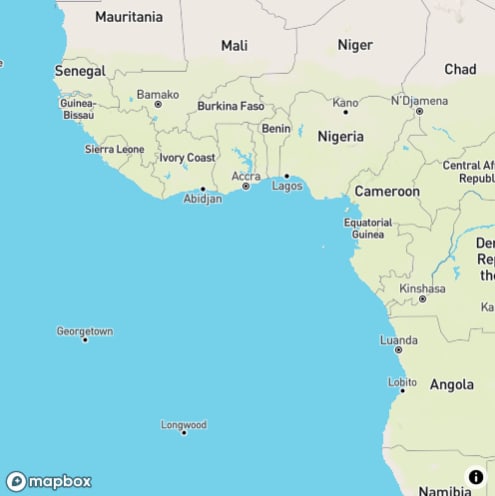
Run it, and we get no errors. But where's the map? Add dimensions to your div.
<div id="my-map" style={{ height: 500, width: 500 }} />
3. Adding a Geolocate Control
Now for the reason we came here.
Add the following to the same useEffect where we made sure the page was mounted:
useEffect(() => {
  const map = new mapboxgl.Map({
    container: "my-map",
    style: "mapbox://styles/mapbox/streets-v11",
  });

  map.addControl(
    new mapboxgl.GeolocateControl({
      positionOptions: {
        enableHighAccuracy: true,
      },
      trackUserLocation: true,
    })
  );
}, []);
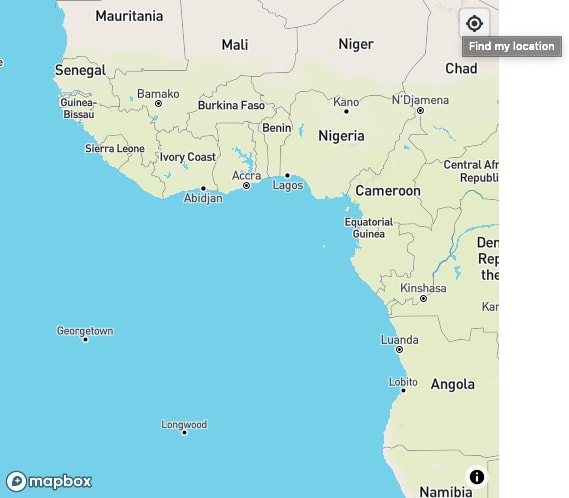
Now we can see the Geolocate button. Click it and it'll actually WORK, flying you over to your current location. ✈️
4. Adding Clusters
Time to dive into something more interesting. As you know, getting the user's current location was just one feature of an existing map that I wanted to recreate.
The tech involved react-map-gl, useSupercluster, and React components as the pins and popup labels (not pictured). A few problems I found with utilizing these packages:
- Pins weren't accurate: the location from faraway zoom levels just didn't look right
- Pins were janky: this approach didn't provide a very smooth pan-around experience, especially on mobile devices
- Pins would persist: in the wrong places. If I set a boundary on the coordinates the users were allowed to pan to, going to the outermost edges would make the pins hug the edge of the screen and go places they didn't belong.
- Popups would show up partially hidden: Ok. So. This one's definitely on me since I created my own popup component, but when I would click on a pin towards the edge of the screen, it would consistently show up to the right of the pin and wasn't smart enough to know it was hitting a viewport edge
¯\(ツ)/¯ If it was on me or not, I mention all of these issues to you because they went away with this new implementation.
Right, so clusters. We'll need data for that. For this demo, I'll create an endpoint api/liveMusic that will return a sample GeoJSON payload.
Reference the Create and style clusters example from Mapbox and put it in the useEffect we've been working on.
Here's the big chunk of code they give us:
map.on("load", function () {
  map.addSource("earthquakes", {
    type: "geojson",
    // Point to GeoJSON data. This example visualizes all M1.0+ earthquakes
    // from 12/22/15 to 1/21/16 as logged by USGS' Earthquake hazards program.
    data:
      "https://docs.mapbox.com/mapbox-gl-js/assets/earthquakes.geojson",
    cluster: true,
    clusterMaxZoom: 14, // Max zoom to cluster points on
    clusterRadius: 50, // Radius of each cluster when clustering points (defaults to 50)
  });

  map.addLayer({
    id: "clusters",
    ...
  });

  map.addLayer({
    id: "cluster-count",
    ...
  });

  map.addLayer({
    id: "unclustered-point",
    ...
  });

  // inspect a cluster on click
  map.on("click", "clusters", function (e) {
    var features = map.queryRenderedFeatures(e.point, {
      layers: ["clusters"],
    });
    var clusterId = features[0].properties.cluster_id;
    map
      .getSource("earthquakes")
      .getClusterExpansionZoom(clusterId, function (err, zoom) {
        if (err) return;

        map.easeTo({
          center: features[0].geometry.coordinates,
          zoom: zoom,
        });
      });
  });

  // When a click event occurs on a feature in
  // the unclustered-point layer, open a popup at
  // the location of the feature, with
  // description HTML from its properties.
  map.on("click", "unclustered-point", function (e) {
    var coordinates = e.features[0].geometry.coordinates.slice();
    var mag = e.features[0].properties.mag;
    var tsunami;

    if (e.features[0].properties.tsunami === 1) {
      tsunami = "yes";
    } else {
      tsunami = "no";
    }

    // Ensure that if the map is zoomed out such that
    // multiple copies of the feature are visible, the
    // popup appears over the copy being pointed to.
    while (Math.abs(e.lngLat.lng - coordinates[0]) > 180) {
      coordinates[0] += e.lngLat.lng > coordinates[0] ? 360 : -360;
    }

    new mapboxgl.Popup()
      .setLngLat(coordinates)
      .setHTML(
        "magnitude: " + mag + "<br>Was there a tsunami?: " + tsunami
      )
      .addTo(map);
  });

  map.on("mouseenter", "clusters", function () {
    map.getCanvas().style.cursor = "pointer";
  });
  map.on("mouseleave", "clusters", function () {
    map.getCanvas().style.cursor = "";
  });
});
Scanning through this code, we can see there is a lot going on. We have a few function calls to add layers for our clusters and their respective labels, mouse event listeners, and click handlers.
4.A. Modify the viewport
One step at a time. First, since our data consists of venues from Washington, D.C., we'll go ahead and change the viewport for our map with center, zoom, pitch, and maxBounds properties around the Capitol City.
const map = new mapboxgl.Map({
  container: "my-map",
  style: "mapbox://styles/mapbox/streets-v11",
  center: [-77.02, 38.887],
  zoom: 12.5,
  pitch: 45,
  maxBounds: [
    [-77.875588, 38.50705], // Southwest coordinates
    [-76.15381, 39.548764], // Northeast coordinates
  ],
4.B. Modify the data source
Now, switching the data source. Currently, the code is referencing a static GeoJSON file provided by Mapbox. Our dummy endpoint returns the same data too, but what if we want to hit an API that returns frequently changing GeoJSON instead? We'll use swr to "get a stream of data updates constantly and automatically.".
Install swr
Obviously, grab the data how you like, but I love this package so we'll use it here.
npm i swr
Set up swr
Create a fetcher. We use fetch since Next.js takes care of the appropriate polyfills for us.
async function fetcher(params) {
  try {
    const response = await fetch(params);
    const responseJSON = await response.json();
    return responseJSON;
  } catch (error) {
    console.error("Fetcher error: " + error);
    return {};
  }
}
Then the hook usage:
const { data, error } = useSWR("/api/liveMusic", fetcher);
Rename the "earthquake" source to your own, replacing their url with data.
map.addSource("dcmusic.live", {
  type: "geojson",
  data: data,
  cluster: true,
  clusterMaxZoom: 14,
  clusterRadius: 50,
});
You'll notice after refreshing the page that nothing appears on the map. However, after a hot reload, pins will show up.
What's happening? If you console.log(data) in the map.on("load") function, you'll see that the data actually shows up as undefined. It hasn't loaded in time for the map.
What we can do? Trigger a modification of our map's source data and layers when we our data has changed and the map has loaded.
4.C. Restructuring the data layering
We want to make sure that we initialize our map once and that any subsequent data changes do not create a new map.
Extract any addSource and addLayer functions into its own function under a addDataLayer.js file. Within this file, we'll check to see if the data source exists and update the data. Otherwise, we'll go ahead and create it.
map/addDataLayer.js
export function addDataLayer(map, data) {
  map.addSource("dcmusic.live", {
    type: "geojson",
    data: data,
    cluster: true,
    clusterMaxZoom: 14,
    clusterRadius: 50,
  });

  map.addLayer({
    id: "data",
     ...
  });

  map.addLayer({
    id: "cluster-count",
    ...
  });

  map.addLayer({
    id: "unclustered-point",
    ...
  });
}
Having this function apart from the map initialization gives us the flexibility to call this as many times as we like without recreating a new map every time. This pattern can be handy for other instances such as applying our data layer after changing map styles (light to dark mode anyone?).
The click and mouse listeners as well the the addControl function can be placed in an initializeMap.js file, just to be tidy.
map/initializeMap.js
export function initializeMap(mapboxgl, map) {
  map.on("click", "data", function (e) {
    var features = map.queryRenderedFeatures(e.point, {
      layers: ["data"],
    });
    var clusterId = features[0].properties.cluster_id;
    map
      .getSource("dcmusic.live")
      .getClusterExpansionZoom(clusterId, function (err, zoom) {
        if (err) return;
        map.easeTo({
          center: features[0].geometry.coordinates,
          zoom: zoom,
        });
      });
  });

  map.on("click", "unclustered-point", function (e) {
    var coordinates = e.features[0].geometry.coordinates.slice();
    var mag = e.features[0].properties.mag;
    var tsunami;
    if (e.features[0].properties.tsunami === 1) {
      tsunami = "yes";
    } else {
      tsunami = "no";
    }
    while (Math.abs(e.lngLat.lng - coordinates[0]) > 180) {
      coordinates[0] += e.lngLat.lng > coordinates[0] ? 360 : -360;
    }
    new mapboxgl.Popup()
      .setLngLat(coordinates)
      .setHTML("magnitude: " + mag + "<br>Was there a tsunami?: " + tsunami)
      .addTo(map);
  });
  map.addControl(
    new mapboxgl.GeolocateControl({
      positionOptions: {
        enableHighAccuracy: true,
      },
      trackUserLocation: true,
    })
  );

  map.on("mouseenter", "data", function () {
    map.getCanvas().style.cursor = "pointer";
  });
  map.on("mouseleave", "data", function () {
    map.getCanvas().style.cursor = "";
  });
}
Since we defined map as a const under a useEffect, we'll need to save the map to state in order to call it when the data changes.
const [Map, setMap] = useState()
Now, make a few changes to pages/index.js:
- Call the initializeMap function in the useEffect where we set the pageIsMounted variable.
- Set the Map variable here as well.
- In a new useEffect, add a "load" event and call the addDataLayer function if the
pageIsMountedand we havedata.
pages/index.js
  useEffect(() => {
    setPageIsMounted(true);

    let map = new mapboxgl.Map({
      container: "my-map",
      style: "mapbox://styles/mapbox/streets-v11",
      center: [-77.02, 38.887],
      zoom: 12.5,
      pitch: 45,
      maxBounds: [
        [-77.875588, 38.50705], // Southwest coordinates
        [-76.15381, 39.548764], // Northeast coordinates
      ],
    });

    initializeMap(mapboxgl, map);
    setMap(map);
  }, []);

  useEffect(() => {
    if (pageIsMounted && data) {
      Map.on("load", function () {
        addDataLayer(Map, data);
      });
    }
  }, [pageIsMounted, setMap, data, Map]);
Refresh your localhost and you should see the pins appear without any hot reloading needing to happen. 🎉
5. Customize cluster styles
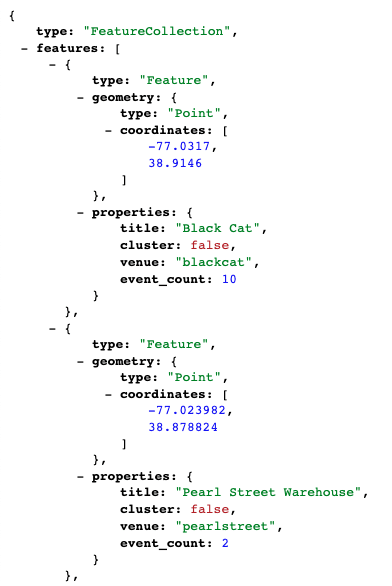
If you look at the geoJSON data provided, you'll see that we actually do a bit of clustering ourselves, assigning each venue an event_count property. Doing this allows us to send less data to the front end. From there, we can aggregate information from geoJSON cluster points easily using clusterProperties.
When we add our source in map/addDataLayer.js, we specify this aggregation through a special array syntax:
clusterProperties: {
  sum: ["+", ["get", "event_count"]],
},
This allows us to modify our layer with id: cluster-count to use sum:
map.addLayer({
  id: "cluster-count",
  type: "symbol",
  source: "dcmusic.live",
  filter: ["has", "point_count"],
  layout: {
    "text-field": "{sum}",
    "text-font": ["Open Sans Bold"],
    "text-size": 16,
  },
  paint: {
    "text-color": "white",
  },
});
In addition, we can add a new layer to label our unclustered-point's:
map.addLayer({
  id: "event-count",
  type: "symbol",
  source: "dcmusic.live",
  filter: ["!", ["has", "point_count"]],
  layout: {
    "text-field": "{event_count}",
    "text-font": ["Open Sans Bold"],
    "text-size": 16,
  },
  paint: {
    "text-color": "white",
  },
});
Lastly, we'll remove the step expression that differentiates the circle color and leave it uniform.
6. Adding a popup
When creating a popup in Mapbox, you have a few options to modify the the content. In their display a popup on click example, they use setHTML. Since I want the flexibility of using my own React component, we'll use setDOMContent instead.
map/initializeMap.js
map.on("click", "unclustered-point", function (e) {
  const coordinates = e.features[0].geometry.coordinates.slice();
  const venue_title = e.features[0].properties.title;

  while (Math.abs(e.lngLat.lng - coordinates[0]) > 180) {
    coordinates[0] += e.lngLat.lng > coordinates[0] ? 360 : -360;
  }

  let placeholder = document.createElement("div");

  ReactDOM.render(<VenuePopup title={venue_title} />, placeholder);

  new mapboxgl.Popup({ offset: 25 })
    .setLngLat(coordinates)
    .setDOMContent(placeholder)
    .addTo(map);
});
For demonstrative purposes,
map/VenuePopup.js
export const VenuePopup = ({ title }) => {
  return (
    <div>
      <strong>{title}</strong>
    </div>
  );
};
After modifying our click functions and mouse listeners to reference our clusters and unclustered-point layers, we have both the expansion zoom feature provided by the Mapbox cluster example working, as well as a popup that references our own data in a React component.
final map/initializeMap.js
import ReactDOM from "react-dom";
import { VenuePopup } from "./VenuePopup";

export function initializeMap(mapboxgl, map) {
  map.on("click", "clusters", function (e) {
    var features = map.queryRenderedFeatures(e.point, {
      layers: ["clusters"],
    });
    var clusterId = features[0].properties.cluster_id;
    map
      .getSource("dcmusic.live")
      .getClusterExpansionZoom(clusterId, function (err, zoom) {
        if (err) return;

        map.easeTo({
          center: features[0].geometry.coordinates,
          zoom: zoom,
        });
      });
  });

  map.on("click", "unclustered-point", function (e) {
    const coordinates = e.features[0].geometry.coordinates.slice();
    const venue_title = e.features[0].properties.title;

    while (Math.abs(e.lngLat.lng - coordinates[0]) > 180) {
      coordinates[0] += e.lngLat.lng > coordinates[0] ? 360 : -360;
    }

    let placeholder = document.createElement("div");

    ReactDOM.render(<VenuePopup title={venue_title} />, placeholder);

    new mapboxgl.Popup({ offset: 25 })
      .setLngLat(coordinates)
      .setDOMContent(placeholder)
      .addTo(map);
  });

  map.addControl(
    new mapboxgl.GeolocateControl({
      positionOptions: {
        enableHighAccuracy: true,
      },
      trackUserLocation: true,
    })
  );

  map.on("mouseenter", "clusters", function () {
    map.getCanvas().style.cursor = "pointer";
  });
  map.on("mouseleave", "clusters", function () {
    map.getCanvas().style.cursor = "";
  });

  map.on("mouseenter", "unclustered-point", function () {
    map.getCanvas().style.cursor = "pointer";
  });
  map.on("mouseleave", "unclustered-point", function () {
    map.getCanvas().style.cursor = "";
  });
}
And we're done! You've just integrated mapbox-gl-js in a Next.js project with clustering and geolocation. If you have any questions or want to offer a different approach, tell us in the comments!
Notes
- To modify the Mapbox Popup container itself, you'll need to use css and either override their classes or provide your own classes through a className prop.
- You can follow this tutorial alongside the branches for this Github repository. The series of commits under part 4. Adding Clusters may be difficult to follow as I was tinkering with the solutioning. I would recommend looking at the last commit of that branch instead.
References
Mapbox Example: Locate the user
Mapbox Example: Create and style clusters
Mapbox Example: Display a Popup on click
SWR: Overview
Mapbox API: setData
Mapbox API: setDOMContent
Mapbox API: Popup







Latest comments (6)
Nice tutorial!
i'm working on with Mapbox + Nextjs and try to use mapbox with context, it's a better idea?
This tutorial really helps me, thanks a lot for writing this 🙏
This was very helpful for me as well. Thank you so much!
I was ultimately unable to send and receive props to the popup components since they are instantiated once in the main useEffect call. I tried Context and was able to "inject" a function into the popup to enable button functionality but this was not enough for my use case so I had to go with React-GL in the end.
I'd be curious to know if you ended up implementing React GL to support the functionality in DC Live.
Clear cut write up!!!
Thank map not displaying error drove me insane. Thanks!
Great write up, thanks for sharing ☺️!
Thanks and no problem! Let me know if you implement this and run into any issues.