
Let’s say you are making a bot for a restaurant on Chatfuel. The bot can tell the users the daily specials. The daily specials would change, well, daily and you want the restaurant staff to update them. Changing things daily inside Chatfuel by people who may not be tech savvy, the restaurant staff for example, is not the recommended thing to do. And things can get further complicated if you are making the bot for a client.
So, we want a place where the staff can update the specials every day and the bot reads the specials before sending the information to the user. Typically, this is a job for a database, but Google Sheets can be used as a light weight and easy to use alternative to databases in this scenario.
The only problem is that Chatfuel doesn’t offer the functionality to read data from Google Sheets out of box. Using third party integrations, Zapier or Integromat for instance, does the trick but it adds to the overhead costs.
The good news is that if you know some basic JavaScript, you can use Google Sheets like a regular database and integrate it with your bot. Enter Google Apps Script!
Google Apps Script lets you do new and cool things with Google Sheets. You can use Apps Script to add custom menus, dialogs, and sidebars to Google Sheets. It also lets you write custom functions for Sheets, as well as integrate Sheets with other Google services like Calendar, Drive, and Gmail.
But Google Apps Script can do a lot more than that. And in this tutorial, we will use Google Apps Script to read the daily specials for a pizza shop from a Google Sheet and send the data as gallery cards to Messenger through our bot.
If you are not familiar with Google Apps Script, it is a scripting language for light-weight application development in the Google ecosystem. It is based on JavaScript. So, if you are familiar with JavaScript, using Google Apps Script is fairly simple.
Let’s get started.
Scaffolding
Go to Google Sheets and create a new blank sheet.
To follow along this tutorial, make columns for name, description and image URL. Here is a screen shot of my sheet with some fake data. Make sure your images are hosted somewhere on the web and they have the right permissions.

Once your sheet is set up as you want, let’s write our script.
Introducing Google Apps Script
There are different types of Google Apps scripts and in this tutorial, I will create a container bound script. You can read more about the different kinds of scripts here. But basically, what it means is that a script which is bound to a Google Sheet cannot be detached from the file they are bound to, and they gain a few special privileges over the parent file.
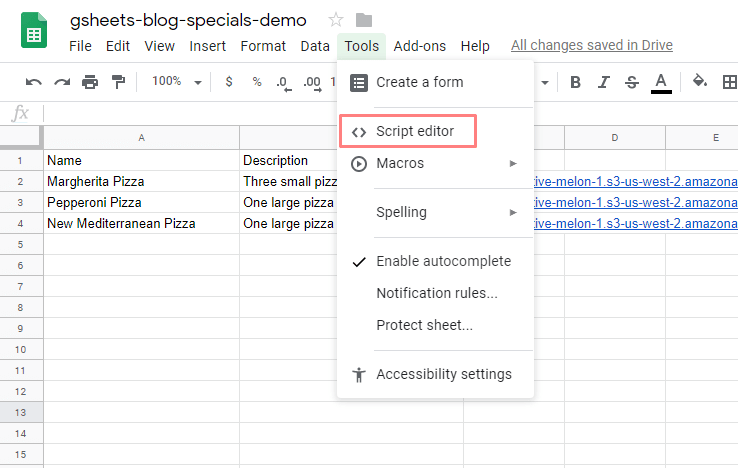
To create a bound script, in your Google Sheet, select tools from the menu and then select Script Editor.
It will open the Google Apps Scripts project page.
A project represents a collection of files and resources in Google Apps Script, sometimes referred to simply as "a script". A script project has one or more script files which can either be code files (having a .gs extension) or HTML files (a .html extension). You can also include JavaScript and CSS in HTML files.
You can read more about Google Apps Scripts projects here.
Give your project a suitable name.

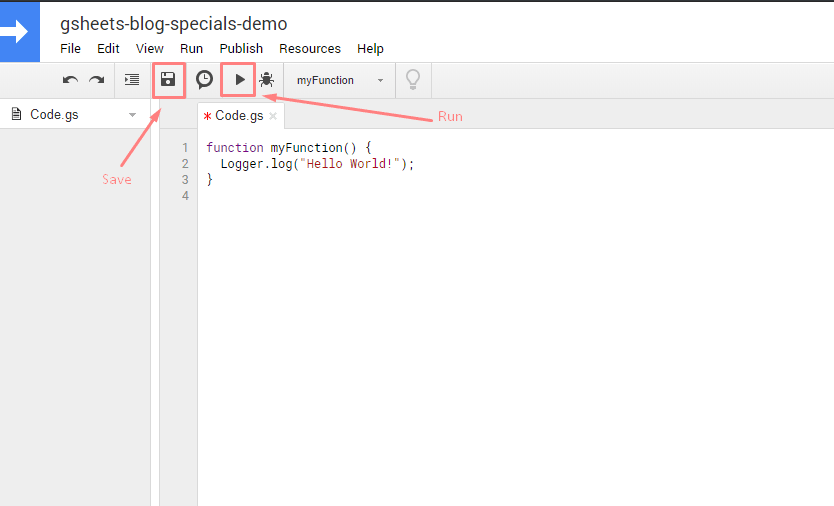
As you can see there is a code editor where we will write our code. Currently there is just an empty function here.
function myFunction() {
}
Google Apps Script has a basic logging mechanism using the Logger class. So we can use Logger.log in place of JavaScript’s console.log. Let’s log a simple “Hello, world!”.
function myFunction() {
    Logger.log('Hello World!');
}
Click save and then run your script.
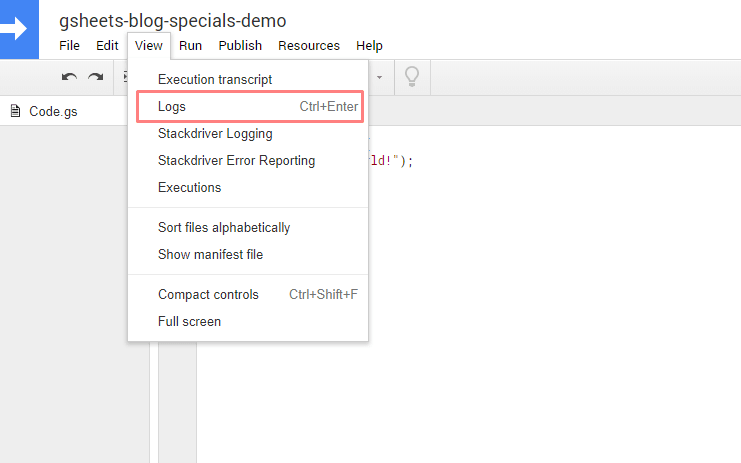
Now click on View > Logs or simply hit Ctrl + Enter and you should see Hello World! displayed on the logs.

Deploying The Script As A Web App
At the moment this is just a script. We will need to turn this script into a web app so our bot can communicate with it.
Any script can be published as a web app if it meets these requirements:
- It contains a doGet(e) or doPost(e) function.
- And the function returns an HTML service HtmlOutput object or a Content service TextOutput object.
Armed with this information, lets change our function.
function doGet() {
  Logger.log("Hello World!");
  return ContentService.createTextOutput('Hello, world!');
}
Let’s save this script again and then deploy it as a web app. Hit Publish and select "Deploy as web app".

Change the “Who has access to this app” to “Anyone, even anonymous” and click deploy.

Note the web app URL from the next screen.
Integrating with Chatfuel
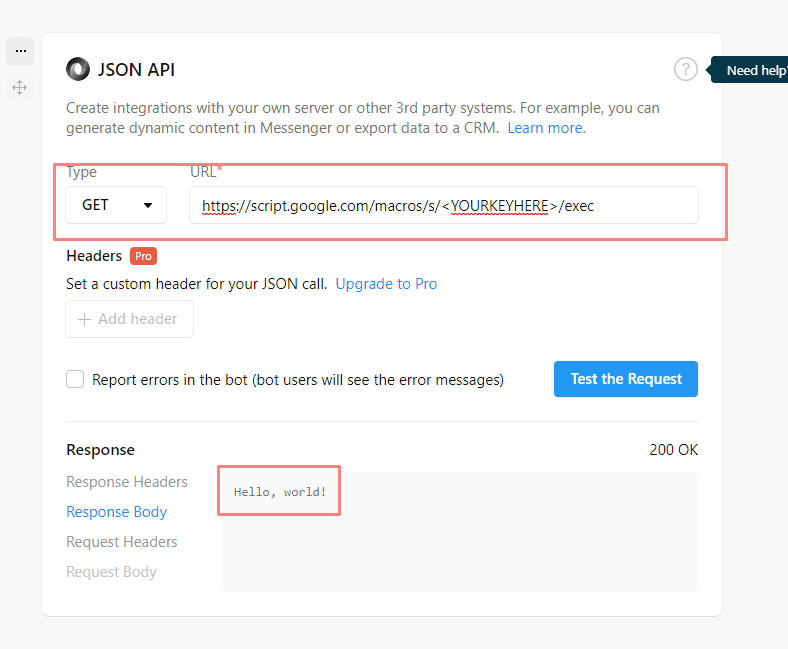
Now go to your Chatfuel bot and add a JSON API card where you want to display the specials. Change the Type of the request to GET and in the URL paste the URL you copied from the Google Apps Script project page. Test the request. In the response section, under Response Body, you should see our Hello, world! text.
Now that our bot is connected to our web app running on Google Apps Script project, let’s see how we can read data from the Google Sheets.
Reading Data From Google Sheets Programmatically
To retrieve the data from the spreadsheet, you must get access to the spreadsheet where the data is stored, get the range in the spreadsheet that holds the data, and then get the values of the cells.
Apps Script facilitates access to the data by reading structured data in the spreadsheet and creating JavaScript objects for them.
Since we are using a bound script the above process is fairly easy. We will just call a few methods on the JavaScript object created for us. You can read about all available methods here. Change the code to following.
function doGet() {
  var sheet = SpreadsheetApp.getActiveSheet();
  var data = sheet.getDataRange().getValues();
  for (var i = 0; i < data.length; i++) {
    Logger.log('Item name: ' + data[i][0]);
    Logger.log('Item description: ' + data[i][1]);
  }
  return ContentService.createTextOutput('Hello, world!');
}
Hit save. Google will ask you permission to access data and it may tell you that this web app is not safe. Proceed anyway and then run your function. Check the logs and you should get something like this.

As you can see it is also reading the header row with the data. But that can be fixed easily by initializing our loop variable with 1 instead of 0.
This is an extremely simple script and we are just scratching the surface of all the possibilities offered to us. Feel free to play around with the code and build more complex functionality. But for the purpose of this tutorial, this script will do.
Making Image Gallery From The Data
Now that we know how we can read and parse data from our sheet programmatically, let's see how we can send this data back as a gallery.
Chatfuel documentation gives us all the information we need. Go to the JSON API section and scroll down to "Sending galleries". The page looks like this.
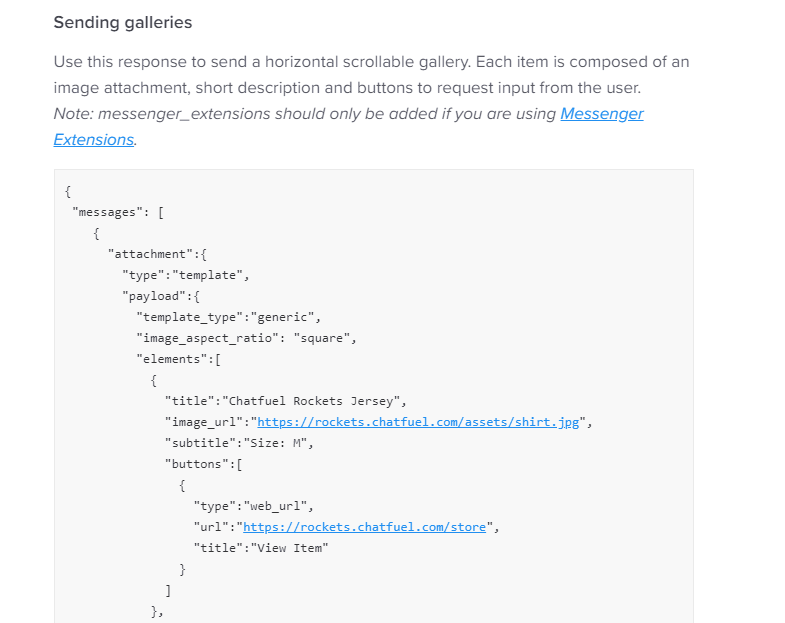
As we can see, we need to send the actual data in the form of a list of objects.
So let's first create a list of objects or elements from our data.
Change the code to following.
function doGet() {
  var sheet = SpreadsheetApp.getActiveSheet();
  var data = sheet.getDataRange().getValues();
  elements = create_elements(data)
  Logger.log(elements);
  return ContentService.createTextOutput('Hello, world!');
}

function create_elements(data) {
  var elements = [];
  for (var i = 1; i < data.length; i++) {
    var object = {
      title : data[i][0],
      image_url : data[i][2],
      subtitle : data[i][1],
      buttons : [
        {
          "type":"web_url",
          "url":"https://blog.naveeraashraf.com/",
          "title":"View Item"
        }
      ]
    }
    elements.push(object)
  }
  return elements
}
We are looping through our rows and adding the data to a JavaScript object, which is then pushed to a list. We also moved the code to create our objects in a separate function to keep our code clean. You can check your logs to see if your code is working properly.
So far we are only logging the objects and not sending them to our bot. Let's change that. First we will use our objects to create the response which will build a gallery. Add the following function to your code. You can copy the response from Chatfuel docs if you wish and make necessary changes.
function buildImageGallery(elements) {
  var output = JSON.stringify({
    messages: [
      {
        attachment: {
          type: "template",
          payload: {
            template_type:"generic",
            image_aspect_ratio: "square",
            elements: elements
          }
        }
      }
    ]
  });

  return ContentService.createTextOutput(output).setMimeType(ContentService.MimeType.JSON);
}
We are simply replacing the elements list in the docs with the list we have created in the previous step.
We will also add some functionality to our code for when there is no data in the sheet. This way our code won't break in case the restaurant staff forgot to add the new specials but deleted the old ones.
Your final code should look like this now.
function doGet() {
  var sheet = SpreadsheetApp.getActiveSheet();
  var data = sheet.getDataRange().getValues();
  elements = create_elements(data)
  if (elements.length != 0) {
     return buildImageGallery(elements);
  } else {
    return notFound()
  }
}

function create_elements(data) {
  var elements = [];
  for (var i = 1; i < data.length; i++) {
    var object = {
      title : data[i][0],
      image_url : data[i][2],
      subtitle : data[i][1],
      buttons : [
        {
          "type":"web_url",
          "url":"https://blog.naveeraashraf.com/",
          "title":"View Item"
        }
      ]
    }
    elements.push(object)
  }
  return elements
}

function buildImageGallery(elements) {
  var output = JSON.stringify({
    messages: [
      {
        attachment: {
          type: "template",
          payload: {
            template_type:"generic",
            image_aspect_ratio: "square",
            elements: elements
          }
        }
      }
    ]
  });

  return ContentService.createTextOutput(output).setMimeType(ContentService.MimeType.JSON);
}

function notFound() {
  var output = JSON.stringify({
    messages: [
      {
        text: "There are no items in this category"
      }
    ]
  });
  return ContentService.createTextOutput(output).setMimeType(ContentService.MimeType.JSON);
}
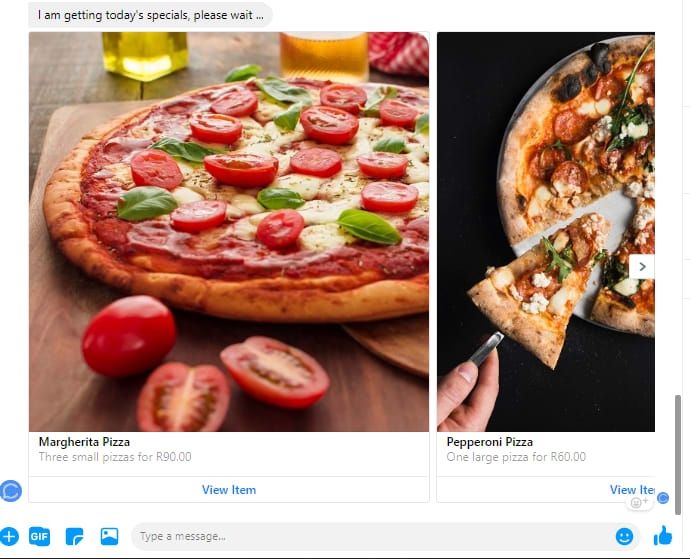
Test your bot in Messenger and you should get the data from your sheet displayed as an image gallery.
That's it! I hope you enjoyed this tutorial. If you did don't forget to share it.

Top comments (21)
Hi. Great post. I am really new to GAS and JSON in Chatfuel. I have the GAS in the google sheet linked to Chatfuel. I am not sure what is needed in Chatfuel to make it work. Does the code in the Google sheet automatically create the Gallery? I'm trying to use JSON and GAS to send and receive data between Google sheet and Chatfuel.
Hi Rob,
I am glad you liked the post. Yes the code in sheets script editor automatically creates the gallery. On the Chatfuel end you just need to use the JSOn block with the url of your web app.
Wow thank you for the reply. So many of these boards you never hear from the authors. Keep it up. :) So something really weird. I followed the process above and then eventually replaced the code with your final code above. When testing the JSON link in Chatfuel I still get the "Hello World!" from the first section of building the code? No matter how many times I published or saved made no change.
I created a new sheet and pasted the final code first. Now it works. :) Thank for for the help.
Are there any other resources (yours or others) that I could use to link Google to Chatfuel?
So I started over this time copying the final code first publishing and linking the new URL to the JSON. This time when running a test JSON instead of the "Hello World!" I got the following:
Okay this reply may help others where the Gallery is not displaying.
After inserting the final code in the GAS, the code must be published.... and here's the trick.... when publishing the GAS be sure to select "Project version" and select "NEW". This will publish the latest code in the script. If you don't do this the latest code is not published. Hope this helps all those where the gallery is not displayed. :)
100% correct! this is exactly what I wanted to suggest to your last comment.
Is there anyway I can point the gallery to a block instead of a web URL? I'm trying to keep the user in the bot instead of pointing them away out of the bot?
If you go through the Chatfuel docs you will find the other options there, including redirecting to a block.
Hi.. this is a very detailed tutorial for setting up gallerycards through GAS.
Can you write similar tutorials for Manychat platform as well? Their API doc is at manychat.github.io/dynamic_block_d...
Thanks Deepak! I am working on a kind of cookbook with easy to follow tutorials like this one, to make your ChatFuel and ManyChat bots more powerful. I will share it on Dev.to platform once I am done.
Hi buddy... Any updates regarding the cookbook? Can you also include steps on how to use conditions to check for tags and send content accordingly?
Thanks Deepak for the reminder! I am working on the book, hopefully I would be able to roll it out soon :) And yes that will be covered in the book.
That's awesome mate... Looking forward to this
The JSON API documentation with Chatfuel says
Documentation update (August 14th - 2019)
• Removed the "type":"element_share", as it was deprecated by Facebook API. Read more details here: bit.ly/2Z5rwCW
Thank you for mentioning this. I will revise the article when I get a bit of time.
Thanks man for the code. Any chance you have updated the code or revise the article? I'm so noob in coding, so a bit struggling until I found this article 😁
Hi Haziq, I have updated the code.
Great. Thank you. I will try this. I slowly learn from this, so one day I can do this myself. Thanks
nothing happen in chatfuel. The gallery don't display
Hi Innovation IT,
I have personally used this script and it works. Are you sure you have setup everything properly?
Same is the case in my case. Not sure where i have gone wrong
Hi Aravind,
Have you copy pasted the code? Are you sure your Google Sheet is setup exactly the same way? I went over the whole thing again and it is still working for me.
Are you publishing the script again as a new version of the app every time you make a change?
Some comments may only be visible to logged-in visitors. Sign in to view all comments.