Routing
Setting up a home lab
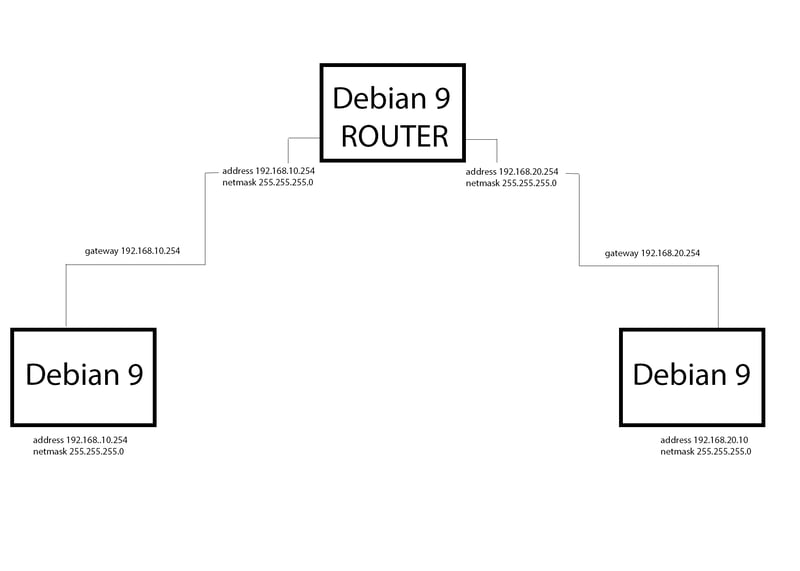
First things first, before setting up a network, always use a diagram, it helps you get your plan in order and not get lost along the way. So this is our diagram.
Explaining the diagram
So the first thing we're going to do is download and install oracle virtualbox which is what we're going to use to run our virtual machines on, after that's installed we're going to download a debian 9 iso. Next after we have everything downloaded we're going to create our first virtual machine that hosts our router machine. We're going to give this virtual machine three network adapters : One is going to be used to connect to the outside internet and the other two are going to be used to connect to the other two machines that are part of virtualbox' internal network.
After our virtual machine is created, we're going to install debian 9 on it and then we're going to assign IP addressing for the internal network, the external network will automatically get IP addressing from your home router so we don't have to worry about it. After we have IP addressing setup, we're going to install the other two "client" machines and connect them to the router, this way the two machines will be able to ping one another.
Downloading and installing required software and OS
Oracle virtual box
Note that the performance of your computer might be affected depending on what hardware do you have and how much you allocate to your virtual machines.
On windows
Head out to virtual box's download page and follow the installation instruction.
On linux
Just follow this guide by Oracle. If you have dependencies issues, check out this page by the virtualbox team.
On MacOS
Much like windows, you only need to visit virtual box's download page and select the OS X hosts option, then follow the installation instruction and you're done.
debian 9
We will download debian 9 in and iso format, Click this link to get it. Remember where you downloaded the ISO file, because you'll need to know that later.
Creating the virtual machines
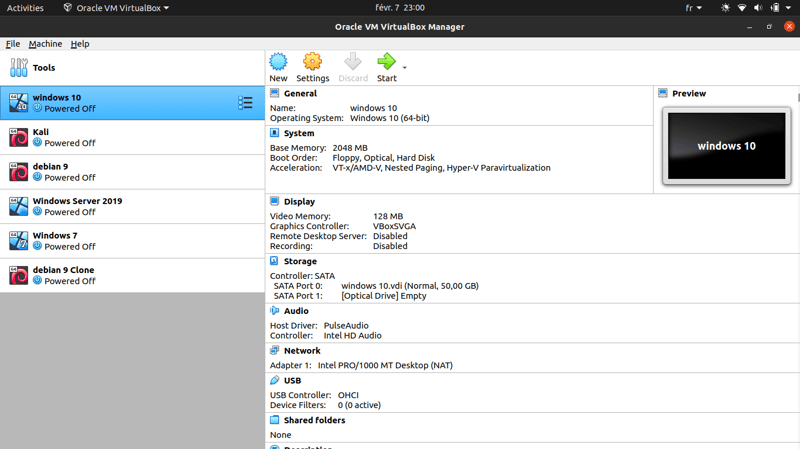
So the next thing we're going to do is we're going to create our virtual machines. Open up virtualbox, I'm using Linux Ubuntu 20.04 so your interface might look slightly different if you're running it on Windows or MacOS.

We'll go to "new" and we're going to create the router debian 9 machine first, pick linux as the type and debian 64 as the version, also you should name it accordingly to remember which machine is which. just leave all the settings by default and simply click next, the settings should be so that you can use at least run three virtual machines at the same time depending on you computer's hardware, or you can tweak them as you please.Next, click on your newly created VM, go to Settings, Network, remember if we look at the diagram, we're creating our router right now so we want to have three NICs (Network Interface Controllers) we want one that's dedicated for the internet that's going to be running NAT and then we'll have two that are dedicated for the internal vmware network. So our third adapter is going to connect to our our house internet and be given an IP address automatically by your router's DHCP, so we want to add one two more adapters. But before that go, we will create two NAT networks (A NAT network is a type of internal network that allows outbound connections), go to "File", "Preferences", "Network" and add two nat networks by clicking the add button.
Back to configuring the router VM, left click it and go to Settings, Network, Adapter 1 and enable it, then simply select "NAT Network" and select the first one, do the same for adapter 2 with the other NAT Network.
Installing Debian 9 in our VM
the VM is configured but it's still empty, so next we are going to install Debian 9 on it. In order for the machine to detect the installation file, we will insert it in it's IDE storage controller, left click the machine, go to "Settings" and then "Storage", click on the "Empty" under "Controller : IDE" then on the blue disk next to the list for "Optical Drive" to choose a virtual optical drive, navigate to the debian 9 iso file you downloaded and select it and hit OK.
Now fire up the vm by double clicking it and you'll be faced with a classic debian installation. Read the official debian documentation if you're stuck at one of installation steps.
Cloning the VM twice to get the clients machines
To create the other two clients' machines, it's much faster to just clone the router machine, after the installation process has finished, go ahead and close the VM, in virtualbox right click and choose "Clone", Rename it something like "debian 9 right" and do the same for the left one. We will configure the networks for each one of them later.
Configure the network interfaces inside debian
Once inside the debian 9 Router VM, we will have to setup the two internal network interfaces. open a terminal and write "ip a", you'll see the loopback interface and below it the three adapters we attached to the machine,notice that the first two, enp0s3 and enp0s8 don't show much information, that because they are the NAT network ones and are not configured, let's fix that. Write this command to open up a text editor with the interfaces configuration file opened in it
sudo gedit /etc/network/interface
If you are unfamiliar with networking concepts such as IP addressing, i strongly advise you to read up on it, as i won't cover them in this guide, you should also learn more about debian network configuration and naming. Go ahead and copy the text below into that text editor.
auto enp0s3
iface enp0s3 inet static
    address 192.168.10.254
    netmask 255.255.255.0

auto enp0s8
iface enp0s8 inet static
    address 192.168.20.254
    netmask 255.255.255.0
Close the editor and restart the networking service by typing the following command :
sudo systemctl restart networking
Type "ip a" again and see that now they are configured. What we basically did here is that we configured the two network interfaces to connect two the other two clients machines, now we will configure each one of them to connect to the router using the gateway address.
Configuring the right debian 9 Client
Before starting the right machine, we have to change some settings since it's a cloned machine, it will have the same MAC address as our router's, and il will also have three network adapter and we only need one. right click the right machine and go to "Settings", "Network", disable adapters 2 and 3 and make adapter 1 attached to "NAT network" and as name the first one, now start the machine. you can run the "ip a" command to take a look
Just like we did for the router, open the interfaces file and write these lines :
auto enp0s3
iface enp0s3 inet static
    address 192.168.20.10
    netmask 255.255.255.0
    gateway 192.168.20.254
Don't forget to restart the networking service. now you can try to ping the router by typing "ping 192.168.20.254" in the terminal, and you do the same from the router and ping the right client with it's address 192.168.20.10
Configuring the left debian 9 Client
Same steps as the right client, only changes are in selecting "natnetwork1" instead of the first one, and add these lines to the interfaces file :
auto enp0s3
iface enp0s3 inet static
    address 192.168.10.10
    netmask 255.255.255.0
    gateway 192.168.10.254
Don't forget to restart the networking service. now you can try to ping the router by typing "ping 192.168.10.254" in the terminal, and you do the same from the router and ping the left client with it's address 192.168.10.10
Now from one client try to ping the other, from the left machine ping 192.168.10.254 and from the right machine ping the left machine with ping 192.168.20.254, not working? Go to the next step
Enabling and disabling routing in the router machine
Don't interrupt the two machines trying to ping each other, now go to the router machine and type the command
sudo more /proc/sys/net/ipv4/ip_forward
You'll get a 0, meaning forwarding packets on this machine is disabled. To enable it, execute this command :
sudo echo 1 > /proc/sys/net/ipv4/ip_forward
Go back to the two client machines and you'll see that it's working, just like a light switch.
You now know how to configure interfaces on your debian machines and setup a router.


Oldest comments (0)