Kubernetes is an open-source project for automating deployment, scaling, and management of containers. It has rapidly become the standard to run production workloads and the community around it is just great!
But developing in Kubernetes presents some challenges. The typical development workflow looks like this: write code, build a Docker image, push it to the registry, redeploy, validate your changes and repeat. This workflow is slow, full of friction, and makes us very unproductive.
And if you are a Windows .NET developer, then you are well aware that there are major challenges around developing applications that are meant to run in Linux containers in Windows. You can cross compile, you can dual boot, you can use WSL, etc. But those experiences are far from frictionless.
Okteto was created to solve this problem. On this blog post, we will show you how Okteto improves the developer experience in Kubernetes for ASP.NET Core developers. You will be able to take full advantage of using an instant development environment, dependency caching, hot-reloading and VS Code's remote debugging features while developing your application directly in Kubernetes.
Step 1: Deploy the ASP.NET Core Sample App
Get a local version of the ASP.NET Sample App by executing the following commands in your local terminal:
$ git clone https://github.com/okteto/aspnetcore-getting-started
$ cd aspnetcore-getting-started
The k8s.yml file contains the raw Kubernetes manifests to deploy the ASP.NET Core Sample App. Run the application by executing the command below:
$ kubectl apply -f k8s.yml
deployment.apps "hello-world" created
service "hello-world" created
This is cool! You typed one command and your application just runs 😎.
You can deploy to your own Kubernetes cluster or give Okteto Cloud a try. Okteto Cloud is a development platform for Kubernetes applications. Free developer accounts come with three Kubernetes namespaces with 8GB of RAM, 4 CPUs, and 50GB Disk space each.
Step 2: Install the Okteto CLI
The Okteto CLI is an open-source project that lets you develop your applications directly in Kubernetes while taking advantage of well-known local tooling. We will use it to speed up our development cycle instead of using the typical development workflow based on building docker images and redeploying containers.
Install the Okteto CLI:
MacOS / Linux
$ curl https://get.okteto.com -sSfL | sh
Windows
Download https://downloads.okteto.com/cli/okteto.exe and add it to your $PATH.
Step 3: Start your development environment in Kubernetes
With the ASP.NET Core sample application deployed, run the following command in your local terminal:
$ okteto up
 ✓  Development environment activated
 ✓  Files synchronized
    Namespace: rberrelleza
    Name:      hello-world
    Forward:   5000 -> 5000
               2222 -> 22

okteto>
The okteto up command starts a Kubernetes development environment, which means:
- The ASP.NET Core Sample App container is updated with the Docker image
okteto/dotnetcore:3. This image is based ofmcr.microsoft.com/dotnet/core/sdk:3, and is preconfigured with all the required dev tools to build, test, debug and run adotnetcore-based application. - A file synchronization service is created to keep your changes up-to-date between your local filesystem and your application pods.
- Container port 5000 is forwarded to localhost.
- Start a terminal into the remote container. Build, test and run your application as if you were in your local machine and get your application logs immediately in your terminal.
All of this (and more) can be customized via the okteto.yml manifest file.
To start the application, execute in the Okteto terminal:
okteto> dotnet watch run
watch : Polling file watcher is enabled
watch : Started
info: Microsoft.Hosting.Lifetime[0]
      Now listening on: http://localhost:5000
info: Microsoft.Hosting.Lifetime[0]
      Application started. Press Ctrl+C to shut down.
info: Microsoft.Hosting.Lifetime[0]
      Hosting environment: Development
info: Microsoft.Hosting.Lifetime[0]
      Content root path: /okteto
Test your application by running the command below in a local terminal:
$ curl localhost:5000
Hello world!
Step 4: Develop directly in Kubernetes
Open Controllers/HelloWorldController.cs in your favorite local IDE and modify the response message on line 25 to be Hello world from the cluster!. Save your changes.
using System;
using System.Collections.Generic;
using System.Linq;
using System.Threading.Tasks;
using Microsoft.AspNetCore.Mvc;
using Microsoft.Extensions.Logging;

namespace helloworld.Controllers
{
    [ApiController]
    [Route("")]
    [Route("[controller]")]
    public class HelloWorldController : ControllerBase
    {
        private readonly ILogger<HelloWorldController> _logger;

        public HelloWorldController(ILogger<HelloWorldController> logger)
        {
            _logger = logger;
        }

        [HttpGet]
        public string Get()
        {
             return "Hello world from the cluster!";
        }
    }
}
Take a look at the Okteto terminal and notice how the changes are detected by dotnet watch run and automatically built and reloaded.
info: Microsoft.Hosting.Lifetime[0]
      Application is shutting down...
watch : Exited
watch : File changed: /okteto/Controllers/HelloWorldController.cs
watch : Started
warn: Microsoft.AspNetCore.Server.Kestrel[0]
      Overriding address(es) 'https://localhost:5001, http://localhost:5000'. Binding to endpoints defined in UseKestrel() instead.
info: Microsoft.Hosting.Lifetime[0]
      Now listening on: http://0.0.0.0:5000
info: Microsoft.Hosting.Lifetime[0]
      Application started. Press Ctrl+C to shut down.
info: Microsoft.Hosting.Lifetime[0]
      Hosting environment: Development
info: Microsoft.Hosting.Lifetime[0]
      Content root path: /okteto
Call your application to see the changes:
$ curl localhost:5000
Hello world from the cluster!
Notice how your code changes were instantly applied to Kubernetes. No commit, build or push required 😎!
Every time you make a change in a file, it will be automatically synchronized to your remote development environment, and the process will be hot reloaded automatically. Can you image how much more productive this is going to make you?
Step 5: Debug directly in Kubernetes
Okteto enables you to debug your applications directly from your favorite IDE. For this post, we are going to integrate Okteto's remote mode with vsdbg (the VS dotnet debugger) and VS Code's remote debugging capabilities.
For this step, we are going to use the C# extension for VS Code. If you don't have it, you can install it here.You might need to restart your VS Code instance.
Open HelloWorldController.cs in VS Code, set a breakpoint on line 26 and press F5. VS Code will connect to your remote development environment via SSH and give you a list of processes you can attach to. Scroll through the list, and select the helloworld process, as shown below (you can also type helloworld in the search bar directly).
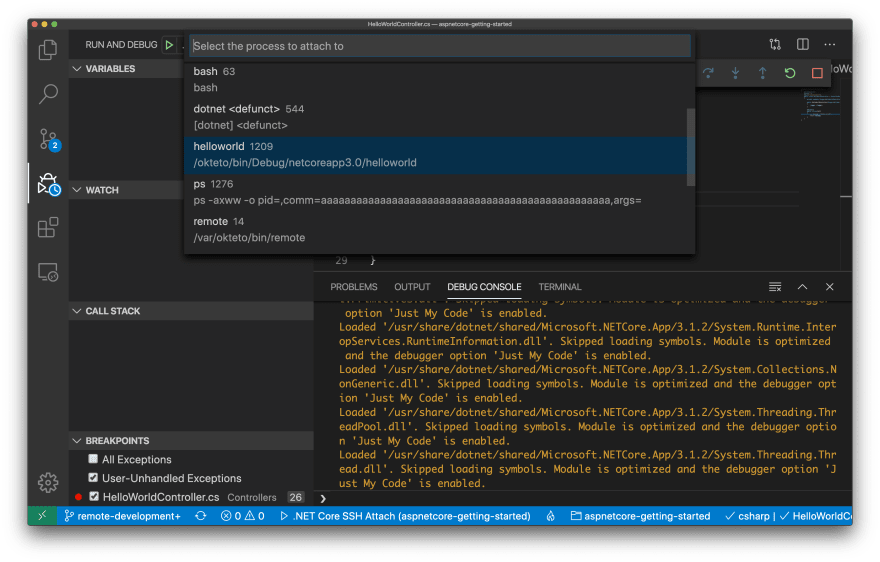
Once you select the process, VS Code will switch to debug view, launch the debugger and attach it to the process you just selected. You'll know it's finished when the status bar at the bottom turns orange.

Go back to the terminal and call your application again:
$ curl localhost:5000
As soon as the service receives the request the execution will halt at your breakpoint and VS Code will jump to the front of the screen. You can then inspect the request, the available variables, etc. Your code is executing in your development environment in Kubernetes, but you can debug it from your local machine without any extra services or tools. Pretty cool no? 😉

How does it works?
Your development environment is configured to automatically start an SSH server in your remote development environment, a port-forward and to add an entry to your local SSH config file when you run okteto up. This allows you to use VS Code to launch a remote debugger securely, so you can develop and debug directly in your remote development environment running in Kubernetes, while coding in your favorite OS and IDE.
All of this is described via okteto.yml and the launch.json manifests. This way, everyone collaborating in your project will get the exact same configuration by simply running okteto up 🤖.
Conclusions
In this post we talked about how you can use Okteto to develop ASP.NET Core applications directly in Kubernetes, independently of your host OS. We showed you how to launch a fully configured remote development, how to iterate in your application, and how to validate the changes you make directly in Kubernetes. Finally, we showed you how you can leverage Okteto's remote mode together with VS Code's Remote Development extension to create a fully remote development environment directly in your Kubernetes cluster, debugger included!
Okteto integrates with every stack and runs in any Kubernetes instance. Let us know what you think about it on Twitter, or in the Okteto channel in the Kubernetes slack.

Latest comments (0)