
The Roblox Lua language is a fast, procedural programming language adapted from Lua. Lua was originally created in 1993 due to software trade barriers in Brazil, which prevented many from buying specialized software from outside the country. Because of this, the language was designed to be highly customizable and C-based so that programmers could make their own implementations using Lua's C API.
In this article, we’ll look at the different data types provided by Roblox Lua, and see how to create and manipulate variables.
Technical requirements
The code included in this article should be intelligible when read alongside the text; a computer is not required. However, if you want to interact with the code, and perhaps go on to experiment with Roblox game programming, then you’ll need access to a computer capable of running Roblox Studio. To utilize most of the features of Roblox Studio, you will also need a stable internet connection. More information on the system requirements of Roblox can be found here https://en.help.roblox.com/hc/en-us/articles/203312800
The code snippets featured in this article are available at https://github.com/PacktPublishing/Coding-Roblox-Games-Made-Easy/tree/main/Chapter03
Creating variables
In programming, a variable is a way for your code to hold various types of data, or data types. In most programming languages, these variables are typed, meaning that the type of variable must be declared when it is created. If you were to create a variable that holds a number, for example, you could only assign data that was a number to that variable. In Roblox Lua, variables are not typed; if you were to initialize a variable as a number, you could later set it to anything else without issue.
Important note
It should be noted that there is a new option for a typed version of Lua, though it is currently in beta, and not available to the general public.
It is important that you know what the most common data types are before you begin programming.
Data types
Integers are any whole, real numbers within a 64-bit range. This means that the value of a signed 64-bit integer can be either positive or negative but can only hold values between (-2^(63)) and ((2^(63)) - 1). The following diagram shows how the 64 bits are formatted to represent a signed integer in binary:

Figure 1 – In a signed integer, the first bit is the sign and the remaining bits represent the magnitude
Numbers can hold both whole and fractional portions of numeric values, meaning that they can hold virtually any number between (-1.8*(10308)) and (1.8*10308)). This difference in the range of possible values stems from how the data type itself is formatted in computer systems; the following diagram shows how binary formatting for numbers differs from integers. The number data type is actually named a double precision floating-point number, though it is more commonly called a double, which is a type of float. These numbers use what is known as IEEE-754, a technical standard that is used to represent floats at the binary level.

Figure 2 – Float bits are formatted differently from integers but how many are used remains the same
Booleans are a simple data type with a binary true or false value; when stored in a variable, they are more frequently called bools. It is important to note that in Lua, 1 and 0 only have numeric values and do not have any uses in Boolean logic, as sometimes seen in other languages.
Strings, as a data type, are best explained in most languages as an array of individual characters. In Lua, however, characters are not a data type. Strings are used to represent letters, numbers, and other characters to the client, but they can have different internal applications.
In Lua, tables, which are closely associated with arrays in other languages, are data types that can hold a potentially unlimited number of elements for a piece of data. Unlike arrays in other programming languages, tables act more like lists, as they are not limited to an initialized size, nor do they require one; as a result, additional table positions do not need to be preemptively reserved. Elements contained in these tables are indexed from 1 to n, with n being how many elements are in your table. It should be noted that in most other languages, the starting index value of a table is 0; this is called zero-based indexing, as distinct from Lua’s one-based indexing. Additionally, like any other variable in Lua, tables are untyped; it could be said that this has many advantages, as in other languages you would be restricted to only adding values of the same type into a single array. However, you should still keep your tables organized and not loosely throw any type of data into it.
Dictionaries are tables that utilize key-based indexing as opposed to numbered indexes. As we mentioned previously, their size is not finite and elements within them are still untyped. The greatest benefit dictionaries offer is the ability to index anything with a convenient key. For example, if you wanted all the apples in the Workspace to have one functionality and all bananas to have another, you could use the name of the fruit as a dictionary key that has an associated function; you could even use the fruit instance itself as the key since the keys are not limited just to strings. As we mentioned previously, Roblox does not make it very practical to utilize object-oriented programming (OOP), so creating a dictionary containing different data types with unique keys allows you to make what is essentially a class within Lua, which can be quite convenient for both organizational and functional purposes.
In mathematics, a vector is a quantity that contains both direction and magnitude. Vectors can be used to represent data about both position and rotation. In Roblox, vectors are a userdatum, meaning that they are a custom data type made by Roblox, not a Lua primitive (native data type) like those previously mentioned. There are two specific vector types you will commonly work with: the Vector3 and Vector2 data types. A Vector3 contains X, Y, and Z components and is used to define the position and orientation of instances such as parts. A Vector2 is typically only used when working with a UI or in any other two-dimensional scenario; it contains only X and Y components. Vectors are useful for performing various calculations, from checking the distance between two positions to calculus-level computations such as cross and dot products:

Figure 3 – A vector is capable of conveying information about both direction and magnitude
A CFrame, or coordinate frame, is another userdatum similar to a vector but having the ability to hold additional information. Like vectors, CFrames contain positional data, but they also include nine elements that make up a 3x3 matrix describing the rotation of the CFrame. Because of this, most CFrame manipulations allow for positional changes to be relative to the orientation of the coordinate frame itself.
Instances are a userdatum and represent everything you can interact with within the Explorer window of Studio. Different types of instances are called classes, and each class possesses different associated properties. To see the extent of instance classes, view the full list on the developer website: https://developer.roblox.com/en-us/api-reference/index
Important note
While you have learned about all the primitive data types Lua contains, there are many more Roblox userdata types. The full list can be found here: https://developer.roblox.com/en-us/apireference/data-types
Next, you will learn how to handle these different data types by assigning them to variables. Variables allow you to hold and manipulate data so that it can be used with any program write.
Setting and manipulating variables
Initializing and changing variables in Lua is a process that utilizes a variety of different operators to achieve a desired result. A convenient way to check the value of your variable is by using the print() function. For many programmers, print("Hello World!") is the first line of code they ever write. The print() function is a valuable tool, not only when looking for bugs, but also for observing what your code produces when it would otherwise not be visible.
Numbers
Numbers are among the most intuitive variables to set and change in Lua. If you want to initialize a variable, you should utilize the local keyword. Initializing a variable without this keyword will work, but it defines the variable for the entire script once it has been run, which is unnecessary in almost all cases and is considered poor style. After putting local, you put the name of your variable. A variable name cannot start with non-alphabetical characters and cannot contain any characters that are non-alphabetical or non-numeric, except for underscores. For example, if you wanted to have a variable that simply held the value of 99, your code would look like this:
local myNumber = 99
There are many different operators we can use to change the variable and even libraries of special functions, but for this example, we simply want the value to increment by 1 to reach a total value of 100. To accomplish this, we can set the variable to itself plus 1 by using the addition operator (+):
myNumber = myNumber + 1
You may have noticed that local does not precede the variable name here. This is because local is only put before your variable name when you're initializing it; to reference or alter a variable, you simply put the variable's name. Depending on the scenario, it may be more practical to simply set the variable to 100 directly. In this case, you would simply set the variable to the value, similar to what you did when initializing it (without the local statement, of course).
The Lua programming language supports the arithmetic operators that are standard across most languages, those being for addition (+), subtraction (-), multiplication (*), division (/), and modulo (%). For more advanced operations, Lua provides a library with the same functionality as the standard math library in the C language. This library provides trigonometric functions, value conversions, and specific values with convenience and accuracy. To utilize this library, we can use the math keyword. Here is an example of getting a more accurate value for pi by using the math library:
myNumber = math.pi
Booleans
Setting a Boolean is simple as there are only two initialization options: using the true or false keyword. An initialization statement for a Boolean value typically looks something like this:
local myBool = true
While changing the value of this variable is simply a matter of setting the bool to true or false, there is a trick for setting the bool to its opposite value in one line, rather than using a conditional. This is to use the not operator, which serves to simply return the opposite of the input following it. For example, if we wanted to change the preceding myBool variable from true to false, we could simply say:
myBool = not myBool
print(myBool) -> false
Strings
To declare a string, you should use the same variable initialization style and encapsulate your text inside double-quotes. While single quotes can be used, double quotes are more typical, unless double quotes are contained within the string itself:
local myString = "Hello"
If your string contains double quotes, Lua uses the backslash () as an escape character. This means that any character that would normally be special is treated as text within a string. For example, if someone in some game dialog is speaking from the third person, you could create double quote marks, like this:
myString = "He said \"I don't like apples!\""
This backslash operator also makes some normal text special. The two characters that are granted functionality by the backslash character are the letters n and t. When a \t is present within your string, a tab will be added in that place; as a side note, a tab is considered a single character by computer systems. When a \n is in your string, a new line is inserted at that point, for example:
myString = "Separated\tby\ttabs"
print(myString) -> "Separated by tabs"
myString = "Separated\nby\nlines"
print(myString) ->
"Separated
by
lines"
If you have multiple lines in your string, you do not necessarily need to use the \n operator. Lua, unlike some other languages, supports the use of multi-line strings. Aside from being able to simply press your Enter key to create new lines, you can more conveniently format paragraph-sized strings in your programs. To initialize a paragraph string, you must capture your text within double brackets, as shown here:
myString = [[This string
can span
multiple lines.]]
One of the most common ways string variables can be altered is by concatenating them. By following any string with .. and providing another string, the latter string will be attached at that position:
myString = "Hello"
myString = myString.. " World!"
print(myString) -> "Hello World!"
The ability to append is particularly useful when you're presenting context-dependent information to a player via a UI element. For example, if you wanted to announce who the winner of the round of a game was, you could append the name of that player to a string:
local winnerName = "WinnerWinner"
myString = "Game over! ".. winnerName.. " has won the round!"
print(myString) -> "Game over! WinnerWinner has won the round!"
Similar to how numeric data has a library for mathematical operations, there exists a library of string functions for more complex manipulations, as well as data management. This library can be accessed by using the string keyword. Some functions include the ability to change the case of all letters within a string, the ability to split strings at certain points, and even to find all strings within a string that match a certain pattern, which is useful for systems such as in-game search bars. For example, all the letters in the following string will be converted into uppercase using one of the string library's functions:
myString = "iT iS wARm tOdaY."
print(string.upper(myString)) -> "IT IS WARM TODAY."
Using strings in numeric arithmetic should be avoided when possible, but there may be situations where it would be appropriate. Whenever a string is used where a number is required, Lua will attempt to automatically convert that string into a number. For example, if you try to add the string "50" to the number 100, it will function correctly, as shown here:
print("50" + 100) -> 150
However, if the string you are attempting to perform an operation on contains non-numeric characters, the string-to-number conversion will fail. To prevent this, you can check if a string is fully numeric by using the tonumber() function. If the string that's been passed to the function cannot be converted into a number, the value that's returned will be nil; nil is a value that represents something non-existent. If we attempt to add the string "Hello" to the number 100, an error will occur:
   myString = "Hello"
   print(tonumber(myString)) -> nil
   local myNumber = 100 + myString -> "local myNumber = 100 +
   myString:3: attempt to perform arithmetic (add) on number and
   string"
Tables
Tables are straightforward but less intuitive to set and manipulate than the other data types we have covered so far, as you must make use of another library to accomplish most alterations. To create a new, empty table, you must set your variable to a set of braces, as shown here:
local myTable = {}
When initializing a new table, you do not need to have it start out empty; you can include elements within your table when it is first created. Elements in tables require a separating character, which can be either a comma (,) or semicolon (;). For example, if a player were tasked with retrieving items from a grocery list, you could initialize a table of predetermined foodstuffs in this fashion:
local myTable = {"Tofu", "Milk", "Bacon"}
Once you've created your table, you will need to be able to index items within your list. Without loops (not covered here) you can only index items individually. Remember that tables use one-based numeric indexing, so indexing items is just done with a number. All items from the grocery list could be either assigned to a variable or acquired directly, as seen in the following code:
local myTable = {"Tofu", "Milk", "Bacon"}
local firstItem = myTable[1]
print(firstItem, myTable[2], myTable[3]) -> "Tofu Milk Bacon"
To add or remove elements from a table, you can use the table library, which can be accessed using the table keyword. This library allows you to alter table structures by changing how they are sorted, what their contents are, and where existing table entries are located. To add new elements to a table, you should use the table.insert() function. The function requires a minimum of two arguments: the table being targeted and the value to be added to the table. If three arguments are provided, the first argument is the targeted table, the second is the desired table position, and the third is the value to be added. When using the function with three arguments, it is important to remember that all the elements following or at the desired position are shifted to the right. There are no restrictions on the provided index, meaning that the index can be negative or can be an element that hasn't been reached yet by the length of the table (though you should avoid doing this). Here is an example of adding an element to the beginning of a table and an element without a position specified, which by default will go to the end of the table:
local items = {"Elephant", "Towel", "Turtle"}
table.insert(items, 1, "Rock")
table.insert(items, "Cat")
-> items = {"Rock", "Elephant", "Towel", "Turtle", "Cat"}
Without loops, you cannot remove all the elements of a specified value or those that meet some criteria with complete certainty. In this case, you will need to know the index of the value you want removed from the table. For example, if the list is only supposed to contain living things, we would want to remove the Rock and Towel items. We can do this by using the table.remove() function. It is important to note that removing an element from a table will shift all the elements that follow it to the left. So, if the rock was removed from the table first, the indexes of all the other items in the table would be one less than they were before. This can be seen in the following code:
items = {"Rock", "Elephant", "Towel", "Turtle", "Cat"}
table.remove(items, 1)
-> items = {"Elephant", "Towel", "Turtle", "Cat"}
table.remove(items, 2)
-> items = {"Elephant", "Turtle", "Cat"}
To confirm that the correct number of elements are within your table at any given time, you can preface a table or table variable with the # operator to return the number of elements within it. Additionally, you can use the table.getn() function to return the same result, though this is a little bit longer to write. You can prove these techniques return the same result by making the following comparison:
print(#items == table.getn(items)) -> true
Dictionaries
As mentioned previously, dictionaries are tables that use custom, key-based indexing as opposed to sorted numeric indexes. Conceptually, you can think of entering values into a dictionary as declaring a variable, except that the local keyword is not applicable here. While elements in a dictionary can be laid out like a table, it is more common for the elements to be situated like a struct, with each entry having its own line; the separating character for elements can be either a semi-colon or a comma. If you had a restaurant's menu within your game, you could arrange the items within a dictionary, with the key being the name of the meal's course and the value being the name of the dish:
local menu = {
    appetizer = "House salad";
    entree = "Ham sandwich";
    dessert = "Ice cream";
}
Indexing these declared elements is quite intuitive as you simply follow the path to the desired value. In this case, let's say you wanted to capture what dish was being served as the entrée on the menu with a new variable:
local meal = menu.entree
print(meal) -> "Ham sandwich"
Setting elements is equally straightforward: by following the path, you can set or alter the element based on its data type like any other variable:
menu.entree = "Turkey sandwich"
One of the advantages of using these keys in Lua is that they are not restricted just to string indexes. By using brackets ([ ]), you can use any data type as an index of your value. This is particularly useful if you want one data type to have a direct association with another at a given value. For example, if you wanted to set a list of threshold prices that correlated with a descriptive string, you could use a number as an index. Bear in mind that in order to index non-string keys, you must also use brackets:
local prices = {
    [0] = "Free";
    [5] = "Cheap";
    [20] = "Average";
    [50] = "Expensive";
}
print(prices[0]) -> "Free"
What may be less obvious is the ability to use userdata values as keys. We could associate the origin of our Workspace with a string, number, or another position; you are not restricted in any regard.
Something to note is that a table can be the value of another table; whenever something exists within another entity of the same type, we call this nesting. You can create tree-like structures by nesting tables within each other, fetching them with the same key-based style. Nesting tables is somewhat of a common practice for organizational and functional purposes. For instance, if you wanted to list some basic stats of non-playable characters (NPCs) in your game, it may make sense to include those stats in a table under one collective NPC table so that the information can be indexed by the name of the NPC:
local units = {
    ["Heavy Soldier"] = {
        WalkSpeed = 16;
        Damage = 25;
    };

      Scout = {
          WalkSpeed = 25;
          Damage = 15;
      };
}
Now let’s look at vectors, knowledge of which will allow you to better understand 3D environments.
Vectors
Vectors are values that represent both direction and magnitude. In Roblox programming, vectors are used to represent positions in three- and two-dimensional environments, define the orientations of different instances, show the direction of CFrames, and calculate additional information about objects in relation to each other.
Declaring a vector is much like creating many other Roblox userdata types. After stating the name of the userdata, you choose the constructing function. In most cases, when you're working with vectors, you will use the new option. For this example, we will be using a Vector3, though a Vector2 follows the same format but with only two components:
local myVector = Vector3.new(0,0,0)
Changing vector values is a little different than changing the other data types we have covered. This is because arithmetic is done across all components with changing behaviors, depending on what is being used in the operation. To demonstrate this, arithmetic between two vectors is done by component, meaning that adding two vectors will combine the values of each component. You can conceptualize this as the vectors being physically overlaid and adding each column together:
myVector = Vector3.new(1,3,5) + Vector3.new(2,4,6)
-> Vector3.new(3,7,11)
However, the behavior of vector arithmetic changes when scalar values are present. A scalar is any value that conveys magnitude but not direction. For example, vectors can be both multiplied and divided by scalars, but you cannot perform addition or subtraction with these mismatched data types. The only exception to this is when a scalar is divided by a vector, in which case division is done by component, with the scalar acting as the numerator of each element:
myVector = Vector3.new(2,4,6) * 2 -> Vector3.new(4,8,12)
myVector = Vector3.new(2,4,6) / 2 -> Vector3.new(1,2,3)
myVector = 2 / Vector3.new(2,4,6) -> Vector3.new(1,0.5,0.333)
Aside from changing vectors as a whole, you can capture individual values from a vector. Here, we are setting three local variables at once. Typically, this format is reserved for what is called a tuple; a tuple is essentially when a function returns multiple values that are not grouped together in a structure such as a table and, consequently, more than one variable must be assigned to one statement. By indexing the X, Y, and Z fields of the vector, we can capture number values, which can be used in various computations:
local x,y,z = myVector.X, myVector.Y, myVector.Z
One of the most common calculations that's done with vectors is finding the distance between two positions. While you could use the distance formula using the math library, there is a more direct way to do this. As we mentioned previously, all vectors have magnitude; this magnitude can also be manually calculated. However, Roblox includes a magnitude property for all vectors that can be captured, as shown here:
local magnitude = myVector.Magnitude
To calculate the distance between two positional vectors, the vectors must be subtracted from each other; then, the resulting magnitude of the new vector will be the distance between them:
local vector1 = Vector3.new(1,5,7)
local vector2 = Vector3.new(2,4,6)
local distance = (vector1 - vector2).Magnitude
print(distance) -> 1.73205
Another data type used in 3D environments is the CFrame. We will discuss them in the next section.
CFrames
The userdata CFrame is similar to a vector but has a wider range of uses and behaviors because of the additional information it carries. Declaring a CFrame variable with only positional data is the same as what you'd do with a vector; you can use the new constructor and must provide X, Y, and Z coordinates, as shown here:
local myCFrame = CFrame.new(0,0,0) --CFrame.new() also works
--for creating blank CFrame identities.
What makes a CFrame distinct from a vector is its matrix of rotational information, which describes its orientation via directional vectors. While you will likely not deal with these matrix components individually, changing the orientation of CFrames is something you will be doing constantly. A typical way to set the orientation of a CFrame is to use the LookAt portion of the CFrame.new() constructor. By providing an origin and target, a new CFrame will be created at the provided position, with LookVector (the front of part being manipulated) directed toward the specified LookAt position. The greatest advantage of this is for making a part look at a different position for ease of movement relative to its forward-facing direction. To test this, add two parts to our Workspace, named Part1 and Part2. Position Part1 wherever you would like and place Part2 where you want the first part to look. Once you've done this, execute the following code to see how the front face of Part1 now points directly at Part2:
local Part1 = workspace.Part1
local Part2 = workspace.Part2
Part1.CFrame = CFrame.new(Part1.Position, Part2.Position)
As we mentioned previously, one of the benefits of manipulating CFrame rotation is for relative movement. If you've already played around with the position property of our parts, you may have noticed that the position is global and there is not really a way for a part to move in the direction it is facing. This global view is called the world space. By using CFrame arithmetic, you can move parts in relation to their orientation, which is important for systems such as projectiles, doors, and even vehicles; this relative view is called the object space. Here is a simple application where you could move a part forward in the direction it is facing by one stud:
myCFrame = myCFrame * CFrame.new(0,0,-1)
Note that multiplying two CFrame values does not actually multiply the components, and the operation that's occurring is conceptually more like addition. When the preceding code is implemented inside a loop, particularly a fast running one, you can simulate movement. This is a technique that's often used for projectile systems, as it saves many resources. This is because the moving part is anchored, so physics calculations do not need to be made. This directional movement is used for almost any moving part and in most cases should be used instead of the Position property.
While it may not be intuitive, you must be aware of which axes control the rotational behavior you seek in a three-dimensional environment. As shown in the following image, the X, Y, and Z axes may control different directions of rotation than you may have expected:
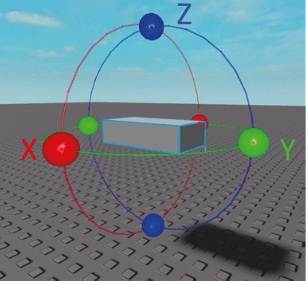
Figure 4 – Looking at the front of this part, you can see which axes cause what rotational behavior
You may be wondering why the handles for the Y axis are horizontal and the handles for the X axis are vertical. The reason is that the axes of rotation are defined by the object moving around the axis. Due to this, they will not stand in the same orientation that the axes lay on a graph. So, in the case of an object being rotated around the Y axis, you would need horizontal handles:
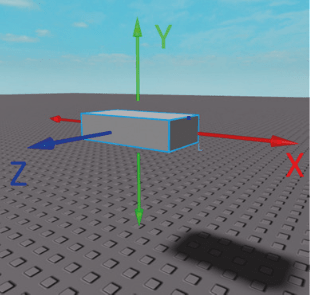
Figure 5 – Here, you can see that the handles correspond to the object rotating around the axes
By using the CFrame.Angles() constructor, you can directly manipulate the orientation of a CFrame. Remember that parts use degrees for their Orientation property, but CFrames use radians when working with their rotational matrix. While keeping the same behavior of other CFrame arithmetic cases, multiplying a CFrame by CFrame.Angles() effectively adds to each orientation component. Let's follow an example where we want a CFrame to fully turn around by 180 degrees. To achieve this, we will need to rotate around the Y axis and use radians, as shown here:
myCFrame = CFrame.new() --No rotation
myCFrame = myCFrame * CFrame.Angles(0,math.pi,0) --you can also
use math.rad(180) for math.pi
CFrames have many built-in functions but do not use a library like the Lua primitive types we have already covered. There are many functions and constructors – even some redundant ones – that all have their own uses for accomplishing complex operations for use in a variety of world-based computations. While these functions are abundant, you will not likely use many of them unless you're making some very math-intensive systems. However, say you wanted to obtain the orientation of the CFrame we just set. As stated previously, CFrames use a matrix of directional vectors to describe their rotation; you are unable to just index this value like a part's orientation. Isolating this orientation for use with parts or calculations is not immediately apparent and requires the use of a special function. To extract this information, we must use the ToEulerAnglesYXZ() function. This function will return three numbers as a tuple in the normal X, Y, Z order. These values represent a close approximation of the rotation of the CFrame in radians. Using the CFrame value from the previous example, we can capture all three components of the orientation within a Vector3 without assigning the values to variables:
local orientation = Vector3.new(myCFrame:ToEulerAnglesYXZ())
-> Vector3.new(-0,3.1415925,0)
With this new value, there are several types of application you may want to perform. This orientation can now be applied to a part in our Workspace; this can be done by multiplying the vector by a conversion value in order to obtain the orientation in degrees:
part.Orientation = orientation * (360 / (2 * math.pi))
If you are interested in exploring more information about other CFrame functions and constructors, you can view all of them by visiting the API reference for the topic on the developer website: https://developer.roblox.com/en-us/api-reference/datatype/CFrame
Instances
Instances are a userdatum and consequently are also created by using the new constructor. There are hundreds of different instances, though only some can be created from scripts, due to security permissions. For now, let's simply make a new part in our Workspace and color it a bright cyan. To do this, we can use Instance.new() and provide a string of the class name as its argument:
local part = Instance.new("Part")
part.BrickColor = BrickColor.new("Cyan")
part.Parent = workspace
Summary
In this article, you’ve learned about the different data types defined in Roblox Lua, and have seen how to create and manipulate variables. These are foundational topics, and a natural next step would be to learn about the language’s other main programming constructs. With that knowledge, you will be in a good position to begin your Roblox game development journey.
Get started with your first Roblox Lua game development project with Zander Brumbaugh's Coding Roblox Games Made Easy. With Zander's expert guidance, this book will walk you through the basics of Roblox game development and help you develop two complete games in no time.

Latest comments (0)