As I continue to build my blog, I want to add some analytics to get an idea of my viewers and what they are interested in reading. Using FaunaDB and Netlify Functions, we are going to build a basic API that will allow us to track the page hits.
TL;DR
You can use Netlify Functions to talk to a database such as FaunaDB. In the below example, we use tracking page hits as a use-case to save into the database. You can found the source code to the Netlify Function here.
The Setup
Front End
We want to keep it as minimal as possible. We can achieve this without using JavaScript by implementing a "Tracking Pixel" which is a <img/> that will be placed on each page. This approach allows us to talk one-way to the server without expecting any data in return. This image src will request our Netlify function which will respond with an transparent image. The Netlify Function will store the page hits into the database and then respond to the client with the transparent pixel.
Back End
This blog doesn't sit on a server (woohoo!). It's a static website built on Eleventy and served from Netlify. Our solution will involve using Netlify Functions which are serverless functions that you can deploy alongside your static website. Behind the scenes, Netlify Functions run on AWS Lambda and the beautiful thing about this is that you don't need to worry about using AWS. Lambda functions are fully managed and auto-scale. AWS and Netlify will take care of setting everything up for you, all we need to do is write the API function and deploy it.
Database
We going to use FaunaDB, a serverless database that is easy to use, can be set up in a couple minutes and works well with serverless functions. This is where we are going to store the page URLs and their page hits.
Everything together should look like this:

Putting it together
FaunaDB
Sign up for an account. The Free account is enough for this tutorial.
Create a new Database and name it after your project.

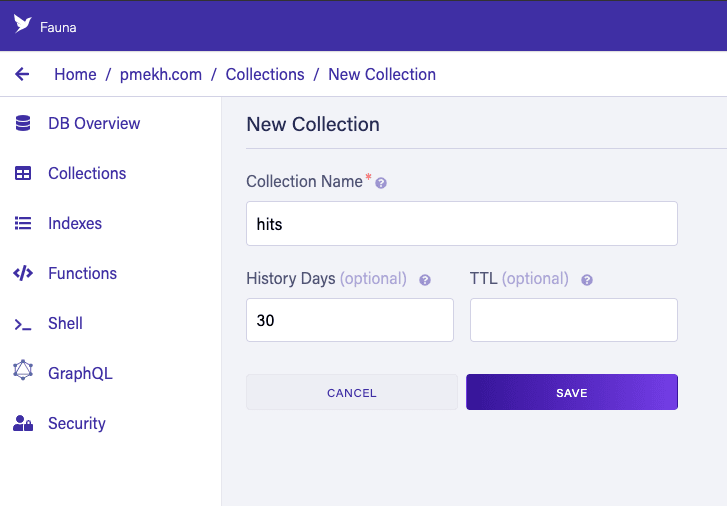
Create a new collection
hits. We will use this to store the page hits.
We now need to create a new Index. In FaunaDB, you use the index to query your documents. (a) Set the
Source Collectiontohits(b) SetIndex Nametohits_by_pathname(c) SetTermstodata.pathname.

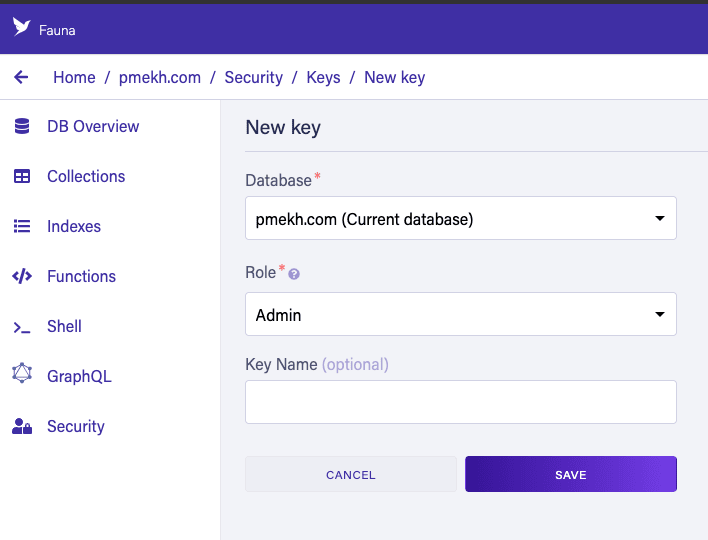
Generate an API key under
Security. We will use this to query our database from within our serverless function.
Netlify Function
We need to write an API that will:
- Query the database for the current page hit for the requested page.
- Increase this count and store it back into the database.
- Respond to the client with a transparent image.
We are going to use the faunadb package. We will need this as dependency to the serverless function (it won't be used on the client side).
npm install faunadb
Create a file ./netlify/functions/tracker.js. Below is the code we will use. I've added comments to walk through what the function does:
const faunadb = require('faunadb');

exports.handler = async (event) => {
  const { headers } = event;
  const q = faunadb.query;

  // Connect to our database.
  const client = new faunadb.Client({
    // This is the Fauna API Key we created.
    // It's stored in Netlify Environment Variables.
    secret: process.env.FAUNA_SECRET_KEY
  });

  // We will use the referer to know which page we want to track.
  const referer = headers.referer;
  const { pathname } = new URL(referer);

  try {
    await client.query(
      // Bind variables to be in the expression (second parameter)
      q.Let(
        {
          // Match the document by the pathname index
          match: q.Match(q.Index('hits_by_pathname'), pathname)
        },
        // Conditionally evaluate expressions
        q.If(
          // IF the document exists
          q.Exists(q.Var('match')),
          // THEN update the document with an updated page hit.
          q.Update(q.Select('ref', q.Get(q.Var('match'))), {
            data: {
              hits: q.Add(
                // Increment the previous hits by 1
                q.Select(['data', 'hits'], q.Get(q.Var('match'))),
                1
              )
            }
          }),
          // ELSE create the document and set the page hit to 1
          q.Create(q.Collection('hits'), {
            data: { pathname, hits: 1 }
          })
        )
      )
    );
  } catch (error) {
    console.error(error);
  }

  // We respond with a transparent image
  return {
    statusCode: 200,
    body: 'R0lGODlhAQABAJAAAP8AAAAAACH5BAUQAAAALAAAAAABAAEAAAICBAEAOw==',
    headers: { 'content-type': 'image/gif' },
    isBase64Encoded: true
  };
};
The Fauna Query Language provides a collection of built-in functions that we used in this function. We started with Let that allowed us to create the variable match. The expression used an If which takes 3 parameters ( cond_expr, true_expr, false_expr ). For the condition, we want to check if the document exists using Exists. If it exists, we referenced it using Select and Update. We used Add to add 1 to the previous count. If the document did not exist, we created it with Create.
Build Environment Variables
We need to add the FaunaDB API Key into Netlify's Environment Variables. It's referenced in the above code using process.env.FAUNA_SECRET_KEY.

Insert the image
Place the <img/> on your template. Here is how I did it for my template:
{% if env.environment == "production" %}
<img src="/.netlify/functions/tracker" alt="" />
{% endif %}
Testing
Testing is a large topic on it's own. Read up on Netlify Dev to get started on the Netlify CLI which will let you test your serverless function locally. I recommend you to test your functions before commiting and deploying.
Wrapping it up
Serverless has a large collection of use-cases other than connecting to a database - such as sending out emails and processing payments. With Netlify Functions we didn't need to worry about setting up any cloud infrastructure or configurations, Netlify took care of that for us. FaunaDB being serverless, it also worked very well with our use-case. Both Netlify Functions and FaunaDB have usage-based pricing models, so you only pay for what you consume. Give both a try - you can go one step further and build yourself a portal that queries your new database and graph out your page hits.

Oldest comments (0)