
If you are new to Github or the open-source community, you will likely be unfamiliar with most of the terms mentioned in the title of this article. Such phrases appeared highly intimidating to me when navigating through making my first contributions to open source projects. However, let me assure you that it is not as daunting as it appears. In this article, I will be breaking down configuring Node CI through Github Actions and giving some tips on how to go about navigating GitHub issues that seem complicated at first.
Let’s start by understanding the meanings of the key terms.
🔗 What is Continuous Integration (CI)?
In most large projects, primarily open source, several developers and contributors are working on building different features and resolving separate issues simultaneously. Even though the individual codes may be working fine separately, they can often introduce conflicts when put together in the project and cause the combined code to break. To avoid such situations, the practice of Continuous Integration (CI) came into being where developers integrate code into a shared repository frequently, preferably several times a day. An automated build and automated tests can then verify each integration.
“Continuous Integration doesn’t get rid of bugs, but it does make them dramatically easier to find and remove.” - Martin Fowler, Chief Scientist, ThoughtWorks
One of the key benefits of regularly integrating code is that they allow you to detect errors quickly and locate them more easily. As each change introduced is typically small, pinpointing the specific change that introduced a defect can be done promptly.
📑 What are GitHub Actions?
When a contributor makes a pull request, there are several organizational tasks that the maintainers of the repository need to perform. These include reviewing the pull request, running some tests, checking if the changes are consistent with the code style of the repo, etc. This is an example of a software development workflow.
Workflows are made up of one or more jobs and can be scheduled or triggered by an event, in this case, making the pull request.
As a project grows bigger and accumulates more contributors, issues, and pull requests, it requires more organizational effort to maintain it. Therefore, the maintainers naturally want to automate most of these tasks, which is possible through GitHub Actions.
GitHub Actions helps you define a set of actions that will be executed automatically in response to events occurring in or to your repository.
💻 Getting started with GitHub Actions
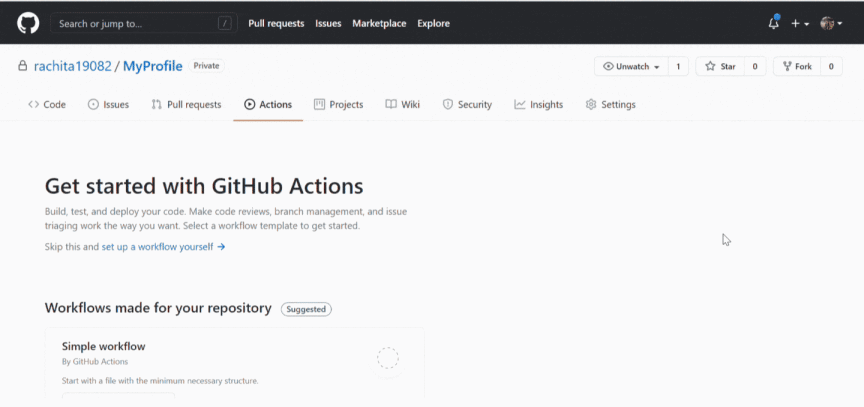
Every GitHub repository has an Actions tab which is indicated below.

Once you navigate to the Actions tab, you will see several workflow templates. Typically, there are four categories which are shown below. You can select the suggested workflow or scroll down to Continuous Integration workflows to pick one based on the tech stack used in the project.
Once you find a suitable template, click on Set up this workflow.
👩💻 Setting up the workflow
On selecting a template, a .yml file will be created in the /.github/workflows directory of your code repository. Every GitHub action requires a .yml (YAML Ain’t Markup Language) file. YAML is a human-readable data serialization language commonly used for configuration files and applications where data is stored or transmitted.
Now you can customize the workflow according to your requirements.
Let’s take the example of a Node project where we want to automate the execution of the following steps every time a pull request is made:
- Install node dependencies
- Run linter to analyze the code for potential errors
- Ensure that changes are consistent with the code style of the repo
Our .yml file should look something like this.
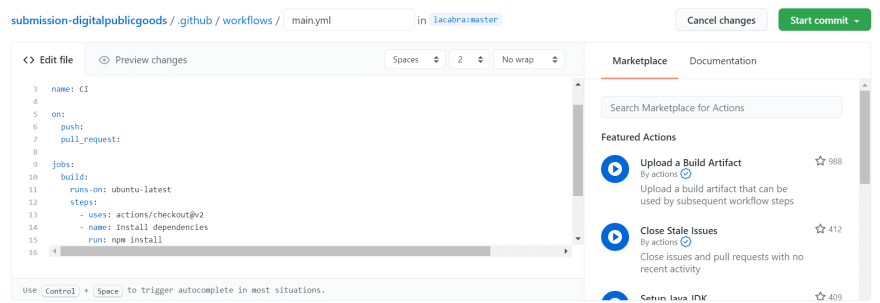
Let’s try to understand the contents of this file step by step.
name: Node CI

on:
   push:
   pull_request:

jobs:
   build:
     runs-on: ubuntu-latest
     steps:
       - uses: actions/checkout@v2
       - name: Install dependencies
         run: npm install
       - name: Linter
         run: npm run lint
       - name: Prettier Format
         run: npm run format
name [optional] - used to describe what the workflow is doing
on - lists the events which trigger the workflow. In this case, the actions are triggered when someone pushes code directly to the repository or when a pull request is made. Here is a list of all events which can trigger workflows.
-
jobs - this section is used to define the actions that will be executed in response to the aforementioned events.
- There can be multiple sequences of tasks nested under jobs. Each sequence is defined by a name, in this case, it is "build". This name can be arbitrary, just like the name of the workflow.
- runs-on - specifies which VM the job should run on. We run this one on Ubuntu but you can also choose Windows or Mac-OS.
- steps - defines a sequence of instructions that build and test our code
- uses: actions/checkout@v2 - This line brings our source code into the virtual machine using an officially maintained action called checkout. This lets you run commands on the code similar to how you test code from the command line when working on the directory in your local machine.
- The uses keyword allows you to use any predefined set of actions
- Each step requires a name and the run keyword to define the command to be executed at that step
- In this case, we have defined three steps to install dependencies, run linter and enforce the code style. You can customize the steps to automate the commands to test your code, just assign a name and type the command.
You’re done! Now every time you push to the project, the commands will fire off automatically.
✅ Testing the workflow
Go ahead and make a pull request on the repository to test how GitHub Actions work. You will see something like this, which indicates whether the newly pushed code passes all the checks.

If the checks fail, you can click the Details button. You will be able to see what exactly went wrong and at which point, as shown below.
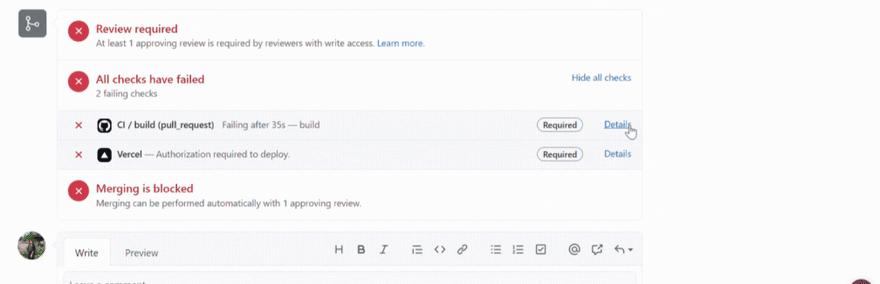
Now you can quickly fix the problem and push the updated code. The green tick mark indicates that your code passes the tests set in the CI.

📝 Conclusion
I hope that the topic of this article does not seem too intimidating anymore. You may come across issues way more complex than this, but the strategy is simple. If you don’t understand what a particular issue requires you to do, research each term and understand its meaning. Once you know what is needed a little better but don’t know how to resolve it, try finding blogs, videos, or tutorials related to the task. If something is still unclear, do not hesitate to ask the community for help by dropping a comment. More often than not, someone is sure to revert to your query.
I hope this blog helped you in some way. If you have any other questions, feel free to drop a comment below.
Best of luck and happy coding! 😃

Latest comments (4)
Hi, there's an issue with your indentation. Make sure the on section and jobs section are at the same non-indent level as name.
Also I like to use a more descriptive name field than "CI", like "Node CI" would work for you.
Thank you so much for pointing out the indentation, I missed it somehow. I really appreciate your insights. 😃
Hey! This was pretty informative
Thanks! Glad you liked it. :D