Non-fungible tokens (NFTs) have been a source of much news and speculation over the past few years. Their most widely known use case has been the sale of digital art assets, commonly used as profile pictures. The most famous examples are CryptoPunks and Bored Apes.
While many NFTs are collections of pre-generated artwork, some incorporate a dynamic generative aspect, in which the art is created on the fly as individual tokens are minted. This is very feasible for profile picture NFTs, which often consist of a single base image in a variety of colors and with different features and accessories. In some cases, such as CryptoKitties, new child tokens can be created by "breeding" existing tokens, giving the child token characteristics of both parents.
In this two-part tutorial, we'll create a simple generative art NFT, ReplBots. The first part of the tutorial will focus on the NFT's Ethereum smart contract, and the second part will focus on building the web frontend, or dApp. In this tutorial, you'll:
- Learn how to create a generative art NFT on the Ethereum blockchain.
- Learn important smart contract development concepts, such as randomness.
- Learn how to interact with the blockchain from frontend JavaScript code.
Getting started
We need two things to get started with this project: a Solidity repl and a browser wallet.
Solidity repl
Sign in to Replit or create an account if you haven't already. Once logged in, create a Solidity starter repl.
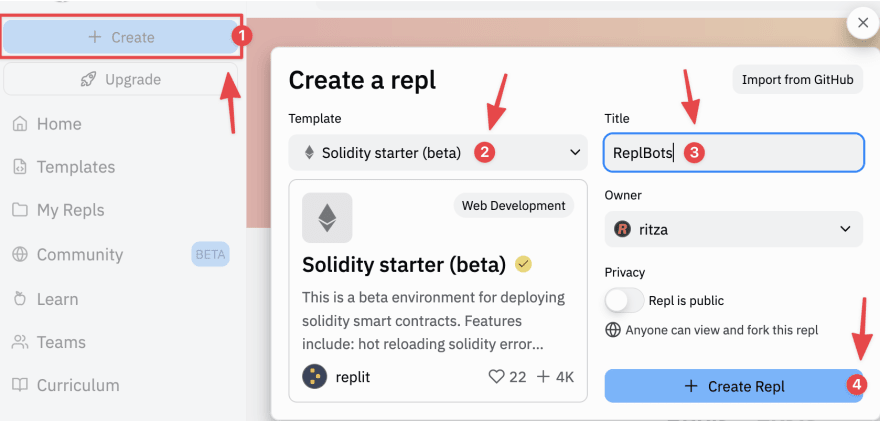
The Solidity starter repl works a little differently from other repls you may have used in the past. Rather than running our repl every time we want to test out a new piece of code, we can run our repl once, to start it up, and it will automatically reload when changes are made to our Solidity code in contract.sol.
The Solidity starter repl comes with a friendly web interface, built using the web3 Ethereum JavaScript API, which we will use to deploy and interact with our contracts. We will deploy to Replit Testnet, a custom version of the Ethereum blockchain managed by Replit and optimised for testing.
Browser wallet
We will need a browser-based web3 wallet to interact with the Replit Testnet and our deployed contracts. MetaMask is a popular and feature-rich wallet implemented as a WebExtension. You can install it from MetaMask's download page. Make sure you're using a supported browser – either Chrome, Firefox, Brave, or Edge.
Once you've installed MetaMask, follow the prompts to create a wallet and sign in. MetaMask will give you a 12-word secret recovery phrase – this is your wallet's private key, and must be kept safe and secret. If you lose this phrase, you will not be able to access your wallet. If someone else finds it, they will.
If you're already using MetaMask, we recommend creating a new account for testing with Replit. You can do this from the account menu, which appears when you click on the account avatar in the top right corner of the MetaMask interface.

Introduction to smart contract development
Feel free to skip this section if you've written Solidity contracts before or completed our escrow tutorial.
Now that we've got our repl and wallet set up, we can start developing. We will be writing contracts, which are the basic building blocks of Ethereum programs. An individual contract can have state variables and functions and can inherit from multiple other contracts. Contracts in Solidity are equivalent to classes in a language like Python or Java.
Contracts on Ethereum and Ethereum-based networks (such as the Replit Testnet and Binance Chain) are compiled to bytecode which runs on the Ethereum Virtual Machine (EVM). This is similar to how Java code compiles to bytecode for the JVM.
A list of opcodes for EVM is provided here. Many of the opcodes dealing with arithmetic and logical operations should be familiar if you've worked with any kind of assembly before. The EVM also has opcodes for blockchain-specific operations, such as getting information about the current block or chain.
An additional consideration, unique to blockchain development, is that each opcode has an associated price (listed here). Users of smart contracts pay a fee (known as gas) to invoke state-changing functions. This fee is determined by the opcodes used, and so it is in the interest of developers to keep their code as simple as possible.
Solidity, which we will be using below, is the most popular language for developing smart contracts on Ethereum. Alternatives such as Vyper exist but are not as widely used.
NFT design
Our ReplBot NFT will consist of a base robot and three accessories. The base robot looks like this:

Each NFT will have three different colors for its frame, visor, and background. Each NFT will also have three different accessories: headgear (a hat or wig), eargear (animal ears or headphones), and facegear (glasses or masks). Some examples:
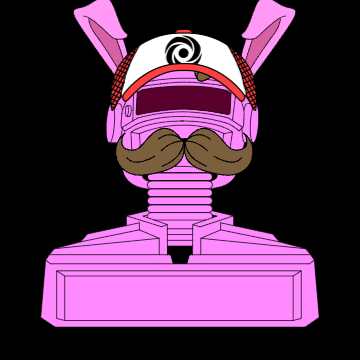

Which colors and accessories each NFT has will be randomly determined at creation time.
Contract code scaffold
Let's start on our NFT contract code. Open contract.sol, delete the file's contents, and add the following skeleton:
// // SPDX-License-Identifier: MIT
pragma solidity ^0.8.8;

import "@openzeppelin/contracts/token/ERC721/extensions/ERC721Enumerable.sol";
import "@openzeppelin/contracts/utils/Strings.sol";

contract ReplBots is ERC721Enumerable {

    uint256 public tokenCounter;

    constructor() ERC721("ReplBots", "RBNFT") {
    }

    function mint(address recipient) public returns (uint256) {
        uint tokenId = tokenCounter;
        tokenCounter++;

        _safeMint(recipient, tokenId);
        return tokenId;
    }
}
The first line of our contract is the license identifier. Smart contracts are usually open-source, and reuse of other projects' code is common in DeFi, so it's a good idea to include a license that indicates how you would like others to use (or not use) your code. Supported licenses are listed here.
In the next line, we define the version of Solidity we're using (in this case, any version newer than 0.8.13 up to 0.9.0). Solidity is an evolving language and often introduces breaking changes, so our code may not compile under older or newer versions of the language.
Following the pragma statement, we import some contracts from the OpenZeppelin contract library. This library includes inheritable base contracts for a wide variety of common smart contract development needs, including base implementations of Ethereum token standards.
The Ethereum token standard for NFTs is ERC-721. Rather than implementing all of the functionality in this specification ourselves, we can import and use OpenZeppelin's version. Note that while OpenZeppelin has a base ERC721 contract, we will use the ERC721Enumerable extension/child contract, which, in addition to all the standard ERC-721 functionality, will allow us to list which NFTs belong to which owners. This functionality is vital for our front end.
We also use OpenZeppelin's Strings library, which provides some useful functions for working with strings.
Our contract definition indicates that we will inherit from ERC721Enumerable:
contract ReplBots is ERC721Enumerable {
In the contract body, we define a tokenCounter state variable. This will provide us with unique, incrementing IDs for tokens as they are minted. Solidity automatically initializes all variables to 0, so we don't need to do so explicitly.
Note the use of uint256 as the type for these values: Because most of the values we deal with in Solidity programs are monetary, we use unsigned integers to avoid storing negative numbers. In versions of Solidity before 0.8.0, this sometimes led to dangerous overflows, but overflow protection is now built into the language.
Next, we have the constructor() method, which calls a parent constructor to define our NFT's name and symbol/stock ticker.
    constructor() ERC721("ReplBots", "RBNFT") {
    }
We then define a mint function, so that we can create NFTs.
    function mint(address recipient) public returns (uint256) {
        uint tokenId = tokenCounter;
        tokenCounter++;

        _safeMint(recipient, tokenId);
        return tokenId;
    }
For now, all this does is increment tokenCounter, create a new token using ERC721._safeMint, and return the numeric ID of the minted NFT. Using _safeMint instead of _mint will prevent us from minting tokens to a recipient that does not have an implemented method for receiving them. This will prevent our tokens from getting stuck in contract addresses and becoming unusable.
The mint() function is a public function, which means it can be called by both external users and by other functions in this contract, or any contracts that inherit from it. Solidity provides granular function and variable visibility options, which are explained here.
NFT data structures
Let's fill out our code skeleton, starting with the data structures we'll need to store information about each NFT we mint. As per our design, each NFT will have three accessories and three colors. We can represent the accessories as strings and the colors as RGB values.
We'll start by defining a string array for each type of accessory. Add the following code above the constructor definition:
    string[] private headgear = [
        "Cowboy Hat",
        "Fro",
        "Baseball Cap",
        "Viking Helmet"
    ];

    string[] private eargear = [
        "Bunny Ears",
        "Headphones"
    ];

    string[] private facegear = [
        "Sunglasses",
        "Moustache",
        "Nose",
        "DOOM Mask"
    ];
Feel free to draw and add other accessories to these lists.
Next, we'll create a struct for defining colors. Add this code below your array definitions:
    struct Color {
        uint8 red;
        uint8 green;
        uint8 blue;
    }
Each color will have a red, green, and blue component, represented as an 8-bit unsigned integer. Most unsigned integers we work with in contracts are 256-bit, to the point that Solidity provides the alias uint for uint256. However, it is good practice to use smaller values where possible, due to gas costs – this is known as tight variable packing. An 8-bit unsigned integer can contain a value from 0 to 255, which is precisely the range we need for storing standard RGB values.
Next, we'll create a struct for the ReplBot itself, consisting of our three colors and three accessories. Add this code below the previous struct definition:
    struct ReplBot {
        Color frame;
        Color visor;
        Color background;
        uint8 head;
        uint8 ears;
        uint8 face;
    }
To save space, we'll store our accessory values as indexes in the arrays we defined above. uint8 allows us to define a maximum of 255 accessories per type, which is more than enough.
Finally, we'll define a mapping type that will allow us to associate numeric token IDs with ReplBot structs. Add this line below your last struct definition:
mapping (uint => ReplBot) private replbots;
Minting NFTs
Now that we have our data structures in place, we can return to our mint function and expand it. Replace your mint() function's body with the following code:
    function mint(address recipient) public returns (uint256) {
        // Get ID and increment counter
        uint tokenId = tokenCounter;
        tokenCounter++;

        // Determine colors
        Color memory frameCol = Color(
            uint8(_random(tokenId, "QWERT") % 255),
            uint8(_random(tokenId, "YUIOP") % 255),
            uint8(_random(tokenId, "ASDFG") % 255));

        Color memory visorCol = Color(
            uint8(_random(tokenId, "HJKL;") % 255),
            uint8(_random(tokenId, "ZXCVB") % 255),
            uint8(_random(tokenId, "BNM,.") % 255));

        Color memory backgroundCol = Color(
            uint8(_random(tokenId, "12345") % 255),
            uint8(_random(tokenId, "67890") % 255),
            uint8(_random(tokenId, "[]{}'") % 255));

        // Determine accessories
        uint8 headIdx = uint8(_random(tokenId, "qwert") % headgear.length);
        uint8 earIdx = uint8(_random(tokenId, "yuiop") % eargear.length);
        uint8 faceIdx = uint8(_random(tokenId, "asdfg") % facegear.length);

        // Create bot
        replbots[tokenId] = ReplBot(frameCol, visorCol, backgroundCol, headIdx, earIdx, faceIdx);

        // Mint token
        _safeMint(recipient, tokenId);
        return tokenId;
    }
The bulk of this code consists of retrieving random numbers and using the modulo operator to convert them into a number in the range we need – for colors, this will be a number between 0 and 255, and for accessories, this will be a valid index in the relevant accessory array.
When we define our Color structs, we specify the data location memory. The data location must be specified for all complex data types: arrays, structs, and strings. For variables that are local to a function, memory is usually correct.
Once that's done, we create the ReplBot struct, assign it to our token ID through the mapping, and then mint the token.
However, if you try to compile this code, you'll notice that _random() is not defined. Unlike many traditional languages, Solidity has no native way of generating pseudorandom numbers. So we'll need to define one ourselves.
Randomness in Ethereum contracts is a difficult thing to get right, and one that can be dangerous if done wrong, depending on what it's used for. If you've delved into randomness in other languages, you'll know that the random numbers we use in programming are usually only pseudorandom, originating from a predetermined seed, or based on the time of execution. This is okay when we're generating a Minecraft world, but presents problems for, say, a blockchain-based lottery. Because Ethereum is a transparent and distributed network, we have no way to hide a seed, and values like the current time can be manipulated by miners looking to profit.
The only foolproof way to generate random numbers at the moment is to use a trusted external source of randomness, such as Chainlink's VRF oracle (an oracle is a data feed built for use by smart contracts). However, as we're building on the Replit Testnet, we won't have access to such an oracle, so we'll need to settle for the best pseudorandomness we can get. If we were building a lottery contract, this would be a problem, but for this project, manipulation can only get you a slightly different-looking ReplBot.
Our _random() function should be inserted below the mint() function. It looks like this:
    function _random(uint tokenId, string memory input) internal view returns (uint256) {
        bytes32 blckhash = blockhash(block.number - 1);
        return uint256(keccak256(abi.encodePacked(block.difficulty, blckhash, tokenId, abi.encodePacked(input))));
    }
This is a view function because it does not change state. In the first line, we're getting the blockhash of the last block to be mined. In the second line, we use abi.encodePacked() to concatenate the following:
- The blockhash we previously retrieved.
- The difficulty of the current block.
- The ID of the token we're minting.
- The
inputstring we passed in when calling_random().
All but the last of these values will be the same for every invocation of _random() in an individual mint() call. This is why we've specified different strings for each one.
We then hash our big chunk of data using keccak256(). A good hash function will return very different outputs given similar inputs, so this ensures that every call to _random() will return a sufficiently distinct result, even when most of the inputs are the same.
Finally, we convert this hash into an unsigned integer, to be returned as our final "random" number.
Viewing token data
Now that we can generate tokens with interesting-looking ReplBots, we need a way of retrieving information about them, so that we'll be able to display them on the web3 frontend we'll build in Part 2 of this tutorial. To this end, we'll write two functions: botAccessories and botColors. These will be externally callable view functions that will take the token ID and return three strings, detailing accessories and colors, respectively. As external calls to view functions are free, we don't have to worry too much about gas costs in these functions.
Enter the following code between the definitions of mint() and _random():
    function botAccessories(uint256 tokenId) public view returns (string memory, string memory, string memory) {
        require(_exists(tokenId), "ReplBots: Query for nonexistent token");

        ReplBot memory bot = replbots[tokenId];

        return (headgear[bot.head], eargear[bot.ears], facegear[bot.face]);
    }
Our function body starts with a require statement. This is an error-handling function in Solidity: If the condition in the first argument is not met, the current transaction will revert (undoing all previous actions) and the error message in the second argument will be displayed. In this instance, we're using it to prevent the details of unminted tokens from being queried.
Once we've confirmed that tokenId is valid, we retrieve its associated ReplBot struct. Solidity allows us to return multiple values from a function, which we use to return three different strings.
Now let's create botColors(). Add the following code below the definition of botAccessories():
    function botColors(uint256 tokenId) public view returns (string memory, string memory, string memory) {
        require(_exists(tokenId), "ReplBots: Query for nonexistent token");

        ReplBot memory bot = replbots[tokenId];

        return (_colorToString(bot.frame),
               _colorToString(bot.visor),
               _colorToString(bot.background));
    }
This function is quite similar to botAccessories(), but as our colors are structs rather than strings, we will need to define a new function, _colorToString() to convert them. Let's do that now.
Add the following code below the definition of botColors():
    function _colorToString(Color memory color) internal pure returns (string memory) {
        string[7] memory parts;

        parts = ["(",
                 color.red.toString(),
                 ",",
                 color.blue.toString(),
                 ",",
                 color.green.toString(),
                 ")"];

        return string(abi.encodePacked(parts[0], parts[1], parts[2], parts[3], parts[4], parts[5], parts[6]));
    }
While Solidity does not currently have a string concatenation function, we can use abi.encodePacked on an array of strings to achieve the same result, similar to what we did in _random(). Solidity also doesn't have any syntactic sugar for expanding/splatting arrays into function arguments, so we have to specify each element individually.
But wait! Where does .toString() come from? If you try to compile this contract now, you'll find that this method is undefined.
Rather than being a Solidity built-in, this comes from the OpenZeppelin Strings library that we imported at the beginning of this tutorial. To use this library, we need to add the following line to our contract definition, right below contract ReplBots is ERC721Enumerable {:
using Strings for uint8;
Solidity's using Library for type directive attaches all functions in the specified library to the specified type. When a library function is called on an object of that type, it will receive that object as its first parameter.
Testing our contract
Now that we've implemented our NFT's core functionality, it's time to deploy to the Replit Testnet and test it out. We'll use our repl's web interface to do this.
First, run your repl. Once all of the dependencies are installed, you should see the Replit Ethereum web interface in your repl's browser. It looks like this:

Connect your MetaMask wallet to the web interface and switch to the Replit Testnet. Then click the link to get 1 ETH for testing. Wait until 1 ETH shows up in your wallet balance on the top right of the page.


Now you can deploy your contracts. Select "ReplBots" from the drop-down box and click "Deploy". Approve the MetaMask pop-up that appears.


Once this contract has been deployed, it will show up as an expandable box below the drop-down box. Expand it and take a look at all the different functions available.
Mint your first NFT by navigating to the mint function. Click on your wallet address in the top right corner of the page to copy it, and then paste it into the recipient field. Then run the function and approve the MetaMask pop-up that appears.
After a few seconds, you should see a pop-up indicating that your transaction has gone through. Congratulations, you're the proud owner of a ReplBot NFT! Check out its colors and accessories by entering ID 0 into botColors and botAccessories.
If you mint again, you should receive a ReplBot with ID 1 and a different set of colors and accessories.

Breeding bots
We can now mint ReplBots with random characteristics, which fulfills the specification we laid out at the start of this tutorial. But with a bit of additional code, we can introduce a second way to create ReplBots, breeding.
For our breed function, we'll accept two separate ReplBots owned by the caller and create a new one with the following characteristics:
- Its colors will be an equal mix of both parents.
- Its headgear will come from the first parent.
- Its eargear will come from the second parent.
- Its facegear will be randomized.
To keep track of which bots are minted and which bots are bred, we'll add a few additional fields to our ReplBot struct. Go to the top of your contract and edit the struct to resemble the following:
    struct ReplBot {
        Color frame;
        Color visor;
        Color background;
        uint8 head;
        uint8 ears;
        uint8 face;
        uint256 generation; // new field
        uint256 parentOneId; // new field
        uint256 parentTwoId; // new field
    }
We'll store our bot's generation and both parent IDs. Bots created through mint will have 0 for all three of these values. To avoid making it look as though all minted bots have token 0 for both parents, we'll start the tokenCounter from 1. Edit its declaration (near the top of your contract) as follows:
uint256 public tokenCounter = 1; // no more token 0
Then we need to add three zeros to the creation of the ReplBot struct in mint(). Find and edit the line below:
        // Create bot
        replbots[tokenId] = ReplBot(frameCol, visorCol, backgroundCol, headIdx, earIdx, faceIdx, 0, 0, 0); // <-- ZEROS ADDED

        // Mint token
        _safeMint(recipient, tokenId);
        return tokenId;
Now we can start on our breed() function. Add the following code below the definition of mint():
    function breed(uint256 parentOneId, uint256 parentTwoId, address recipient) public returns (uint256) {
        // Require two parents
        require(parentOneId != parentTwoId, "ReplBots: Parents must be separate bots");
        // Check ownership
        require(ownerOf(parentOneId) == msg.sender, "ReplBots: You don't own parent 1");
        require(ownerOf(parentTwoId) == msg.sender, "ReplBots: You don't own parent 2");

        ReplBot storage parentOne = replbots[parentOneId];
        ReplBot storage parentTwo = replbots[parentTwoId];

        // Check age
        require(parentOne.generation == parentTwo.generation, "ReplBots: Parents must belong to the same generation");
    }
We start our function off with some checks: The two parent IDs must be different, they must be owned by the function caller (msg.sender), and they must be in the same generation.
Next comes our bot creation code, which will be similar to the code in our mint() function. Add the following code below the final require() statement in the breed function above:
        // Increment token counter
        uint tokenId = tokenCounter;
        tokenCounter++;

        // Interpolate colors
        Color memory frameCol = Color(_meanOfTwo(parentOne.frame.red, parentTwo.frame.red),
                                      _meanOfTwo(parentOne.frame.green, parentTwo.frame.green),
                                      _meanOfTwo(parentOne.frame.blue, parentTwo.frame.blue));

        Color memory visorCol = Color(_meanOfTwo(parentOne.visor.red, parentTwo.visor.red),
                                      _meanOfTwo(parentOne.visor.green, parentTwo.visor.green),
                                      _meanOfTwo(parentOne.visor.blue, parentTwo.visor.blue));

        Color memory backgroundCol = Color(_meanOfTwo(parentOne.background.red, parentTwo.background.red),
                                      _meanOfTwo(parentOne.background.green, parentTwo.background.green),
                                      _meanOfTwo(parentOne.background.blue, parentTwo.background.blue));

        // Choose accessories
        uint8 headIdx = parentOne.head;
        uint8 earIdx = parentTwo.ears;
        uint8 faceIdx = uint8(_random(tokenId, "asdfg") % facegear.length);

        // Create bot
        replbots[tokenId] = ReplBot(frameCol, visorCol, backgroundCol, headIdx, earIdx, faceIdx, parentOne.generation + 1, parentOneId, parentTwoId);

        // Mint token
        _safeMint(recipient, tokenId);
        return tokenId;
All of our bot's colors and attributes are generated according to the breeding process we specified above. One last thing we'll need to do is define the _meanOfTwo() function we're using to determine the child bot's colors. Add the following code to the bottom of your contract, just below the definition of _random():
    function _meanOfTwo(uint8 first, uint8 second) internal pure returns (uint8) {
        return uint8((uint16(first) + uint16(second))/2);
    }
Here we convert first and second into uint16 values to prevent them from overflowing (which would cause our function to revert), divide the result by two, and return it as a uint8.
Lastly, we'll need to define a new view function to return the generation and parentage of individual tokens. Insert the definition of the following function, botParentage(), just below the definition of botColors():
    function botParentage(uint256 tokenId) public view returns (uint, uint, uint) {
        require(_exists(tokenId), "ReplBots: Query for nonexistent token");

        ReplBot memory bot = replbots[tokenId];

        return (bot.generation, bot.parentOneId, bot.parentTwoId);
    }
Compile and deploy your contract as you did before. Because it's a new contract, you'll need to mint two new ReplBots before you can try out the breed function. Do so now, and check that your child bot (ID 2) looks as expected. Then call botParentage to check its generation and parents.
Adding events
Our contract is now fully functional, but there are a few niceties we can add, in the form of events. Events provide a user-friendly form of logging on the blockchain and are commonly used by dApps. It's considered best practice to emit events whenever a state change is made, so we should define events for our contract's two state-changing actions, minting and breeding.
Event definitions are commonly placed at the bottom of contracts. Add the following code just above your contract's final closing brace (}):
    event ReplBotCreated(address recipient, uint tokenId);
    event ReplBotBorn(address recipient, uint tokenId, uint parentOneId, uint parentTwoId, uint generation);
Then insert an event emission near the end of your mint() function, as below:
        _safeMint(recipient, tokenId);

        emit ReplBotCreated(recipient, tokenId); // <-- NEW LINE

        return tokenId;
And another one near the end of your breed() function:
        _safeMint(recipient, tokenId);

        emit ReplBotBorn(recipient, tokenId, parentOneId, parentTwoId, parentOne.generation + 1); // <-- NEW LINE

        return tokenId;
Next steps
We're done with our contract code. In the second part of this tutorial, we'll build a dApp frontend for users to mint, view, and breed ReplBot NFTs. If you'd like to spend a bit more time exploring Solidity first, here are some ways you might want to change and expand this contract:
- Add more accessories. You'll need to draw these yourself!
- Refactor the code to reduce the size of the contract and make individual functions more gas efficient. One quick way to do this would be to change the visibility of the
publicfunctions toexternal. - Tweak the breeding algorithm.
- Introduce a siring mechanism that allows users to breed ReplBots they don't own.
You can find our repl here.

Top comments (0)