The motivation
I am a solo developer working full time.
Like most developers, I have project ideas that I want to build and validate. I can work on my projects evenings or a few hours on weekends.
Needless to say, it might take ages to build something sensible if you do not commit full time.
Or if you pick the wrong tech...
The choice of a tech stack has a dramatic impact on time to market. Using the technology I've always used to build web apps isn't always the right thing to do.
It seems that if you know a technology, you can use it to build apps much faster than you would with alternative tech. However, in my case, it means overcomplicating things by picking the wrong tools and denying progress.
Let me explain. If I need an SQL database, it does not mean that MySQL or PostgreSQL are my best options. What if there are alternatives?
I did some research and found tools that are great for what I need in my next MVP and it’s very easy to get started with them.
I looked for a mix of simplicity and scalability that would be easy to deploy, maintain and cheap or even free (at the beginning) to run. And I wanted GraphQL!
Here is what I found!
The better, simpler tools
Turns out, it’s absolutely real with Jamstack and FaunaDB combination!
Jamstack stands for JavaScript, APIs, and Markup. But it is much more than that.
While many people still think that Jamstack is for static sites only, in reality one can build a half static and half dynamic website that combines the best of the two worlds.
There are many static site generators to choose from. For example, Gatsby if you like React or Gridsome if you prefer Vue.
Thanks to FaunaDB - a serverless database with native GraphQL support, I can have a GraphQL server out of the box without writing a single line of code. All I need is a schema to get a GraphQL server up and running. Nothing short of amazing.
To make things look even better, FaunaDB offers secure authentication/access management out of the box so I don’t have to roll out my own.
FaunaDB allows you to modify data structures as the project's requirements change. This is very handy, especially for an MVP where one can’t predict what features will be needed in 2 weeks or so.
Before you conclude that FaunaDB is only a NoSQL database, you need to know that it has support for 100% ACID transactions and offers multiple data models - relational, document or graph.
Both Gatbsy and Gridsome use GraphQL under the hood which makes them an ideal match for FaunaDB.
Jamstack is easy to deploy. There are many services that offer simple static site deployments to the global CDN: Netlify, Vercel (formerly Zeit) to name a few.
Zero running costs
FaunaDB has a generous free plan which allows you to experiment and get started, but more importantly, there is no infrastructure to build, host or operate.
In the free tier, Netlify offers build previews, CI/CD, GitHub integration, automatic SSL certificate management for domains and serverless functions.
What more can an early-stage project ask for?
Build, deploy and market. Everything else is done for you.
The bottomline
If you combine Jamstack with a serverless database and a deployment platform, you will have a full-stack framework for building dynamic web apps.
This article is the first one of a series of articles about challenges I faced (still facing as I write) with my side project and how I overcame them with Gatsby, FaunaDB and Netlify.
The project
The V1 of my project is a mix of static and dynamic pages with information about online courses and a few social features. Authenticated users will be able to bookmark and follow courses.
Content creators will submit and edit course information. Before the new or updated content goes live, it needs to be reviewed and approved.
The challenges:
1. Provide the same data statically and dynamically.
The information about the courses is going to be served as static pages because I want them to be SEO optimized.
On the other hand, bookmarks represent the same data, but they can’t be statically generated as they change often. The same is true for courses that users follow.
Using a single data source will prevent duplication and enable a streamlined approach to updating or adding new data.
Traditionally, we’d use a relational database for that, but we’ll achieve it with FaunaDB just as easily. And get a lot more useful features out of the box.
2. Authentication + ABAC + bookmarks feature
As mentioned earlier, FaunaDB offers secure authentication and ABAC out of the box. Attribute-based access control (ABAC) extends the role-based access control (RBAC) making it even more powerful.
For example, FaunaDB allows us to define what resources can be accessed during any given transaction. For instance, specific date or time of day. I can think of a common use case - controlling trial periods. Or you might want to restrict access for users with expired subscriptions.
In my case, I will authenticate users to store their bookmarks.
3. Reflecting “bookmarked” states for items that have been bookmarked
This is a dynamic data that will be applied during hydration (when client JS runs)
4. Track how content changes (content moderation)
Unsurprisingly, FaunaDB gets us covered with its temporality feature, that shows how exactly data has changed over time.
Architecture overview
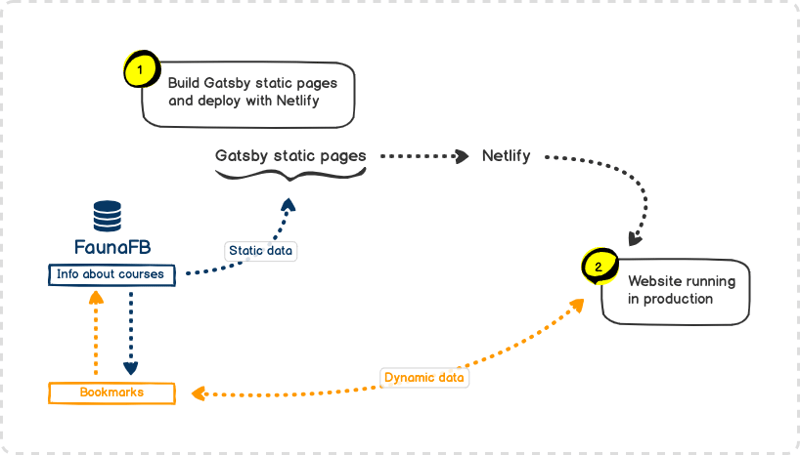
- Gatsby static pages are built with data fetched from FaunaDB at build time.
- Gatsby calls the FaunaDB’s GraphQL API endpoint directly using the Apollo client (read the Security notice below).
- Bookmarks made by users are stored in FaunaDB and reference the same data source as used to build static pages. That means that all changes to data will be immediately reflected for bookmarks because they are served dynamically and will become available in static pages after they are rebuilt.
!!! Security notice !!!
In general, it’s not advisable to keep secrets on the client-side to call third party APIs. This approach is less secure in comparison to calling your API endpoint that is available under the same domain together with implementing techniques and best practices to mitigate common client-side vulnerabilities.
In my MVP, I need to provide users with an ability to bookmark courses and share them across different devices they use. Bookmarks are everything but sensible information and this is why security is not a concern for this functionality. Not having to deal with the backend saves some time for me.
As I release the MVP, I will write a tutorial on a secure authentication flow involving backend and FaunaDB’s FQL because improvements are part of the MVP’s evolution.
Data modelling with GraphQL
Before we create our GraphQL server with FaunaDB, we need to create a GraphQL schema. Here it is:
type Course {
 title: String!
 author: Author!
}

type Author {
 name: String!
 courses: [Course] @relation
}

type Query {
 allCourses: [Course!]
 allAuthors: [Author!]
}
We have the Author and the Course types. Authors can have multiple courses and to let FaunaDB know about it we use the @relation directive, which instructs FaunaDB to establish relations between entities so we don’t have to.
I have also defined two queries to retrieve all courses and all authors.
Copy and paste the above code into a schema.gql file.
Get started with FaunaDB and GraphQL
You need to create an account with FaunaDB or log in if you have one already.
If you have a new account, you will land on the main dashboard page
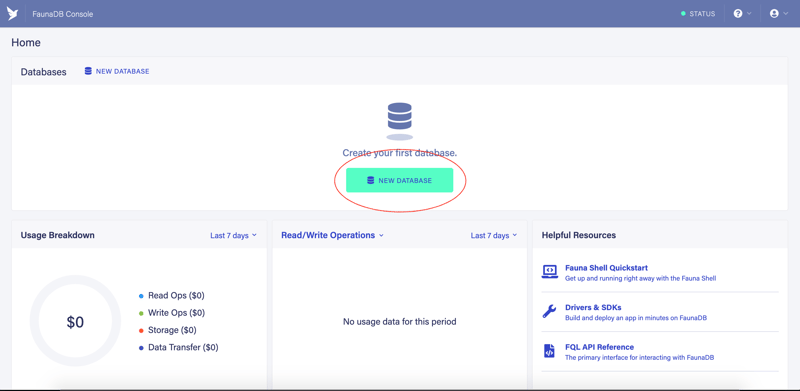
- Click on a button marked by a red oval to create your first FaunaDB database
- Enter an arbitrary database name and Save it.
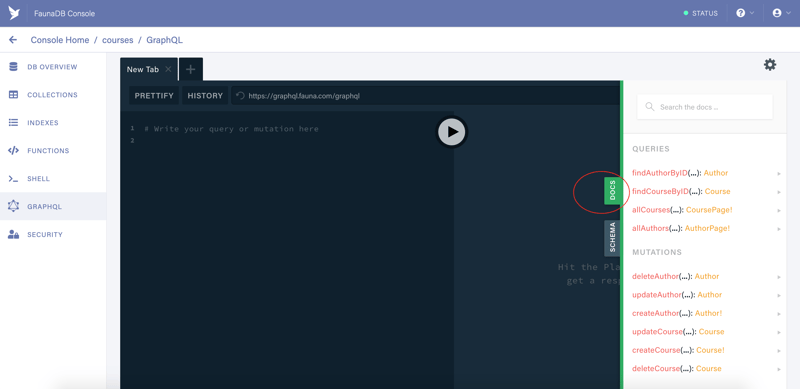
Click on the GraphQL menu item to go to the GraphQL Playground page as shown on the next screenshot:
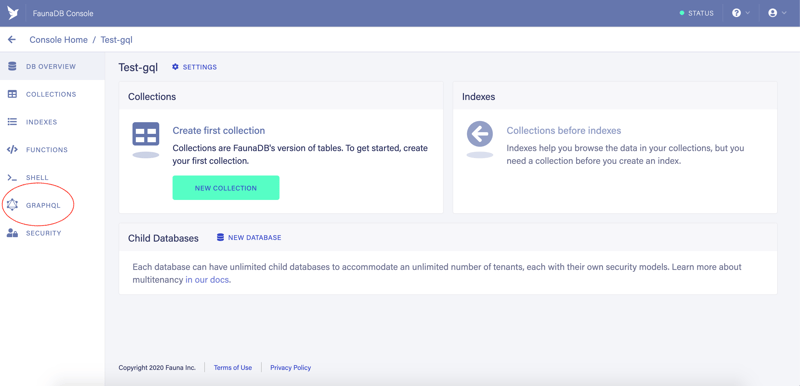
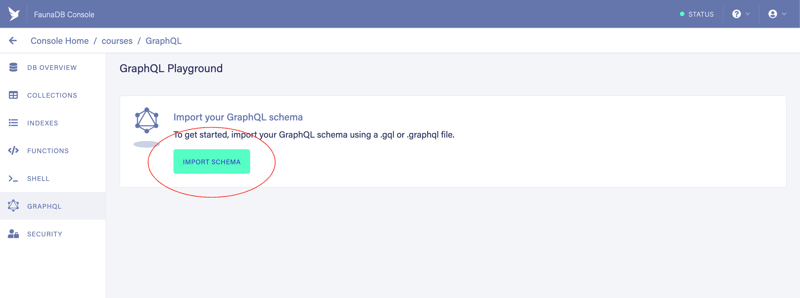
Click on the Import Schema button and choose the
schema.gqlfile from the list:
After a successful schema import, you will see the GraphQL Playground
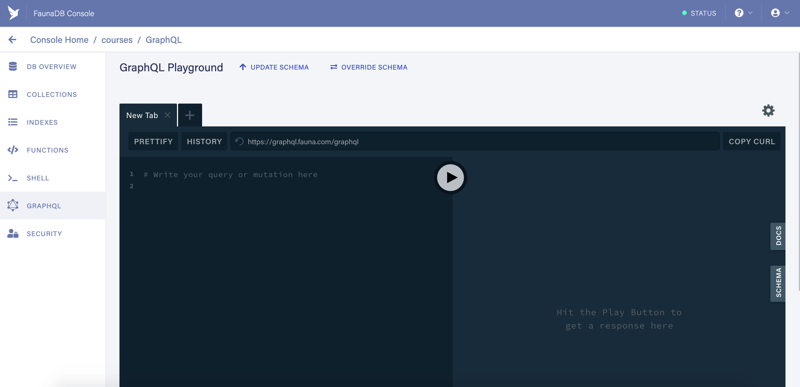
We are done! Our GraphQL server is up and running. No server and no coding required to get a complex setup in no time flat.
We can see that FaunaDB has created two extra queries for our convenience. And we also have several mutations that we did not have in our schema but FaunaDB has us covered.
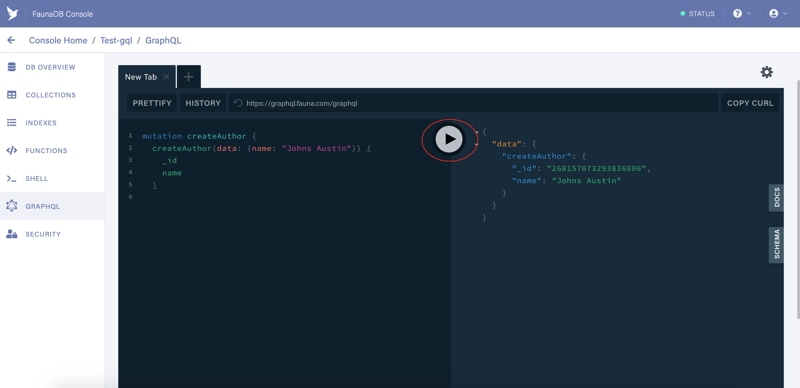
Let’s create the first author. Copy and paste the following code:
mutation createAuthor {
  createAuthor(data: {name: "Johns Austin"}) {
    _id
    name
  }
}
Paste it in the “New Tab” just like in this screenshot below and then click the “Play” icon in the red oval.
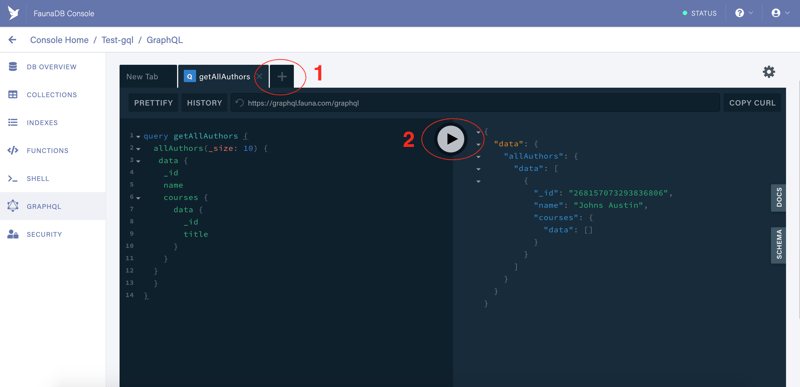
Let’s add a new tab (1) and run (2) a query to list all authors. Copy-paste the following query code and hit “Play”
query getAllAuthors {
  allAuthors(_size: 10) {
   data {
    _id
    name
    courses {
      data {
        _id
        title
      }
    }
  }
  }
}
As you can see, we have successfully created the author. The query returned the _id and the name fields as well as the author’s courses, however, the author has no courses and we get an empty array. So let’s create a course for our author.
NOTE! We will need the author’s _id in the next mutation. In my example the author's _id is 268157073293836806 but you will have a different one so you need to replace it with yours as a value for connect.
Create a new tab and copy-paste the following mutation code:
mutation createCourseForAuthor {
  createCourse(data: {
    title: "React for beginners",
    author: {
      connect: "268157073293836806"
    }
  }) {
    _id
    title
  }
}
Then run the mutation by clicking the “Play” button to create a new course for the author’s _id that we provided.
If you switch back to the previous tab where we ran a query to list all authors and rerun it, you will see that the author now has a course.
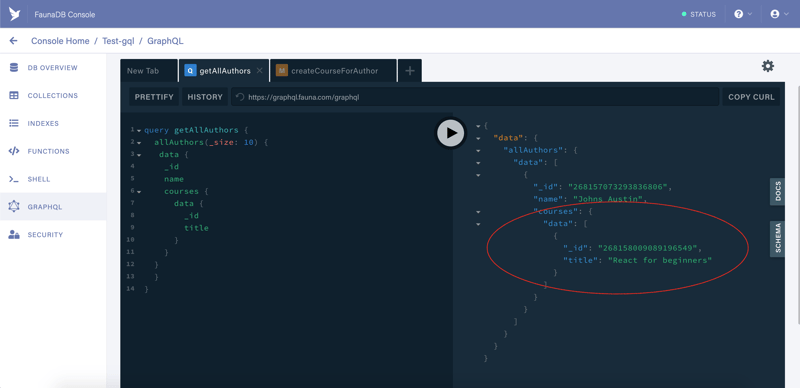
Notice the connect property. It is called a relational mutation and is used for connecting courses to their authors in our case.
There are two more types of relational mutations: create and disconnect.
The disconnect is opposite to connect - we can use it to remove a course from an author.
The create relation mutation can be used to create a course and an author in one single query like so:
mutation createCourseAndAuthor {
  createCourse(data: {
    title: "Advanced React",
    author: {
      create: {
        name: "Andrews Winters"
      }
    }
  }) {
    _id
    title
    author {
      _id
      name
    }
  }
}
If you paste the above mutation in a new tab and run it, you should see that both the course and the author have been successfully created.
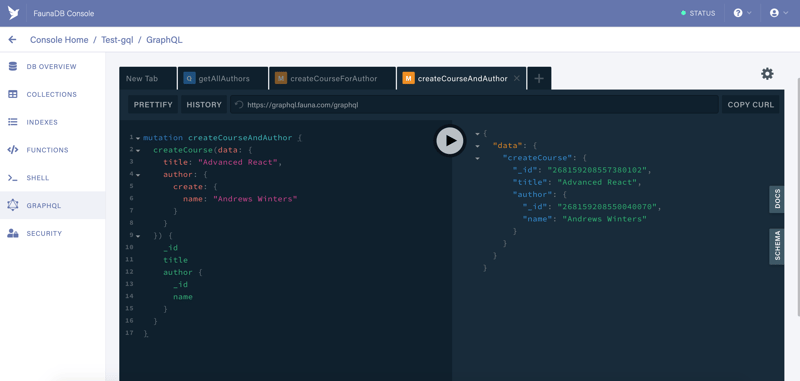
And again, If you switch back to the tab where we ran a query to list all authors and rerun it, you will see that now we have two authors.
The create relation mutation can also be used to create an author with one or more courses in a single query. Copy-paste in the new tab and run the following query to see it in action:
mutation createAuthorWithCourses {
  createAuthor(data: {
    name: "Wiley Cardenas",
    courses: {
      create: [
        { title: "NodeJS Tips & Tricks" },
        { title: "Build your first JAMstack site with FaunaDB" },
        { title: "VueJS best practices" }
      ]
    }
  }) {
    _id
    name
    courses {
      data {
        _id
        title
      }
    }
  }
}
Run the query to list all authors and you will see that we have 3 authors now and the latter one has 3 courses, as seen in the mutation above.
The remaining queries and mutations are self-explanatory and you can easily explore them by looking up the syntax in the DOCS tab - yet another powerful feature of GraphQL.
Sourcing data from FaunaDB with Gatsby
- Clone and run the starter project.
I have prepared a Gatsby starter with some initial setup:
git clone --single-branch --branch article-1/starter git@github.com:sandorTuranszky/Gatsby-FaunaDB-GraphQL.git gatsby-fauna-db
If you wish, you can clone the branch with the final code running this command:
git clone --single-branch --branch article-1/source-data-from-FaunaDB git@github.com:sandorTuranszky/Gatsby-FaunaDB-GraphQL.git gatsby-fauna-db
Once cloned, follow these steps:
cd gatsby-fauna-dbnpm installgatsby develop
Note that if you cloned the branch with the final code, you will need an access key to run the project. Go to the “Create an access key” section and follow instructions there before running gatsby develop
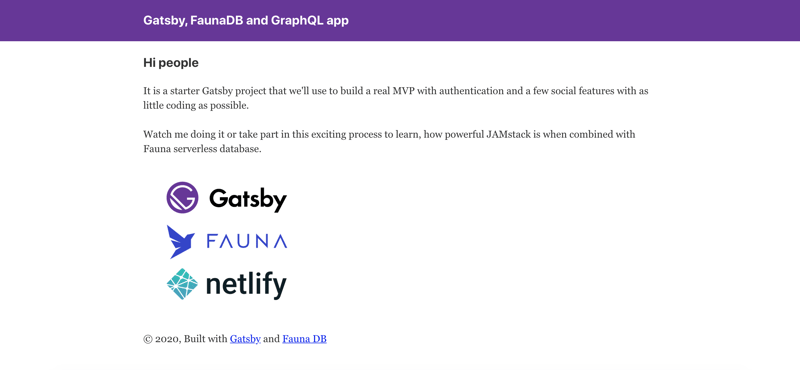
If you navigate to http://localhost:8000, you should see a starter website running in development mode with hot-reloading.
If you cloned the final code, scroll to the end of this article to see the final implementation
Earlier I mentioned that one of the challenges is to use data from the same source for static and dynamic content. FaunaDB will provide us with data:
- at build time when we build static pages (covered in this article);
- and for “bookmarks” functionality that will be dynamically fetched for logged in users.
We need to list courses for all users, including guest users. To do so, we need to create an access key with particular allowed actions. In our case, we need the “read” actions only.
Create an access key
Let’s head over to the FaunaDB dashboard and create an access key.
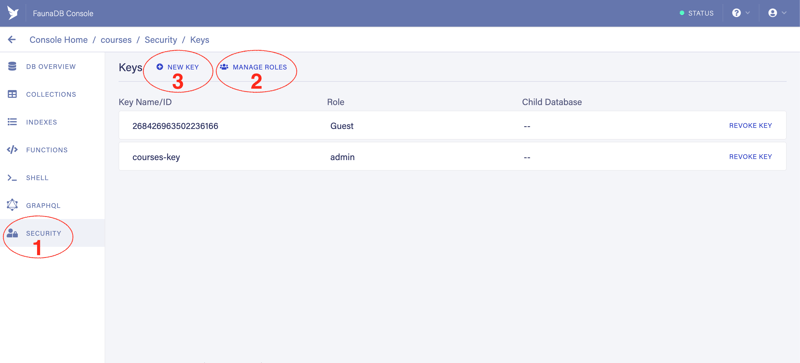
To create a key we will need a role. Let’s create a role first. Click on Manage Roles (2) and when you land on the following screen, click New Role
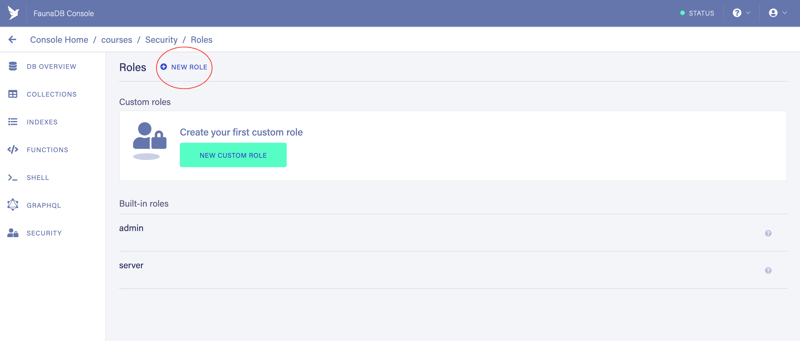
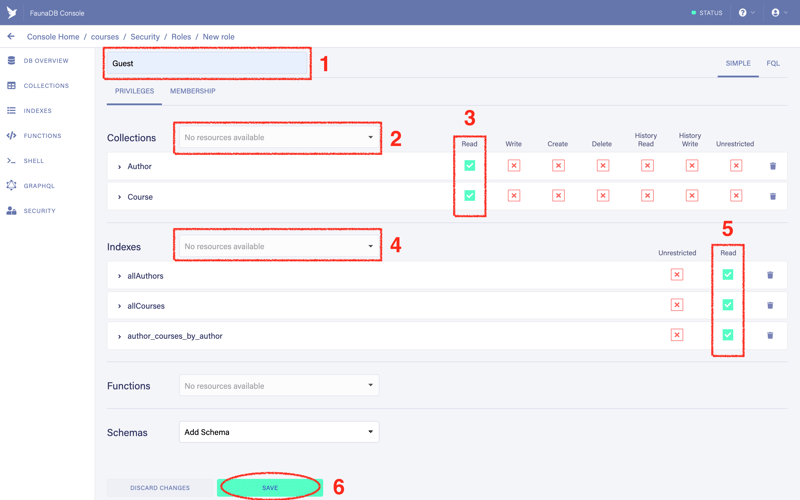
2.1 Name the role as you wish (1). I named it “Guest”.
2.2. Choose collections from the dropdown (2). We need both Author and Course collections.
2.3. Add “Read” actions to both collections (3)
2.4. Choose indexes: allAuthors, allCourses, author_courses_by_author (4)
2.5. Add “Read” actions to both indexes (5)
2.6. Click the “Save” button (6)
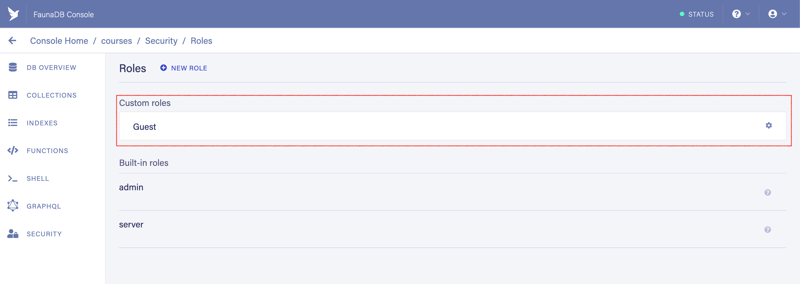
- Now that we have the role, we can create the access key. Click on Security (1) menu item and then on New Key (2)
You will land on the following page:

3.1. Leave the Database as it is (1)
3.2. Choose the role we created previously (2) (in my case it was "Guest")
3.3. Add an optional key name (3)
3.4. Click the “Save” button (4)
You have created your access key.
Do not refresh the page because the key is visible only once and you will need to recreate it.
Your access key will be different from the one you can see in the red rectangle in the next screenshot:
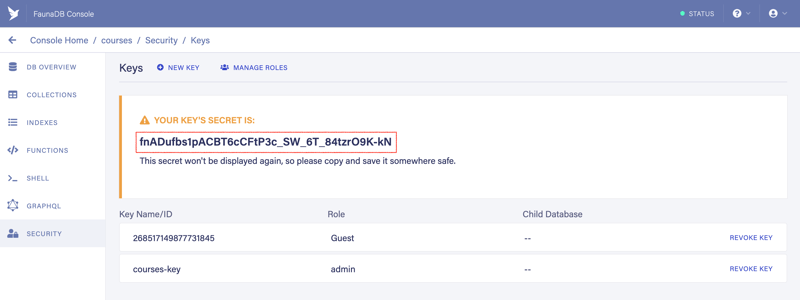
Create .env.development and .env.production files in the root of the project and paste your access key in both of them as values for FAUNADB_BOOTSTRAP_KEY and GATSBY_FAUNADB_BOOTSTRAP_KEY vars.
FAUNADB_BOOTSTRAP_KEY=fnADufbs1pACBT6cCFtP3c_SW_6T_84tzrO9K-kN
GATSBY_FAUNADB_BOOTSTRAP_KEY=fnADufbs1pACBT6cCFtP3c_SW_6T_84tzrO9K-kN
GRAPHQL_ENDPOINT=https://graphql.fauna.com/graphql
GATSBY_GRAPHQL_ENDPOINT=https://graphql.fauna.com/graphql
We can test the newly created access key in the GraphQL Playground that we used earlier.
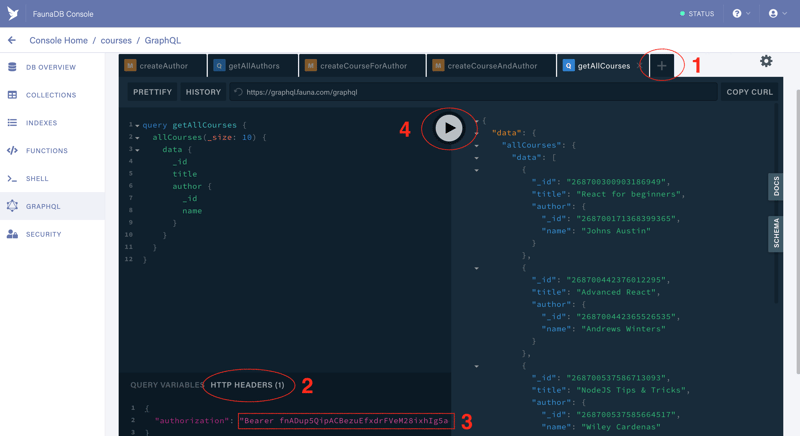
- Create a new tab by clicking on the “+” (1)
- Click on the HTTP HEADERS link (2) Note that you might see there an access key that was added automatically when the playground was created. It might look like this:
{
  "authorization": "Basic Zm5BRHHDJENod0FDRXRISHhnJSHSKljclZmb3pMb2tvMjhtMGhHGD4B3azpjb3Vyc2VzOnNlcnZlcg=="
}
- Add your access key (3).
Note that you need to replace
BasicwithBearerso it looks like this:
{
  "authorization": "Bearer fnADufbs1pACBT6cCFtP3c_SW_6T_84tzrO9K-kN"
}
Copy and paste and run the following query, you should see the lists of courses and authors.
query getAllCourses {
  allCourses(_size: 10) {
        data {
      _id
      title
      author {
        _id
        name
      }
    }
  }
}
If you replace the getAllCourses query with the following createAuthor mutation and run it:
mutation createAuthor {
  createAuthor(data: {name: "Johns Austin"}) {
    _id
    name
  }
}
you will get an expected error:
{
  "errors": [
    {
      "message": "Insufficient privileges to perform the action.",
      "extensions": {
        "code": "permission denied"
      }
    }
  ]
}
This error makes sense because we defined only the “Read” action for the access key we created.
Connect starter to FaunaDB
It was mentioned that with Gatsby one can build a combination of a static and a dynamic website. Static pages are generated at build time - when the project is built for deployment. During that stage, we will source data about courses from FaunaDB using a plugin.
Gatsby has plugins for nearly all types of data sources.
We will use gatsby-source-graphql plugin to source data from FaunaDB. This is a generic plugin to use when you need to query GraphQL APIs.
- Install
gatsby-source-graphqlplugin
npm install --save gatsby-source-graphql
- Add the following code into the plugins array in the
gatsby-config.jsfile
 {
     resolve: "gatsby-source-graphql",
     options: {
       typeName: "FAUNADB",
       fieldName: "FaunaDB",
       url: process.env.GRAPHQL_ENDPOINT,
       headers: {
         Authorization: `Bearer ${process.env.FAUNADB_BOOTSTRAP_KEY}`,
       },
     },
}
The code above adds gatsby-source-graphql plugin to Gatsby configuration.
- The
fieldNameproperty is going to be used as a wrapper for queries to FaunaDB and as a root element for data that will be retrieved from it (it will make sense soon) - The url property points to FaunaDB’s GraphQL API endpoint.
- We also provide our access key in
headersto connect to FaunaDB
We are ready to write our first query. Head over to /src/pages/index.js and replace its contents with the following code:
import React from "react"
import { graphql } from "gatsby"

import Layout from "../components/layout"
import SEO from "../components/seo"

const IndexPage = ({ data: { FaunaDB } }) => {
 const data = FaunaDB.allCourses.data
 return (
   <Layout>
     <SEO title="Home" />
     <ul>
       {data &&
         data.map(item => {
           return (
             <li key={item._id}>
               {item.title} ({item.author.name})
             </li>
           )
         })}
     </ul>
   </Layout>
 )
}

export default IndexPage

export const pageQuery = graphql`
 query {
   FaunaDB {
     allCourses(_size: 10) {
       data {
         _id
         title
         author {
           _id
           name
         }
       }
     }
   }
 }
`
Mind the backtick at the end of query
Notice that our GraphQL query is nested in the FaunaDB key that we specified in the fieldName of the gatsby-source-graphql plugin in the gatsby-config.js file. The result of the query is also nested in the same key:
const data = FaunaDB.allCourses.data
Run gatsby develop to rebuild the site and you will see our articles:

Now, let’s create a new author and a new course in one bulk operation using the following mutation in the GraphQL playground:
Use the tab that has the admin key, e.g. the one where we used mutation before. You will not be able to run mutations with the Guest key
mutation createAuthorWithCourse {
  createAuthor(data: {
    name: "Blake Fletcher",
    courses: {
      create: [
        { title: "Mastering Vue 3" }
      ]
    }
  }) {
    _id
    name
    courses {
      data {
        _id
        title
      }
    }
  }
}
If you now run the following query in the GraphQL Playground, you will see that we have a new author and a new course added:
query getAllAuthors {
  allAuthors(_size: 10) {
   data {
    _id
    name
    courses {
      data {
        _id
        title
      }
    }
  }
  }
}
Now refresh our Gatsby website only to see that the new author and the course are not showing up. This is expected because data is retrieved from FaunaDB only at build time. We need to rebuild our website. Stop the project and rerun it with gatsby develop command and refresh again. You will see the newly added author and the course:

This is how easy it is to use FaunaDB as a data source for generating static pages with Gatsby using GraphQL API.
Conclusion
We have explored how easy it is to create a GraphQL server with FaunaDB and we have solved the first part of the challenge #1 - “Provide the same data statically and dynamically”
In the next article, we will solve the second part of it - we will introduce the “Bookmarks” feature and load all bookmarks dynamically for logged in users. We will achieve it by adding SPA features to our static site to prove that Gatsby is much more than a static site generator.
We will also see how easy it is to create a secure authentication flow using FaunaDB’s built-in Authentication feature.
UPDATE: Here is the second article.



Oldest comments (5)
Fantastic tutorial, this went on my reading list and in my bookmarks!
Thanks a lot, very interesting, I've just followed you, wondering if dev.to will notify me about the next part?
We can check it out. I will post the next part on 4th of August.
No, I have not received something on email, so sad )
dev.to/sandorturanszky/how-to-add-...