Make REST API AUTHENTICATION in LARAVEL 9 USING LARAVEL SANCTUM
Laravel Sanctum provides a featherweight authentication system for SPAs (single page applications), mobile applications, and simple, token based APIs.
Installation Steps
If you are not using LARAVEL 9 you need to install LARAVEL Sanctum Otherwise you can skip the installation step.
Step 1
Install via composer
composer require laravel/sanctum
Step 2
Publish the Sanctum Service Provider
php artisan vendor:publish --provider="Laravel\Sanctum\SanctumServiceProvider"
Step 3
Migrate The Database
php artisan migrate
USING SANCTUM IN LARAVEL
User HasApiTokens Trait in App\Models\User
In Order to use Sanctum we need to use HasApiTokens Trait Class in User Model.
User Model should look like.
<?php

namespace App\Models;

use Illuminate\Contracts\Auth\MustVerifyEmail;
use Illuminate\Database\Eloquent\Factories\HasFactory;
use Illuminate\Foundation\Auth\User as Authenticatable;
use Illuminate\Notifications\Notifiable;
use Laravel\Sanctum\HasApiTokens;

class User extends Authenticatable
{
    use HasApiTokens, HasFactory, Notifiable;

    /**
     * The attributes that are mass assignable.
     *
     * @var array<int, string>
     */
    protected $fillable = [
        'name',
        'email',
        'password',
    ];

    /**
     * The attributes that should be hidden for serialization.
     *
     * @var array<int, string>
     */
    protected $hidden = [
        'password',
        'remember_token',
    ];

    /**
     * The attributes that should be cast.
     *
     * @var array<string, string>
     */
    protected $casts = [
        'email_verified_at' => 'datetime',
    ];
}
API Authentication Routes
Create AuthController to handle all authentication realted to API
php artisan make:controller Api\\AuthController
In routes\api.php file update the API
Route::post('/auth/register', [AuthController::class, 'createUser']);
Route::post('/auth/login', [AuthController::class, 'loginUser']);
Now update AuthContoller with
<?php

namespace App\Http\Controllers\Api;

use App\Models\User;
use Illuminate\Http\Request;
use App\Http\Controllers\Controller;
use Illuminate\Support\Facades\Auth;
use Illuminate\Support\Facades\Hash;
use Illuminate\Support\Facades\Validator;

class AuthController extends Controller
{
    /**
     * Create User
     * @param Request $request
     * @return User
     */
    public function createUser(Request $request)
    {
        try {
            //Validated
            $validateUser = Validator::make($request->all(),
            [
                'name' => 'required',
                'email' => 'required|email|unique:users,email',
                'password' => 'required'
            ]);

            if($validateUser->fails()){
                return response()->json([
                    'status' => false,
                    'message' => 'validation error',
                    'errors' => $validateUser->errors()
                ], 401);
            }

            $user = User::create([
                'name' => $request->name,
                'email' => $request->email,
                'password' => Hash::make($request->password)
            ]);

            return response()->json([
                'status' => true,
                'message' => 'User Created Successfully',
                'token' => $user->createToken("API TOKEN")->plainTextToken
            ], 200);

        } catch (\Throwable $th) {
            return response()->json([
                'status' => false,
                'message' => $th->getMessage()
            ], 500);
        }
    }

    /**
     * Login The User
     * @param Request $request
     * @return User
     */
    public function loginUser(Request $request)
    {
        try {
            $validateUser = Validator::make($request->all(),
            [
                'email' => 'required|email',
                'password' => 'required'
            ]);

            if($validateUser->fails()){
                return response()->json([
                    'status' => false,
                    'message' => 'validation error',
                    'errors' => $validateUser->errors()
                ], 401);
            }

            if(!Auth::attempt($request->only(['email', 'password']))){
                return response()->json([
                    'status' => false,
                    'message' => 'Email & Password does not match with our record.',
                ], 401);
            }

            $user = User::where('email', $request->email)->first();

            return response()->json([
                'status' => true,
                'message' => 'User Logged In Successfully',
                'token' => $user->createToken("API TOKEN")->plainTextToken
            ], 200);

        } catch (\Throwable $th) {
            return response()->json([
                'status' => false,
                'message' => $th->getMessage()
            ], 500);
        }
    }
}
Protect API With Authentication we need to use auth:sanctum middleware.
Route::apiResource('posts', PostController::class)->middleware('auth:sanctum');
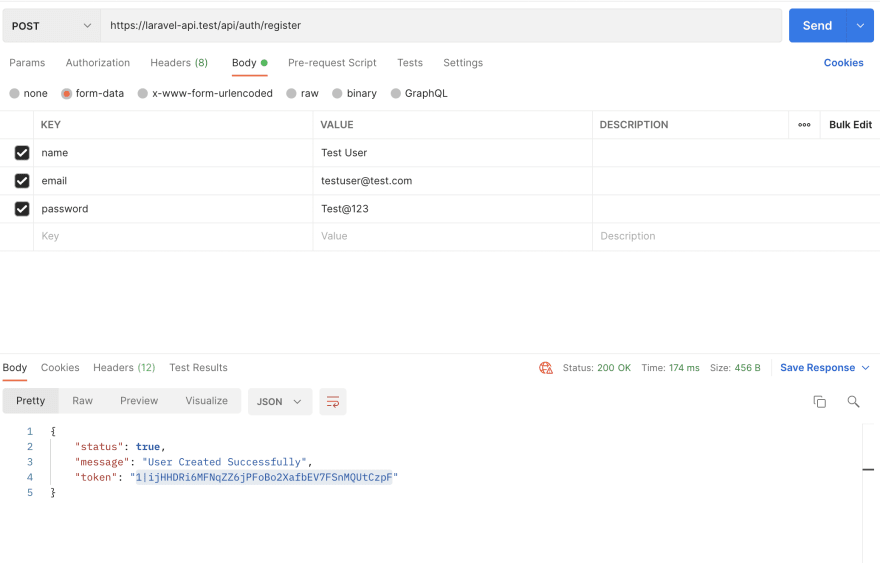
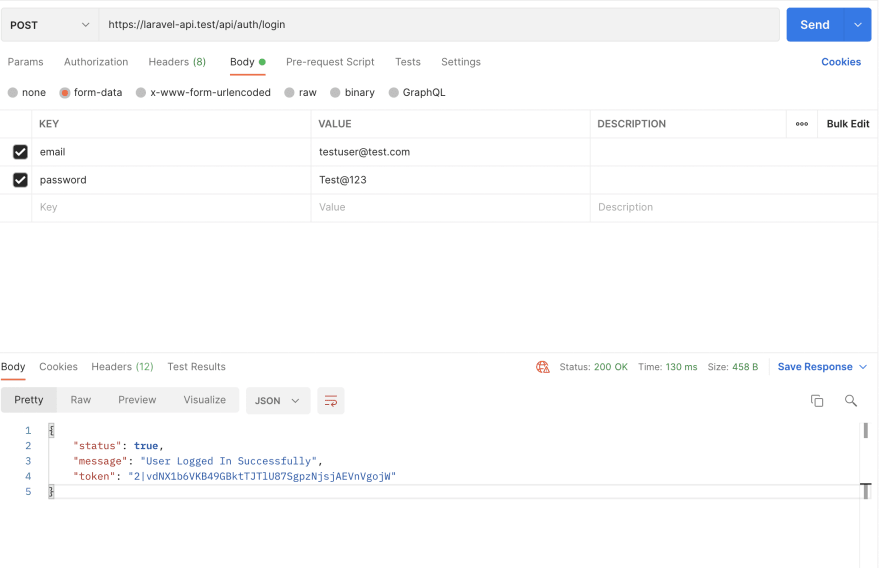
Here are the results.
The complete Tutorial is below in the video.
If you face any issue while making REST API, please comment your query.
Thank You for Reading
Reach Out To me.
Twitter
Instagram
TechToolIndia YouTube Channel


Latest comments (13)
I'm from Vietnam you get 10 points no buts
Good sanctuam tutorials
Hi can you make an login page on Laravel blade template and login through API post method with same email and password that was saved in db
Hi @ahmad9250
You can connect me at my email shanisingh280795@gmail.com , We can discuss there.
Thanks
Hello, thank you so much
I code exactly like you, but this error is shown when I try the login query in postman:"message": "SQLSTATE[23000]: Integrity constraint violation: 1048 Column 'tokenable_id' cannot be null"
please help me :(
Hello
tokenable_id can be user_id or post_id. It depends to your token model like App\Models\User.
I think it will help you :)
Hi Shani, thanks for this tutorial. I want to list the all users I have in DB and don't want this API to be public. How do I secure this api using sanctum. To access this DB no user logs in becuase this api is used to select the users only.
You can write a new middleware or use Auth Gaurd for Securing the API.
Dear Shani singhn
First of all thank you for the great articles.
I have a question and if you can help me it will be great.
I am useing csrf-cookie base authentication not token based
But i am unable to test api from post man, or swagger due to header cookies check
have you any advice or solution for me?
Please reply me.
Hi Tanveer,
laravel.com/docs/9.x/sanctum#csrf-...
This can help you setting up csrf-cookie.
Thanks
Hey, good article short and concise!
But may I ask about other uses of this personal access token?
If I may, I will ask point by point if you are willing to enlighten me..
createToken("API TOKEN")->plainTextTokenand input it in database table personal_access_tokens when we login/register right?auth:sanctumonly to provide a limit onRoute::middleware('auth:sanctum')->group(function () { });??personal_access_tokens?Hi
So use of Personal Access token is to identify users identity and based on that it gives you response, and to get JSON response you can define request type JSON then Laravel API will always give you JSON Response.
in Addition you can write exception handler condition and format the response as well.
hope this will clear your thoughts.
Whoa, thanks for the reply!
I've been trying for days to understand everything by reading the documentation from Laravel, also asking on Stackoverflow, but in the end I just understand that Personal Access Tokens are just User ID identifiers, and NOT work like a session security, right?
By the way, thanks for the explanation on the first point.
The second, thanks for pointing out about the json type acceptance and now i can json type message like this
