In this article, we will have a look at how to work with remotes in order to work together with collaborators, how to work with branches, how to resolve conflicts between two sets of changes (aka "Why does git reject my push?"), and finally, how to merge and delete branches using the CLI or the GitHub UI.
(Cover image by fabrizio turco from FreeImages)
Recap
In the Introduction article, we looked at how to set up a local git repository, how to configure git and create aliases, and how to add and commit files on the example of creating an encyclopedia with articles and a list of topics to write about. We have also added some aliases to our gitconfig file at ~/.gitconfig, such as this one that lets us print a neat-looking tree in the command line to show us the git history. I'm adding it here again since we will keep using it throughout this article.
[alias]
lg = !clear && git log --all --graph --pretty='format:%C(auto)%h%d %s  %C(magenta)[%an] (%ad)%C(reset)' --date=format:'%d.%m.%y %H:%M'
Now we will look at how to save our work remotely so that we won't only have access to it locally on our machine but also on other machines and can work on changes together with collaborators. Our encyclopedia is going places and at any rate, we wouldn't want to do it all by ourselves. It's time to give this thing called balance a go and let other people join in on our project.
Working with remotes
All we have for now is our changes on our own machine. Anything that we commit will not be lost as long as our machine is working, but we can't share it with anyone else easily nor will it be safe if our device decides to stop working (as they tend to do in the most inopportune moments).
Creating a remote repository
Firstly, we need to settle on a place to host our repository. This could be GitHub or GitLab, for example.
After creating an account, we can create our repository.
On how to set up a repository, please see these articles in their respective documentation pages: GitHub, GitLab
Pushing our existing changes to the remote
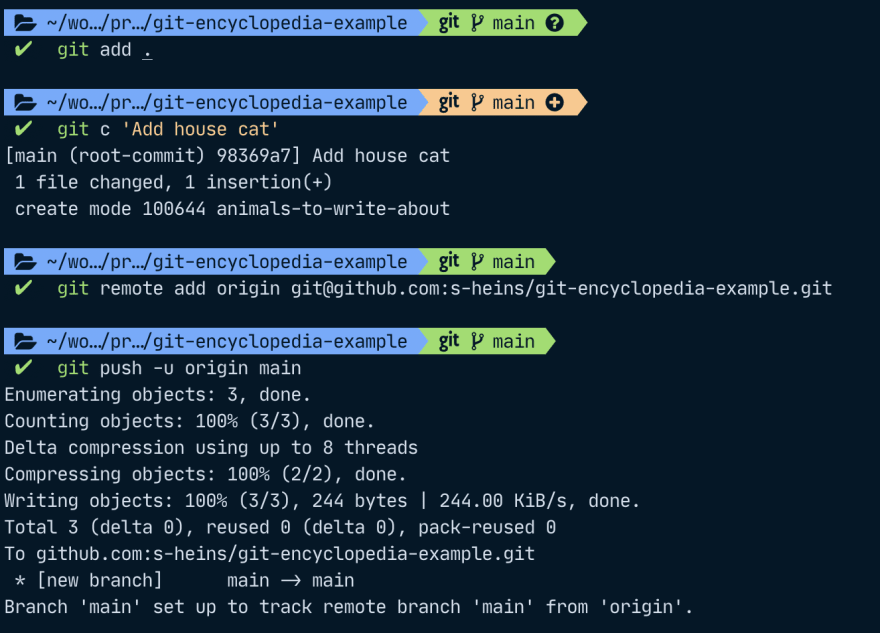
After creating a new repository on GitHub, it already shows us some instructions on how to push an existing git repository:
The first line is adding a so-called origin to our local repository. This is referencing our new repo on github. In this example you can see that I have chosen to use SSH but this can be switched with a button further on top if you want to use HTTP. Using SSH will require you to set up a private and public SSH key pair whereas you will only have to authenticate with your username and password or access key if you use HTTP, so it will be easier if you have never done this before.
Since I had previously connected to GitHub on my machine, I was not prompted for my login credentials here. If you are, enter the credentials you are prompted for and then you are able to push to your remote repository, to your origin.
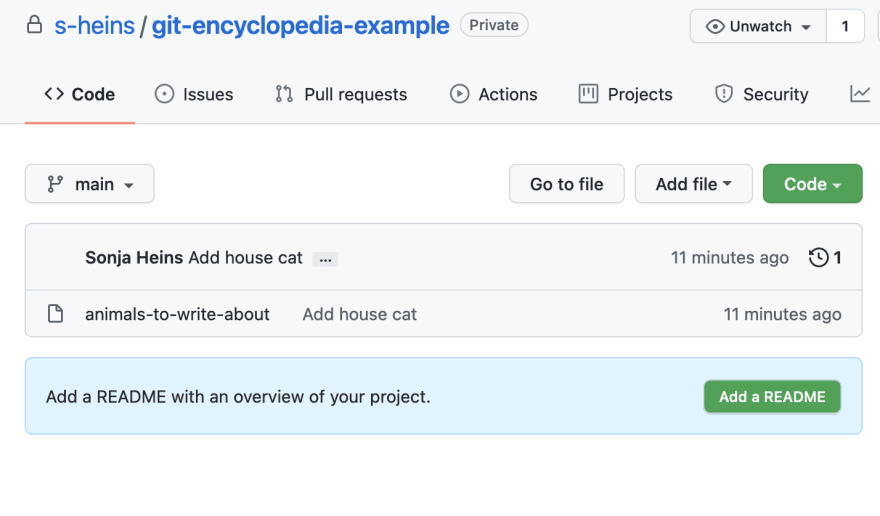
After pushing, we can now see our changes on the site we have chosen as a host for our repo after refreshing in the browser. It will also show the last commit message, "Add a house cat" in this example, along with our files.
Cloning a remote
For now, we have worked alone on our encyclopedia, or rather, the list of animals we want to write about.
Our git history will look something like this; it's a single line since we have only worked on one branch.
Now our editor tells us to get cracking since so far, we have only made one measly list of animals to write about, it's not quite an encyclopedia. We have already pushed our repo, so we're ready to have collaborators join us in this project!
We have managed to recruit Anna Animallover and Wolfgang Wanderlust to join us. Anna is going to help us complete our list of animals and then write articles on them and Wolfgang will write about cities of interest.
You can find the address for your repository on the site you have chosen to host it – you will need this so that Anna and Wolfgang can clone your repository.\
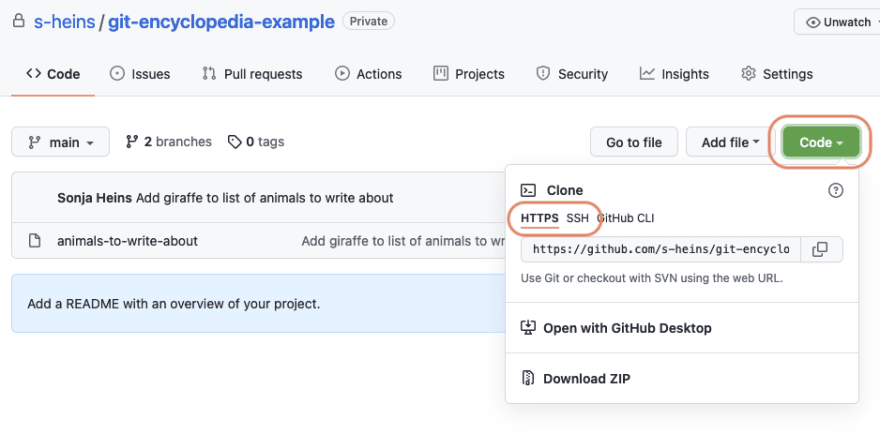
On GitHub, it looks like below. As before, you can choose either HTTP or SSH which will change the link. In this example, it is https://github.com/s-heins/git-encyclopedia-example.git for HTTP and git@github.com:s-heins/git-encyclopedia-example.git for SSH.
Anna and Wolfgang can then clone our repository by running git clone <repository-address>.
Branching
The first thing Anna wants to do is create a new branch. This way we can keep the main branch for things that have already been reviewed and we can have our in-progress work in the other branches of our project.
Creating a new branch
To create a new branch and switch to it, use git checkout -b my-branch-name. In case you are working with tickets on Jira, for example, prefixing your branch with the ticket name enables your team to get a good overview on what tickets are currently in progress. We could name our branch "ENC-001_add-animal-articles" if our ticket number is "ENC-001", for example.
Pushing a new branch to origin
After Anna has added some articles (git add .) and committed them to her local repository (git commit -m "My message"), she wants to push those changes to the remote.
She can do so by running git push -u origin my-branch-name. With this, her local changes are propagated to our origin (also called upstream), our repository on GitHub. Now it is possible for others to see Anna's changes and add their own.
From our machine, we can now git pull and git will tell us that a new branch has been created. We can check it out by running git checkout articles-on-animals-from-list. This will switch our working branch to Anna's branch and since we just pulled, we will also have her latest committed changes.
After we have created articles for the animals that are still missing from the list, we can add those changes to a commit and push them. This time, git already knows the upstream branch (namely, origin/articles-on-animals-from-list), and thus we can just use git push without any arguments.
After Anna pulls again, she will also have our changes.
By using the same branch and adding our commits, we can safely collaborate. Anna and me can both commit and push our changes as we go along. We just shouldn't both alter the same file at the same time or we will get conflicts that we will need to resolve.
Resolving conflicts
Let's say we have the idea to add more animals to our list of animals to write about but Anna has the same idea. We add a gorilla and a chimpanzee, she adds an alligator and a crocodile. We push first so now the file will have updated without Anna knowing about it.
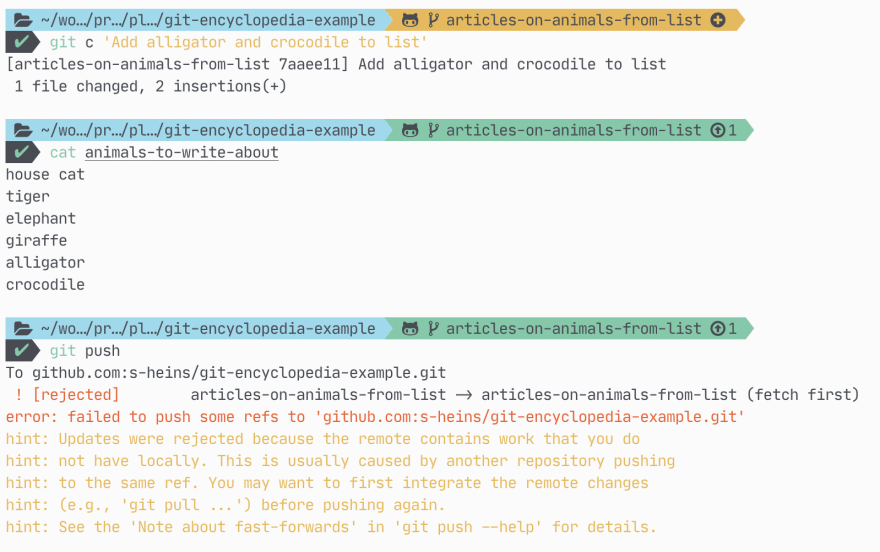
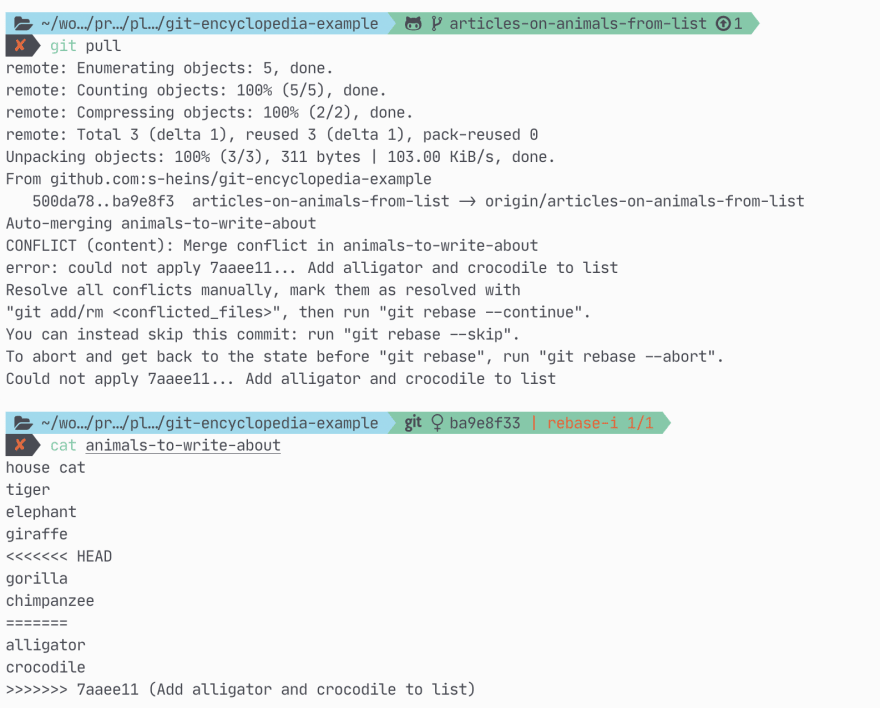
When Anna tries to push her commit, git will not let her. It rejects her commit and tells her to pull first.
Once Anna pulls, git now tells her she has a conflict. If you use an IDE with version control functionality, you can also resolve any conflicts there and you normally would. Here, we will go the manual way for now because it will give us some insight into what happens in git behind the scenes without part of it being masked by IDE functionality.
As you can see, the contents of the file have a line saying HEAD that contain our changes where we added the gorilla and chimpanzee (the changes that we have already pushed to our branch on the remote), then another line of equals signs as separators, then her changes where she added the alligator and the crocodile, and then a line with the name of her commit, 7aaee11, and her commit message (Add alligator and crocodile to the list).
If we look at the git tree in the console again, we can see that Anna's commit, 7aaee11 and my commit that is pushed to the upstream, ba9e8f3 both have the same parent. We now have to resolve the conflicts so that Anna's changes can be propagated to our repository.
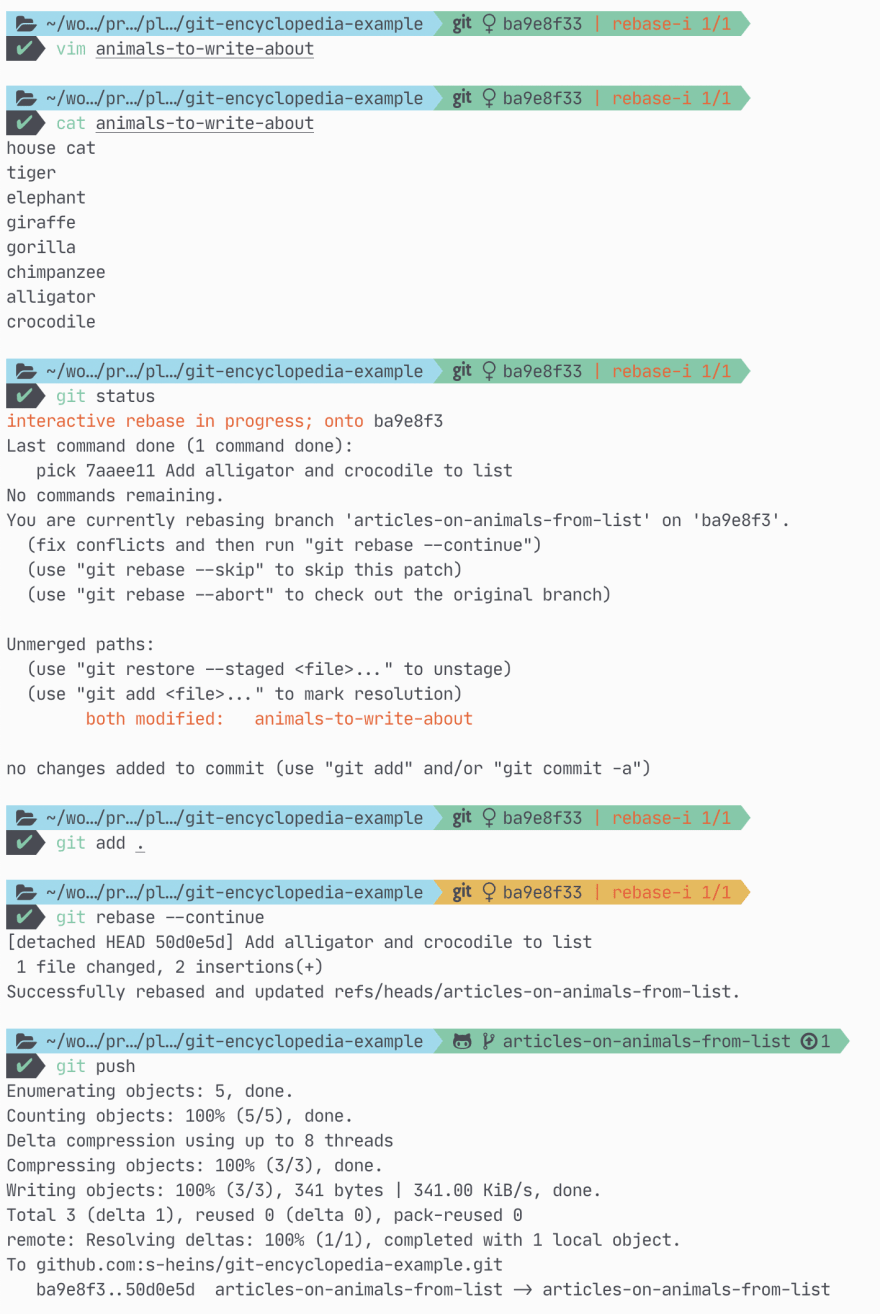
We can now edit the file to remove the three lines git has added to show us the parts of the file where we have conflicts. Since we want to retain all animals, we only need to delete these lines. As you can see on the screenshot, the file only has the list of animals afterwards, and the lines with the <<<<, >>>> and ==== are no longer contained.
After we have resolved the conflicts, we need to add the file so git knows that we can continue reconciling the changes that Anna and I have made.
In this case, I have put a line in my ~/.gitconfig file telling git it should rebase rather than try to merge any conflicts. That means that it will try to make it as if Anna's changes had come after my own. We will go into the difference between merging and rebasing in a later article. For now, it doesn't matter that much which one you pick. If you look at the above screenshot, you will see git tells me to run git rebase --continue once I am done resolving my conflicts. If you chose merge as a pull strategy, it will tell you to run git merge --continue instead. This will only have an impact on how our tree looks afterwards but it will not have any impact on our file changes.
If we now look at the git tree after finishing the rebase, we can see that it looks as if Anna had done her changes after our own.
Merging and deleting branches from the console
Let's say we have added articles on all animals we had on our list for now, have shown them to our editor, and they are happy with them. That means that we can now propagate those changes into our main branch and will no longer need our branch articles-on-animals-from-list.
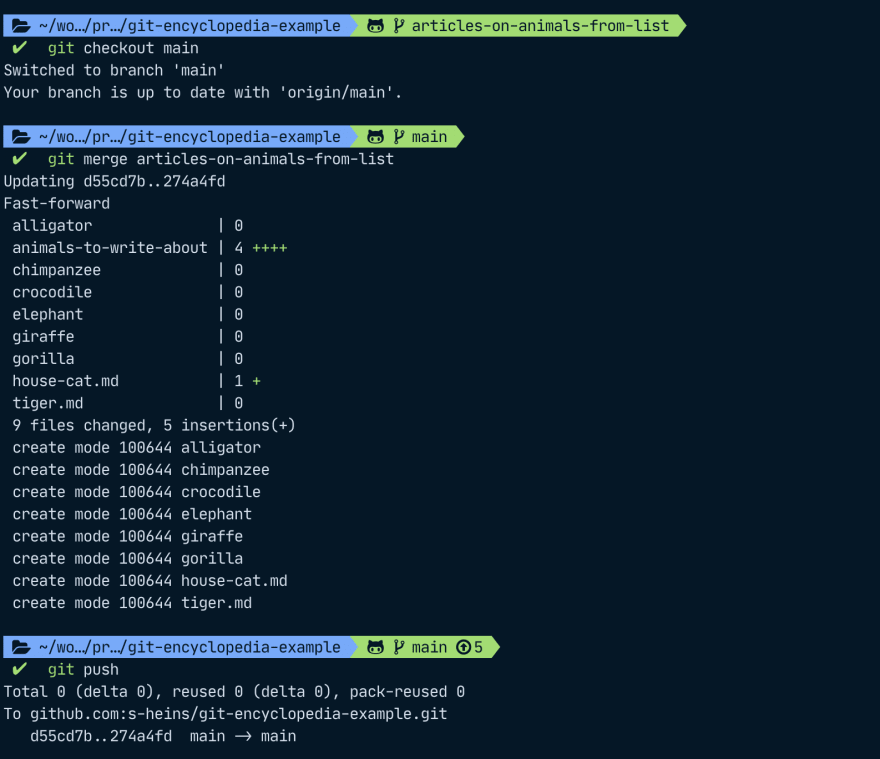
Firstly, we'll want to git pull on our article branch to make sure we have the latest changes. Then, we check out the main branch and run git merge articles-on-animals-from-list. Afterwards, we push again to make sure those changes are also on our upstream main branch.
Afterwards, we can delete the branch on your machine by running this command:
git branch -D articles-on-animals-from-list
And this command to delete the remote branch:
git push --delete articles-on-animals-from-list
Merging and deleting branches from the GitHub UI
In practice, you will probably never run these commands from the CLI but rather use a version control provider such as GitHub or GitLab. Rather, you will create a request to propagate your changes into the main branch, called pull request (PR) on GitHub, and merge request (MR) on GitLab.
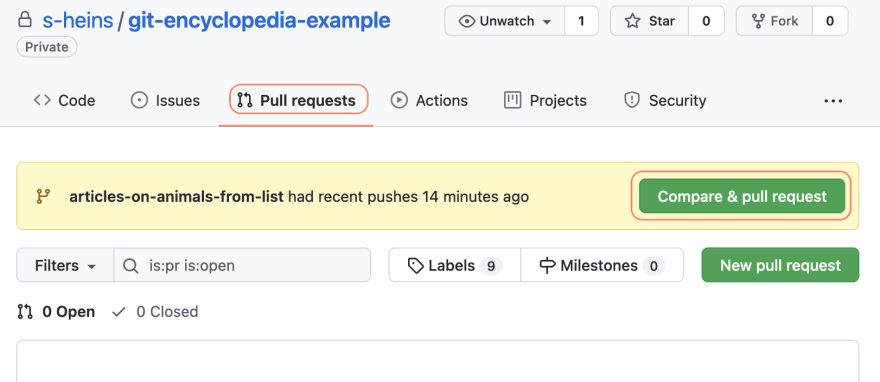
On GitHub, click on the "Pull requests" tab and then on the button saying "Compare & pull request".
On the next dialogue window, click on "Create pull request".
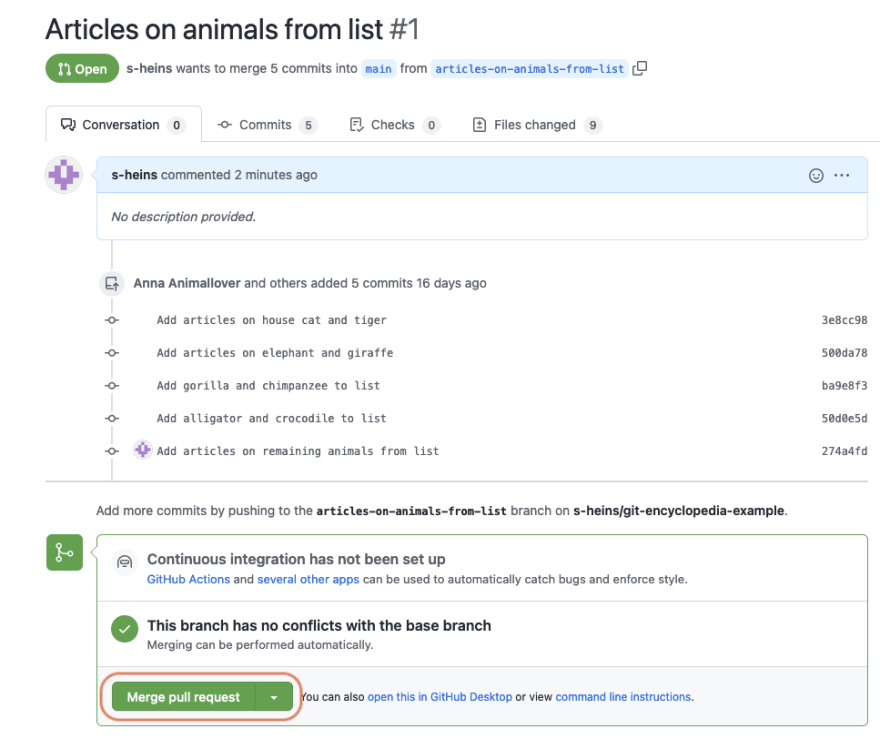
You will see an overview page where you can see how many commits will be added to main and what changes they will introduce.
After it has been reviewed, it can be merged to main by clicking the "Merge pull request" button.
After confirming the merge, you also have the option to delete your old branch via the UI. However, this will only delete the remote branch and you will still have to run git branch -D articles-on-animals-from-list to delete your local branch.
Conclusion and command summary
We have looked at how to push our changes to a remote repository and have created our first branch, kept adding and committing and have resolved our first conflict!
Here are some commands to keep in mind:
-
git clone <address>to clone a remote repository -
git checkout -b my-branch-nameto create a new branch and switch to it -
git push -u origin my-branch-nameto push a branch to a remote -
git checkout my-branch-nameto switch to an existing branch from the remote -
git pullto pull changes from the remote -
git rebase --continueorgit merge --continueto continue a rebase or merge after adding files -
git merge my-branchto merge "my-branch" into the branch you have currently checked out -
git branch -D my-branchto delete "my-branch" locally -
git push --delete my-branchto delete "my-branch" on the upstream









Oldest comments (0)