
Azure Virtual Machine Scale Sets (VMSS) offer a powerful, scalable way to manage multiple identical virtual machines. Whether you're running a containerized app or a high-availability backend, VMSS can simplify scaling and ensure performance.
In this guide, I’ll show you how to deploy a Linux VMSS, configure it step by step, and securely connect to your instances via SSH.
Table of Contents
What is a Virtual Machine Scale Set (VMSS)?
Deploying a Linux VMSS in Azure
Generating SSH Keys
Connecting to VMSS Instances via SSH
Autoscaling and Load Balancing
Spot VMs for Cost Optimization
Wrapping Up
What is a Virtual Machine Scale Set (VMSS)?
A Virtual Machine Scale Set is an Azure resource that allows you to provision and manage a group of identical virtual machines. With VMSS, you can:
Automatically scale based on real-time demand
Maintain high availability across multiple zones
Easily manage software updates across all VMs
It’s ideal for scenarios like hosting web apps, microservices, or distributed compute workloads that benefit from horizontal scaling.
Deploying a Linux VMSS in Azure
Let’s walk through how to create a VMSS using the Azure Portal.
Step 1: Sign in to the Azure Portal
Visit https://portal.azure.com and log in with your Microsoft credentials.

Step 2: Start a New VMSS Deployment
Search for "Virtual Machine Scale Sets" in the top search bar and click Create to begin setup.


Step 3: Basic Configuration
Under the Basics tab:
Subscription: Choose your active subscription.
Resource Group: Create a new one or use an existing group.
Region: Select a region (e.g., East US).
VMSS Name: Name your scale set (e.g., MyLinuxVMSS).
Availability Zones: Optional — pick any zone or none.
Orchestration Mode: Set to Uniform for identical VM behavior.
Security Type: Leave as Standard.
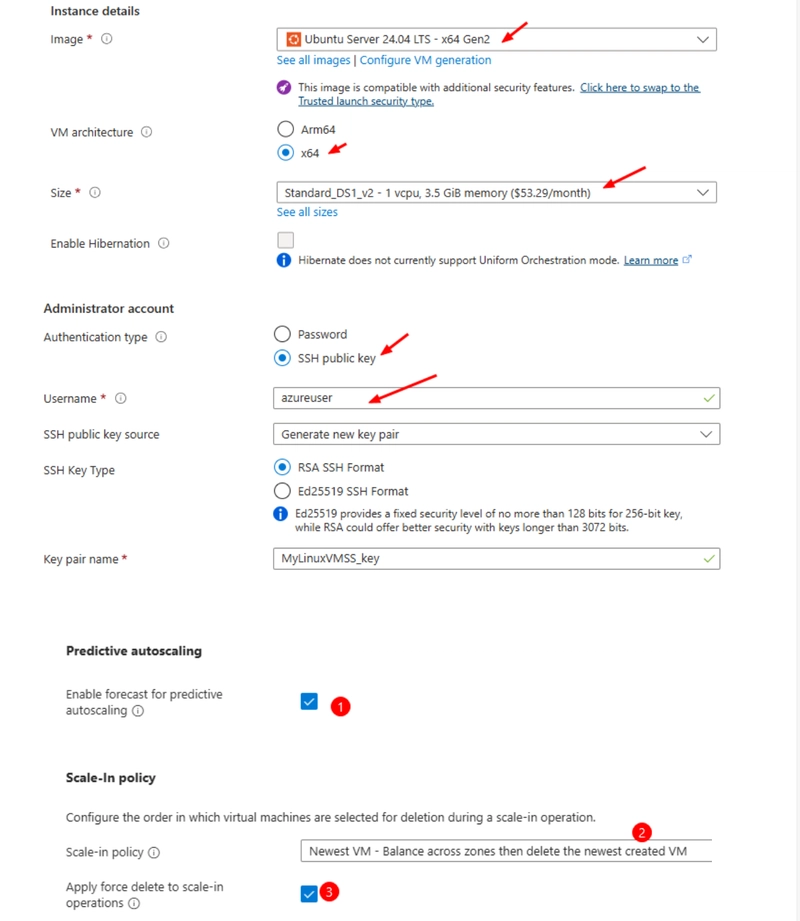
Scaling Options:
Start with Manual.
You can later configure predictive autoscaling to simulate performance.
For Scale-In Policy, choose how instances are removed (e.g., oldest first).
VM Image & Size:
Use Ubuntu 20.04 LTS (or any Linux distro).
Select a size like Standard B1ms for testing.
Instance count: Start with 2 or more.
Authentication:
Use SSH Public Key
Set a username (e.g., azureuser)
You'll paste the public key after generating your SSH pair.

Step 4: Disk Setup
OS Disk: Choose either Standard SSD or Premium SSD.
Data Disks: Optional, based on app needs.
You can leave other options as default.

Step 5: Networking Settings
Virtual Network: Select existing or create new.
Subnet: Use the default or define one.
NIC Settings: Ensure each VM connects properly.
Public IP: Enable to allow external access.
Open Ports: Allow SSH (22) and HTTP (80) as needed.
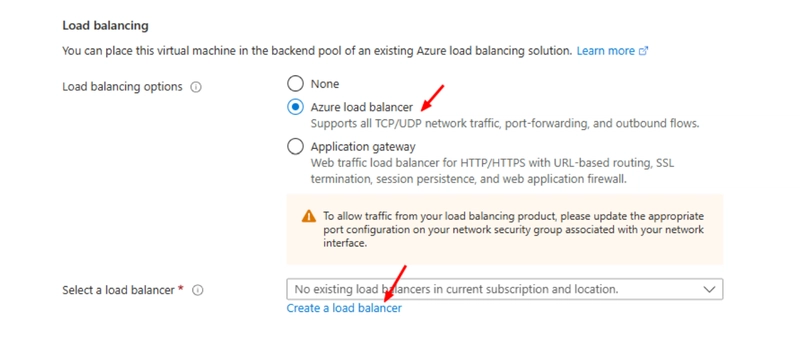
Load Balancer:
Choose Azure Load Balancer to distribute traffic.
Create a new one (e.g., MyVMSSLoadBalancer)
Set IP Type to Public
Protocol: TCP


Step 6: Review and Create
Check over your configuration, then click Create to begin deployment.


Generating SSH Keys
If you don’t have SSH keys already:
Run this command on your terminal:
bash
Copy
Edit
ssh-keygen -t rsa -b 2048 -f ~/.ssh/myVMSSKey
Copy the contents of ~/.ssh/myVMSSKey.pub and paste it in the SSH Public Key field during VMSS setup.
🔗 Connecting to VMSS Instances via SSH
Step 1: Find Your Public IP
Go to your deployed VMSS → Instances tab → Note the Public IP.

Step 2: Connect via Terminal
Use this command to connect:
bash
Copy
Edit
ssh -i ~/.ssh/myVMSSKey azureuser@
Replace with your instance's actual IP.


You can also connect via the load balancer frontend IP, which rotates traffic across all VM instances.
Autoscaling and Load Balancing
Azure lets you define autoscaling rules based on CPU usage, memory thresholds, or other metrics.

This ensures your app scales up under high load and scales down during off-peak times.
Spot VMs for Cost Optimization
Want to save money?
Consider using Spot VMs, which are up to 90% cheaper than regular VMs — but with the trade-off that Azure may evict them when demand is high.
Key Points:
Cheap: Great for batch jobs and test environments.
Evictable: Azure can terminate them with little notice.
Use Cases: Ideal for workloads that tolerate interruptions.

Wrapping Up
And there you have it — a full walkthrough on setting up a Linux Virtual Machine Scale Set on Azure, from deployment to SSH access and beyond.
VMSS is an excellent tool to ensure your infrastructure is scalable, resilient, and ready for production workloads.
Have any questions or want to share your VMSS setup? Drop a comment below 👇

Top comments (0)