Follow me on Twitter, happy to take your suggestions on topics or improvements /Chris
In this article, we will cover the testing framework Jest. We will learn how to:
- write tests, it’s a breeze to write tests and assert on specific conditions
- manage our test suite, by running specific tests as well as specific test files by utilizing the pattern matching functionality
- debug our tests, by augmenting VS Code we can gain the ability to set breakpoints in our tests and create a really nice debugging experience
- snapshot mastery, learn how using snapshots can give you increased confidence that your components are still working after a change you made
- leverage mocking, mocking dependencies can ensure you only test what you want to test and Jest has great defaults when it comes to mocking
- coverage reports, we have come to expect a good coverage tool to be included in all good testing libraries. Jest is no different and it’s really easy to run coverage reports and quickly find what parts of your code that could benefit from some more testing
Jest sells itself by saying it’s
Delightful JavaScript testing
What makes is delightful? It boasts that it has a zero-configuration experience.
Ok, we are getting closer to the answer.
- Great performance by tests running in parallel thanks to workers.
- Built-in coverage tool
- Works with typescript thanks to ts-jest
Get started
Let’s try to set it up and see how much configuration is needed. If you just want to try it, there is a Jest REPL where you will be able to write tests among other things.
Writing our first test
To make the test runner find the tests we need to follow one of three conventions:
-
Create a
__tests__directory and place your files in there -
Make file match
*spec.js -
Make file match
.test.js
Ok, so now we know how Jest will find our files, how about writing a test?
// add.js

function add(a, b) {
  return a + b;
}

module.exports = add;

// add.spec.js

const add = require('../add');
describe('add', () => {
  it('should add two numbers', () => {
    expect(add(1, 2)).toBe(3);
  });
});
We see above that we are using describe to create a test suite and it to create a test within the test suite. We also see that we use expect to assert on the result. The expect gives us access to a lot of matchers, a matcher is a function we call after the expect:
expect(something).matcher(value)
As you can see in our test example we are using a matcher called toBe() which essentially matches what's inside the expect to what's inside the matcher, example:
expect(1).toBe(1) // succeeds
expect(2).toBe(1) // fails
There are a ton of matchers so I urge you to have a look at the ones that exist and try to use the appropriate matcher Matchers
Running our test
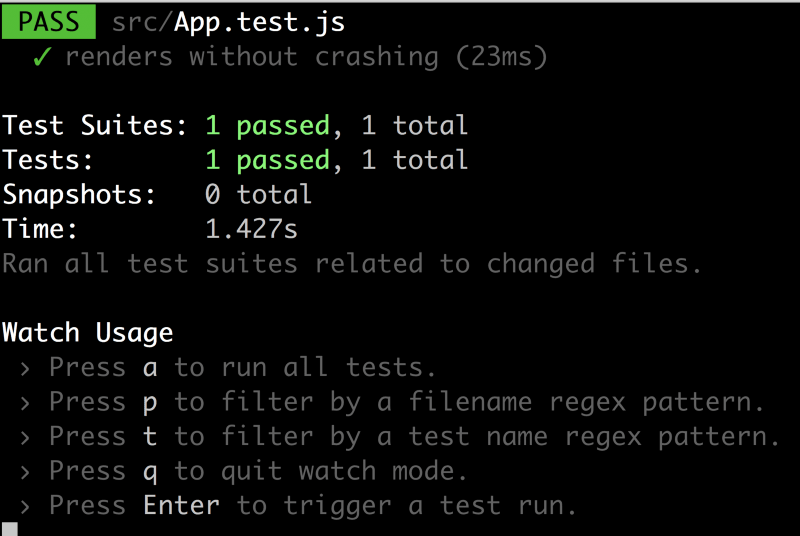
The simplest thing we can do is just to create a project using create-react-app, cause Jest is already set up in there. Once we have the project created and all dependencies installed we can simply run:
yarn test
It will show the above image containing:
- One executed test suite,
-
One passing tests and host of commands that we will explore in a bit. It seems to have run the file
src/App.test.js.
Let's have a look at the said file:
import React from 'react';
import ReactDOM from 'react-dom';
import App from './App';

it('renders without crashing', () => {
  const div = document.createElement('div');
  ReactDOM.render(<App />, div);
  ReactDOM.unmountComponentAtNode(div);
});
As we can see it has created a test using it and have also created a component using ReactDOM.render(<App />, div), followed by cleaning up after itself by calling ReactDOM.unmount(div). We haven't really done any assertions at this point, we have just tried to create a component with no errors as the result, which is good to know though.
How about we try adding add.js file and its corresponding test?
Let’s first add add.js, like so:
// add.js

function add(a,b) { return a + b; }
export default add;
followed by the test:
// add.spec.js

import add from '../add';

it('testing add', () => {
  const actual = add(1,3);
  expect(actual).toBe(4);
});
Our Jest session is still running in the terminal:
We can see that we now have two passing tests.
Debugging
Any decent test runner/framework should give us the ability to debug our tests. It should give us the ability to:
- run specific tests
- ignore tests
- set breakpoints, let us add breakpoints in our IDE (more up to the IDE vendor to make that happen)
- run in browser, let us run our tests in a Browser
Run specific test files
Let us look at how to do these things, let’s start with running specific tests. First off we will add another file subtract.js and a corresponding test.
// subtract.js

function subtract(a,b) {
  return a - b;
}
export default subtract;
and the test:
// subtract.spec.js

import subtract from '../subtract';

it('testing subtract', () => {
  const actual = subtract(3,2);
  expect(actual).toBe(1);
});
Let’s have a look at our terminal again and especially at the bottom of it:
If you don’t see this press w as indicated on the screen. The above gives us a range of commands which will make our debugging easier:
-
a, runs all the tests -
p, this will allow us to specify a pattern, typically we want to specify the name of a file here to make it only run that file. -
t, it does the same as p but it lets us specify a test name instead -
q, quits the watch mode -
Return, to trigger a test run
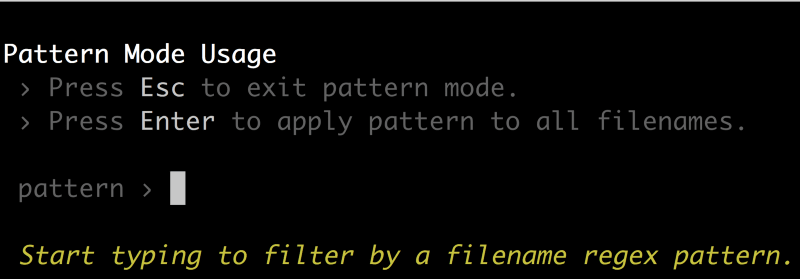
Given the above description we will try to filter it down to only test the add.js file so we type p:
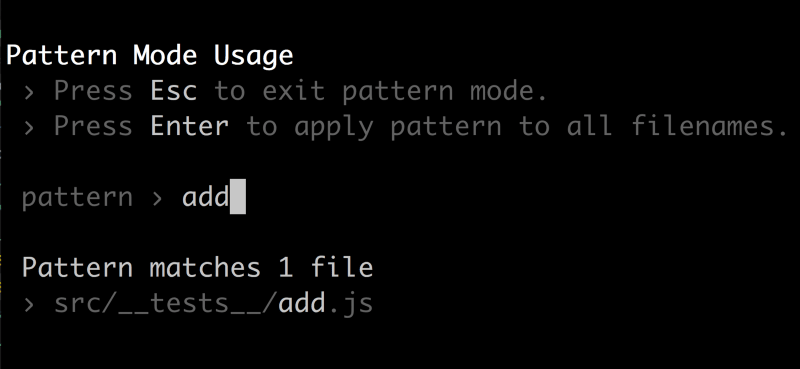
This takes us to a pattern dialog where we can type in the file name. Which we do:
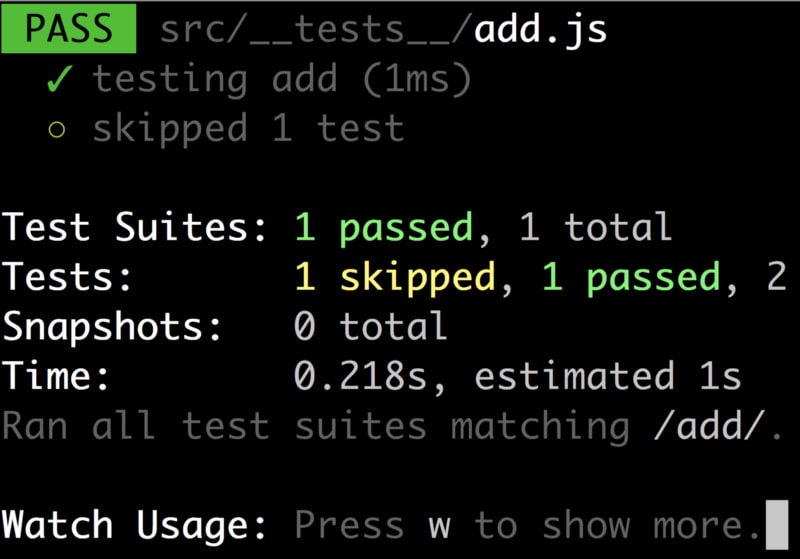
Above we can now see that only the add.js file will be targeted.
Run specific tests
We have learned how to narrow it down to specific files. We can narrow it down to specific tests even using the p, pattern approach. First off we will need to add a test so we can actually filter it down:
//add.spec.js

import add from '../add';

it('testing add', () => {
  const actual = add(1,3);
  expect(actual).toBe(4);
});

it('testing add - should be negative', () => {
  const actual = add(-2,1);
  expect(actual).toBe(-1);
});
At this point our terminal looks like this:
So we have two passing tests in the same file but we only want to run a specific test. We do that by adding the .only() call to the test, like so:
it.only('testing add', () => {
  const actual = add(1,3);
  expect(actual).toBe(4);
});
and the terminal now looks like so:
We can see that adding .only() works really fine if we only want to run that test. We can use .skip() to make the test runner skip a specific test:
it.skip('testing add', () => {
  const actual = add(1,3);
  expect(actual).toBe(4);
});
The resulting terminal clearly indicated that we skipped a test:
Debugging with Breakpoints
Now, this one is a bit IDE dependant, for this section we will cover how to do this in VS Code. The first thing we are going to do is install an extension. Head over to the extension menu and search for Jest. The following should be showing:
Install this extension and head back to your code. Now we have some added capabilities. All of our tests should have a Debug link over every single test.
At this point, we can add a breakpoint and then press our Debug link. Your breakpoint should now be hit and it should look like so:
Snapshot testing
Snapshot is about creating a snapshot, a view of what the DOM looks like when you render your component. It’s used to ensure that when you or someone else does a change to the component the snapshot is there to tell you, you did a change, does the change look ok?
If you agree with the change you made you can easily update the snapshot with what DOM it now renders. So snapshot is your friend to safeguard you from unintentional changes.
Let’s see how we can create a snapshot. First off we might need to install a dependency:
yarn add react-test-renderer --save
Next step is to write a component and a test to go along with it. It should look something like this:
// Todos.js

import React from 'react';
const Todos = ({ todos }) => (
  <React.Fragment>
   {todos.map(todo => <div>{todo}</div>)}
  </React.Fragment> );
export default Todos;
// Todos.spec.js
import renderer from 'react-test-renderer';
import React from 'react';
import Todos from '../Todos';
test('Todo - should create snapshot', () => {
  const component = renderer.create(
    <Todos todos={['item1', 'item2']} />
  );
  let tree = component.toJSON();
  expect(tree).toMatchSnapshot();
})
Note how import, imports the component we are about to test:
import Todos from '../Todos';
This is followed by using the renderer to create an instance of our component. Next step is to turn that component into a JSON representation like so component.toJSON() and lastly, we assert on this by calling expect(tree).toMatchSnapshot(), this will call a snapshot that will place itself in a __snapshots__ directory under your tests directory.
Managing the snapshot
Ok, so we have a snapshot, now what? Let’s do a change to our todo component, like so:
// Todos.js

import React from 'react';
const Todos = ({ todos }) => (
  <React.Fragment> {
    todos.map(todo => (
      <React.Fragment>
        <h3>{todo.title}</h3> <div>{todo.description}</div>
      </React.Fragment>
    ))}
   </React.Fragment> );

export default Todos;
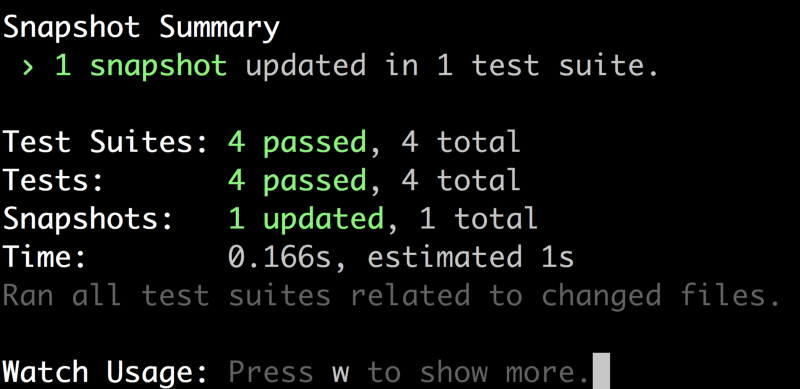
We see that our todo is an object instead of a string so it has a title and description property. This WILL make our snapshot react and it will say the following:
It clearly indicates something is different and asks us to inspect the code. If we are happy with the changes we should press u to update the snapshot to its new version. So look at the code and yes this is an intended change so therefore we press u. We end up with the following image telling us everything is ok:
Mocking
Mocking is one of those things that needs to work well. Mocking in Jest is quite easy. You need to create your mocks in a directory that is adjacent to your module, or more like a child directory to the module. Let’s show what I mean in code. Imagine you have the following module:
// repository.js

const data = [{ title: 'data from database' }];

export default data;
Let’s look at a test for this one:
// repository.spec.js

import data from '../repository';

describe('testing repository data', () => {
  it('should return 1 item', () => {
    console.log(data);
    expect(data.length).toBe(1);
  });
});
Not the best of tests but it is a test. Let’s create our mock so that our file structure looks like so:
// directory structure

repository.js // our repo file
__mocks__/repository.js // our mock
Our mock should look like this:
// __mock__/repository.js

const data = [{ title: 'mocked data' }];
export default data;
To use this mock we need to call jest.mock() inside of our test, like so:
// repository.spec.js

import data from '../repository';
jest.mock('../repository'); // taking __mock/repository instead of the actual one
describe('testing repository data', () => {
  it('should return 1 item', () => {
    console.log(data);
    expect(data.length).toBe(1);
  });
});
Now it uses our mock instead of the actual module. Ok you say, why would I want to mock the very thing I want to test. Short answer is : you wouldn’t. So, therefore, we are going to create another file consumer.js that use our repository.js. So let's look at the code for that and its corresponding test:
// consumer.js

import data from './repository';
const item = { title: 'consumer' };
export default [ ...data, { ...item}];
Above we clearly see how our consumer use our repository.js and now we want to mock it so we can focus on testing the consumer module. Let's have a look at the test:
// consumer.spec.js

import data from '../consumer';
jest.mock('../repository');
describe('testing consumer data', () => {
  it('should return 2 items', () => {
    console.log(data);
    expect(data.length).toBe(2);
  });
});
We use jest.mock() and mocks away the only external dependency this module had.
What about libs like lodash or jquery, things that are not modules that we created but is dependant on? We can create mocks for those at the highest level by creating a __mocks__ directory.
There is a lot more that can be said about mocking, for more details check out the documentation Mocking docs
Coverage
We have come to the final section in this chapter. This is about realizing how much of our code is covered by tests. To check this we just run:
yarn test coverage
This will give us a table inside of the terminal that will tell us about the coverage in percentage per file. It will also produce a coverage directory that we can navigate into and find a HTML report of our coverage. But first off let's change the add.js file to add a piece of logic that needs a test, like so:
// add.js

function add(a, b) {
  if(a > 0 && b > 0 ) {
    return a + b;
  }
  throw new Error('parameters must be larger than zero');
}
export default add;
Now we can see we have more than one path through the application. If our input params are larger than zero then we have existing tests that cover it.
However, if one or more parameters is below zero then we enter a new execution path and that one is NOT covered by tests. Let’s see what that looks like in the coverage report by navigating to coverage/lcov-report. We can show this by typing for example
http-server -p 5000
and we will get a report looking like this:
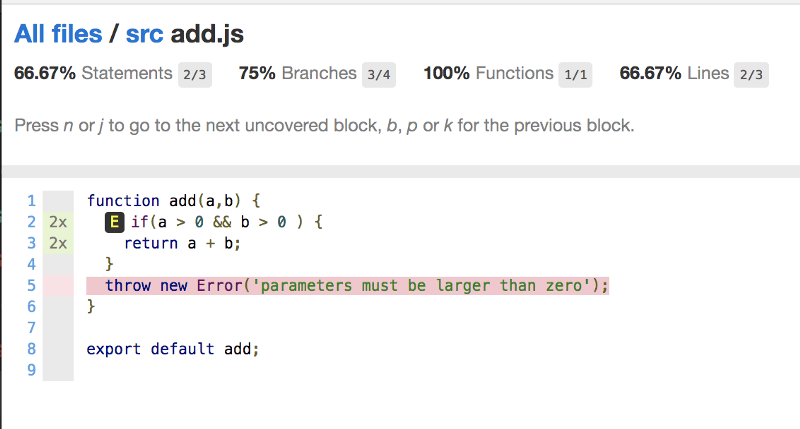
Now we can navigate to src/add.js and it should look like this:
Now we can clearly see how our added code is indicated in red and that we need to add a test to cover that new execution path.
Next, we add a test to cover for this, like so:
// add.spec.js

import add from '../add';
describe('add', () => {
  it('testing addition', () => {
    const actual = add(1,2);
    expect(actual).toBe(3);
  });

  it('testing addition with neg number', () => {
    expect(() => { add(-1,2); }).toThrow('parameters must be larger than zero'); })
  })
)
Our second case should now cover for the execution path that leads to an exception being thrown. Let’s rerun our coverage report:
Summary
We’ve looked at how to write tests. We’ve also looked at how to debug our tests using an extension from VS Code which has allowed us to set breakpoints.
Furthermore, we’ve learned what snapshots are and how to best use them to our advantage.
Next up we’ve been looking at leveraging mocking to ensure we are in complete isolation when we test.
Lastly, we’ve looked at how we can generate coverage reports and how that can help you to track down parts of your code that could really benefit from some more testing.
Further reading
- official docs for Jest can be found here Official docs
- My free React book










Latest comments (5)
Very well documentation Chris. Learning Jest felt like a breeze.
Shoutout to React Testing Library (testing-library.com/docs/react-tes...)! I just refactored all my tests to use this library and it's been great.
I had previously been using Enzyme - I had to rethink how I do testing, but I think it's much less brittle now.
hey Joe. Actually, I have an article on that dev.to/softchris/use-react-testing...
Will this work for front-end apps only or back-end as well?
backend as well.. Currently using it to test Node.js apps. Especially the mocking part is super useful with Node.js