
Traefik is an open source edge router for the cloud. Like a hostess at a restaurant that meets incoming guests and shows them to their tables, traefik intercepts requests at the edge of the network and relays them to their services.
In this tutorial, we'll learn how to install and configure highly available, low-latency API gateways with traefik on StackPath's edge computing network.
API Gateway Setup
In the course of this tutorial, we'll deploy the following infrastructure:
- Gateways: one or more traefik gateways distributed over different PoPs
- Config DB: a single database container with the gateway's routes
- Services: some API servers to test the routes

Step 1 - Prepare the API Servers
To learn how traefik works, we’ll deploy some test APIs in StackPath. You can replace these services with other containers or VMs. Or, if you already have APIs running elsewhere, you can route traffic to them from StackPath.
To get started, log in or create a StackPath account. The first time you log in to StackPath, you’ll be asked to create a Stack. Stacks are like projects, a group of deployed resources and services. In this tutorial, we’ll focus on deploying edge computing services.
After logging in, click Workloads > Create Workload in the left navigation menu.

Set the workload type to Container. Then, type the name of the Docker image that implements your API service. As an example, we can use containous/whoami, a service that always responds with its IP address and hostname.

Click Continue to Settings.
In the Settings section, you can define environment variables and startup commands for the container. You can also expose ports to the internet.
Unless you need direct access to your containers, avoid opening any ports in this section. We should route all public connections from the gateway.
Click Continue to Spec.
Select a machine in Spec and set the name of the Deployment Target. Deployment targets are used to configure auto-scaling.
Choose one PoP and set the number of instances to two.

Click Create Workload and wait a few seconds until your containers are running.
Step 2 - Install Etcd
Traefik has two types of settings: static and dynamic, with the former being activated when the gateway boots up and the latter taking effect without interruption. Dynamic settings are stored in distributed databases like Consul, ZooKeeper, or etcd.
Here we’ll use etcd, an easy-to-use key-value database for the cloud.
Create a second workload on StackPath. Like you did in Step 1, go to Workloads > Create Workload. Set the name of the workload to “my-api-config”. Then, select Container in Workload Type, and type quay.io/coreos/etcd:v3.4.0 in Image.

Click Continue to Settings.
You don’t have to open any ports here as all communication with etcd can take place over the private network.
We’ll configure etcd with Environment Variables. There are three settings we’re interested in.
ETCD_DATA_DIR - Tells etcd where the database is located. We’ll point it to a persistent mount to preserve the data across reboots and upgrades. Set it to /etcd-data.
ETCD_LISTEN_CLIENT_URLS - Defines the ports and interfaces that etcd binds to. Set it to http://0.0.0.0:2379.
ETCD_ADVERTISE_CLIENT_URLS - This is the DNS name or IP address the clients use to connect with etcd. StackPath provides a free internal Discovery DNS service that simplifies this step enormously.
Discovery DNS
StackPath's Discovery DNS service helps you connect your containers and VMs using predictable names instead of IP addresses. DNS entries are automatically created when you update workloads. You can use hostnames, workload names, ports, and SRV records to define your network.
For instance, we can find all healthy containers in a given workload following this formula:
WORKLOAD_NAME.STACK_NAME.edgeengine.internal
So, if the workload name for etcd is my-api-config and the stack is called my-default-stack, then its FQDN (Fully Qualified Domain Name) is my-api-config.my-default-stack.edgeengine.internal.
In this tutorial, we’ll only deploy a standalone etcd instance. Later, you might decide to upgrade it to a cluster. If you follow this pattern, the system naturally grows as you add new instances.
Set this value to http://my-api-config.YOUR_STACK_NAME.edgeengine.internal:2379.

Click Continue to Spec.
On Additional Volume set the mount path to /etcd-data and set the volume size.
Set the Deployment target and click Create Workload.

Click Overview in the left menu and scroll down to the Manage Your Instances section and enable Remote Management.
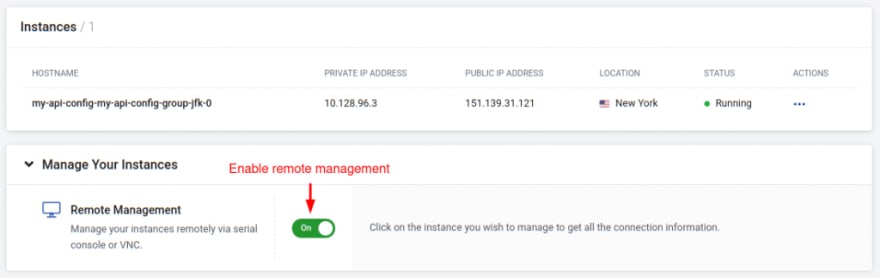
Click on your etcd instance and scroll down to the Instance Details section.
Click on the Run & Open Terminal button next to Remote Management. A terminal window opens.

Define the username and password environment variables. We’ll need to repeat the export commands each time we connect to the etcd instance.
export ETCDCTL_USER=root
export ETCDCTL_PASSWORD=TYPE_YOUR_ETCD_PASSWORD
Create a new username and enable authentication.
etcdctl user add "$ETCDCTL_USER":"$ETCDCTL_PASSWORD"
etcdctl user grant-role root $ETCDCTL_USER
etcdctl auth enable
Use the following command to get etcd ready for the traefik configuration:
etcdctl put traefik -- true

OK
Leave the terminal window open. We’ll use it to configure Traefik next.
Step 3 - Deploy Traefik
Traefik gateways can issue certificates, buffer and filter requests, and authenticate users right on the edge of your network where it makes the most sense. In this step, we’ll create a third workload with the traefik containers.
Create a new workload in StackPath. Select Container in Workload Type. On Image, type traefik:2.2.

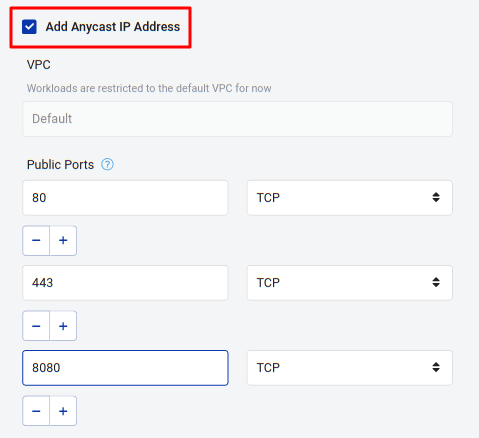
Click Continue to Settings and enable the Add Anycast IP option so users are always routed to the closest gateway. Then, on Public Ports, add ports 80 (HTTP) and 443 (HTTPS). Traefik also offers an optional dashboard on port 8080. The dashboard shows all sorts of interesting information so you may want to open that port too.
Next, we need to tell Traefik where to find the configuration database. Use the + buttons in Commands to add the following lines—one line per command. Fill in your etcd DNS and password.
traefik
--providers.etcd.endpoints=my-api-config.YOUR_STACK_NAME.edgeengine.internal:2379
--providers.etcd.username=root
--providers.etcd.password=YOUR_ETCD_PASSWORD
If you wish to enable the dashboard, also add these commands:
--api
--api.insecure=true

Click Continue to Spec
On Deployment Target, set the name of the deployment and choose as many PoPs and instances as you need. There is no limit to the number of instances and PoPs you can deploy. Prioritize locations that are close to you and your users to reduce latency.
Depending on the load you expect, two or three nodes may be enough. Or perhaps you find that you need 20 or 30 nodes spread all over the world. The good news is that you can scale it up and down at the click of a button—in seconds, without interruptions.

Click Create Workload
Click Overview, scroll down, and copy the gateway’s anycast IP.

Step 4 - Configure Routes and Services
In this section we’ll try out two common gateway scenarios: load balancer and API consolidation.
Traefik uses routers to match incoming requests with their destinations. Routers check for specific patterns in headers, hostnames, paths, or query strings, and forwards them to the corresponding service. Replies are sent back to the client as if they had originated from the gateway.
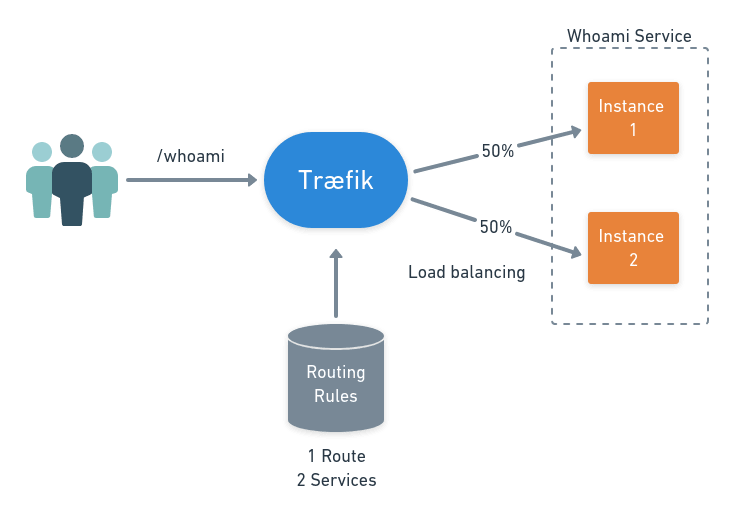
Load Balancer Scenario
A load balancer distributes incoming connections among two or more API servers.
Traefik uses a tree to represent the routers on the configuration database. To define the routes, we only have to create the relevant nodes.
traefik
└── http
    ├── middlewares
    ├── routers
    └── services
First, we need to find out the DNS names of the API services we plan to proxy. On StackPath, go to the test service workloads you created in Step 1 and take note of their hostnames.
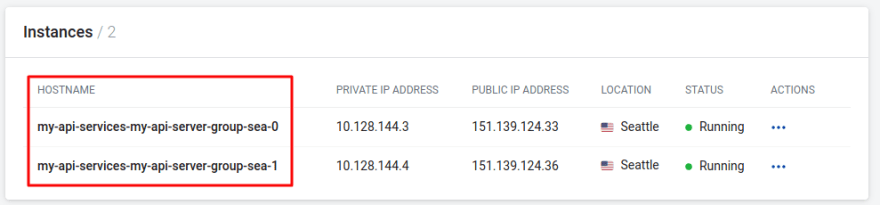
Here we benefit from StackPath’s DNS discovery service. We can target any particular instance as HOSTNAME.STACK_NAME.edgeengine.internal.
So, in this case, the FQDN for the services are:
my-api-services-my-api-server-group-sea-0.my-default-stack.edgeengine.internalmy-api-services-my-api-server-group-sea-1.my-default-stack.edgeengine.internal
Note: If you are proxying API services deployed outside of StackPath, the DNS resolver tactic won’t work. You’ll need to provide for DNS resolution or IP addresses yourself.
Go back to the etcd terminal window and type the following commands to define a load balancer service called whoami:
etcdctl put traefik/http/services/whoami/loadbalancer/servers/0/url -- http://YOUR_API_SERVICE_1_HOSTNAME
etcdctl put traefik/http/services/whoami/loadbalancer/servers/1/url -- http://YOUR_API_SERVICE_2_HOSTNAME
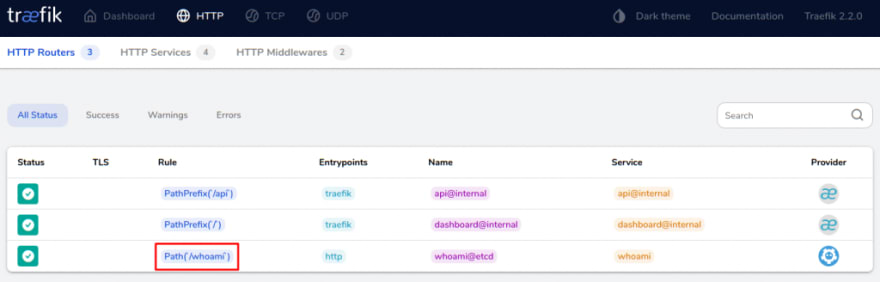
Next, we have to set the rules that send incoming traffic into the load balancer. This router matches requests to the /whoami path (for example, example.com/whoami).
etcdctl put traefik/http/routers/whoami/rule -- 'Path(`/whoami`)'
etcdctl put traefik/http/routers/whoami/service -- whoami
Once configured, you can check the new route on the dashboard (if you have enabled it).
To try the load balancer, you can use curl or a browser.
curl -w "\n" http://GATEWAY_ANYCAST_IP/whoami
You can then test how the load balancer is working by making two consecutive requests to the gateway’s anycast IP.
Hostname: my-api-services-my-api-server-group-sea-0
IP: 10.128.144.3
[...]
On the second request, you should get a different API service IP.
Hostname: my-api-services-my-api-server-group-sea-1
IP: 10.128.144.4
[..]
API Consolidation Scenario
API consolidation is another everyday scenario for a gateway. Traefik allows developers to solidify all their API services under a single endpoint. In this example, we’ll learn how to merge two APIs services.
Imagine we have two different APIs, foo and bar, which we want to present as a single entity. The easiest way to achieve this is by using different paths:
-
example.com/foois relayed to the foo service -
example.com/baris relayed to the bar service.

First, create both services in the database.
etcdctl put traefik/http/services/foo/loadbalancer/servers/0/url -- http://YOUR_API_SERVICE_1_HOSTNAME
etcdctl put traefik/http/services/bar/loadbalancer/servers/0/url -- http://YOUR_API_SERVICE_2_HOSTNAME
Since the foo and bar services do not know about the gateway, we have to remove /foo and /bar from the requests. While the requests are passing through the gateway, we can rewrite them using middlewares.
Create a StripPrefix middleware to remove the extra paths.
etcdctl put traefik/http/middlewares/strip-foobar/stripPrefix/prefixes/0 -- /foo
etcdctl put traefik/http/middlewares/strip-foobar/stripPrefix/prefixes/1 -- /bar
Finally, create two routes to match /foo and /bar.
etcdctl put traefik/http/routers/foo/service -- foo
etcdctl put traefik/http/routers/foo/middlewares/0 -- strip-foobar
etcdctl put traefik/http/routers/foo/rule -- 'Path(`/foo`)'

etcdctl put traefik/http/routers/bar/service -- bar
etcdctl put traefik/http/routers/bar/middlewares/0 -- strip-foobar
etcdctl put traefik/http/routers/bar/rule -- 'Path(`/bar`)'
The dashboard now shows:

Once again, you can try the gateway. The /foo path should respond with one IP.
curl GATEWAY_ANYCAST_IP/foo

Hostname: my-api-services-my-api-server-group-sea-0
IP: 10.128.144.3
[..]
While the /bar path should always return the other IP:
curl GATEWAY_ANYCAST_IP/bar

Hostname: my-api-services-my-api-server-group-sea-1
IP: 10.128.144.4
[..]
Step 5 - Add More Middlewares
In addition to StripPrefix, traefik ships with many other middlewares to filter, buffer, and authenticate requests. For instance, we can try RateLimit, which prevents abuse of the APIs and mitigates Denial of Service (DoS) attacks.
First, configure the middleware with the following commands.
etcdctl put traefik/http/middlewares/ratelimit-foobar/rateLimit/average -- 10
etcdctl put traefik/http/middlewares/ratelimit-foobar/rateLimit/burst -- 20
etcdctl put traefik/http/middlewares/ratelimit-foobar/rateLimit/period -- 1
Then, add it to the foo and bar routers.
etcdctl put traefik/http/routers/foo/middlewares/1 -- ratelimit-foobar
etcdctl put traefik/http/routers/bar/middlewares/1 -- ratelimit-foobar
And that's it. Clients exceeding 10 requests per second on average or a burst of 20 requests will get a 429 error code (too many requests).
Check the full list of middlewares here. And, as an exercise, try combining the CircuitBreaker and retry middlewares to keep track of service health and retry failed requests.
Step 6 - Securing the Gateway
Traefik has many options to secure the gateway. Before using it in production, check the following settings.
Dashboard
The dashboard shows potentially sensitive information about your architecture. If you don't need it, you can disable it by removing the --api and --api.insecure startup options in the container workload.
If you plan to keep using the dashboard, ensure that it’s adequately secured.
- Use StackPath network policies to control what IPs can access the dashboard.
- Add a password by setting up one of the authentication methods described here.
Authentication
Traefik ships with several authentication middlewares. If your API service requires users to authenticate, you can set up one of the following middlewares.
- BasicAuth uses basic HTTP authentication to control access of known users. Usernames and passwords are stored encrypted on the dynamic configuration.
- DigestAuth authenticates using HTTP digests. The user credentials are stored on the dynamic configuration.
- ForwardAuth controls access permissions using a custom-defined external API service.
SSL/TLS
Traefik can act as a TLS terminator. If your API servers are in a private network you may not need HTTPS transport between them and the gateway. In such scenarios, traefik can offload the encryption workload.
Before using the setup in production, you should activate TLS on your gateway. There are two methods for setting up certificates.
- Standard certificates: you can add a disk volume on your traefik container to store the certificates.
- Let's Encrypt: you can use Let's Encrypt to get free and automated certificates. This setting is static and must be enabled when traefik starts up.
Once configured, you can add the RedirectScheme middleware to redirect all incoming HTTP to HTTPS.
Next Steps
In this tutorial, we have learned how to get started with traefik on StackPath by deploying some conventional gateway scenarios.
While we focused only on HTTP, traefik can also work with TCP and UDP traffic, which adds the possibility of routing content related to streaming, conferencing, and gaming.
Besides routing, traefik adds observability to your APIs.
As a next step, learn how to use the metrics and tracing integrations to monitor the network
Cover image source: https://joshuaavalon.io/setup-traefik-step-by-step

Oldest comments (0)