Managing users and API keys is a necessary task for creating a Software as a Service (SaaS). In this article, I demonstrate how to create a simple, cost effective serverless SaaS user management application. The frontend is created using Vue JS and the Amplify plugin. The backend uses Cognito for authentication of the user management API, and a key system created with DynamoDB which authorises users to access a test API created with Application Load Balancer. Check out the live demo 💽.

Not everything is intended for everyone. In a scenario where restricting access is necessary, user management must become a component of the architecture. The AWS solution to user management is the Cognito service. This integrates simply with API Gateway — but as described in the previous article, API gateway can get pretty expensive, and for high load the more cost effective alternative is Application Load Balancer.
Cheaper than API Gateway — ALB with Lambda using CloudFormation
*An alternative to API gateway is Application Load Balancer. ALB can be connected with Lambda to produce a highly…*medium.com
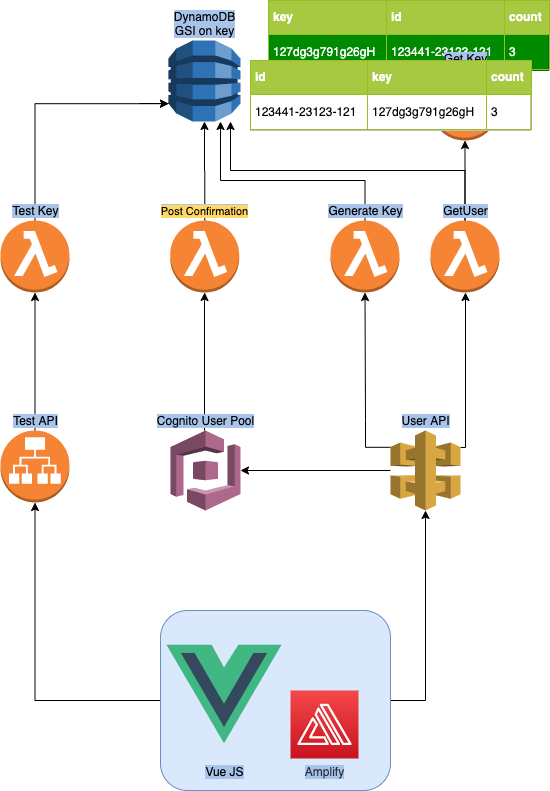
The architecture for this user management application (see below) makes use of both API gateway and ALB for their respective benefits. API gateway is chosen for the User API for two reasons:
the requests are likely to be low in volume meaning costs will be low
the requests are direct from the frontend with authentication using the Amplify package with the Vue JS framework
ALB is chosen for the example service Test API as it is expected to experience a high volume of requests which might rack up a hefty bill on API Gateway. Also, the requests are likely to be from other servers meaning API keys are preferable. Users are generated an API key on sign up which is used to authenticate the Test API. Usage of the API is monitored by incrementing a count on the User table each time a request is made to the Test API.
 *
*
User Manager Quickstart Architecture Diagram*
This architecture is cost effective for high-load APIs. A quote from this article might help you decide if your service falls into that category:
$15 (ALB’s cost) worth of API Gateway calls will net you around 4.3 million API calls in the month (well, 5.3 million if you count the free tier). So, if your API is small enough to fit under that number of calls, stick with API Gateway — it’s simpler to use. But, 5.3 million API calls is only around two requests per second. So, if your API is used very much at all — or even if you have DNS health checks enabled — you could easily end up paying more for API Gateway than you would for Application Load Balancer.
I presume this article will not bring in more than two reads per second, meaning an ALB would not be suitable for running the demo of the service. Instead, the test API seen in the diagram has been replaced with another API Gateway. You can see a demonstration of the app in use below.
The full code for this project can be found here ☁️
The live demo can be found here 💽
 *
*
Video of Use Manager App*
Let’s Build! 🔩
Backend
The infrastructure for this system is written as code using the CloudFormation framework.
VPC
ALBs must be placed within a Virtual Private Cloud on AWS. The service uses a stripped down VPC consisting of only two public subnets and an Internet Gateway. A more complete VPC is described in a previous article:
Virtual Private Cloud on AWS — Quickstart with CloudFormation
*A Virtual Private Cloud is the foundation from which to build a new system. In this article, I demonstrate how to…*medium.com
User Management with Cognito
The AWS Cognito service is used to manage users. Users are stored in user pools, and Clients (mobile or web apps) can interact with them using an API. I configured the Cognito user pool to send an email with a verification code on sign up.
CognitoUserPoolClient:
    Type: AWS::Cognito::UserPoolClient
    Properties:
    ClientName: CognitoUserPoolClient
    UserPoolId: !Ref CognitoUserPool
    AllowedOAuthFlows:
    - implicit
    AllowedOAuthFlowsUserPoolClient: true
    AllowedOAuthScopes:
    - email
    - openid
    LogoutURLs:
    - !Sub
        - https://um-app.${ Domain }
        - Domain: !ImportValue UserManagerApp-RootDomain
    CallbackURLs:
    - !Sub
        - https://um-app.${ Domain }
        - Domain: !ImportValue UserManagerApp-RootDomain
    SupportedIdentityProviders:
    - COGNITO
You must also define a client; this allows for OAuth on our frontend client.
NB: Setting the URLs to
localhostallows for local development.
CognitoUserPoolClient:
    Type: AWS::Cognito::UserPoolClient
    Properties:
    ClientName: CognitoUserPoolClient
    UserPoolId: !Ref CognitoUserPool
    AllowedOAuthFlows:
    - implicit
    AllowedOAuthFlowsUserPoolClient: true
    AllowedOAuthScopes:
    - email
    - openid
    LogoutURLs:
    - !Sub
        - https://um-app.${ Domain }
        - Domain: !ImportValue UserManagerApp-RootDomain
    CallbackURLs:
    - !Sub
        - https://um-app.${ Domain }
        - Domain: !ImportValue UserManagerApp-RootDomain
    SupportedIdentityProviders:
    - COGNITO
Cognito user pools offer useful event tiggers such as sign up confirmation. I have used the post-confirmation event to trigger a Lambda function which writes the user’s username, a newly generated API key, and a zero initialised counter to a DynamoDB table. The table has a Global Secondary Index (GSI) on the Key attribute which allows for a user lookup with just the Key.
UserTable:
    Type: AWS::DynamoDB::Table
    Properties:
    AttributeDefinitions:
        - AttributeName: "Id"
        AttributeType: "S"
        - AttributeName: "Key"
        AttributeType: "S"
    KeySchema:
        - AttributeName: "Id"
        KeyType: "HASH"
    ProvisionedThroughput:
        ReadCapacityUnits: 1
        WriteCapacityUnits: 1
    GlobalSecondaryIndexes:
        - IndexName: "KeyLookup"
        KeySchema:
            - AttributeName: "Key"
            KeyType: "HASH"
        Projection:
            ProjectionType: "ALL"
        ProvisionedThroughput:
            ReadCapacityUnits: 1
            WriteCapacityUnits: 1
The PostConfirmation Lambda function template:
PostConfirmationLambdaFunction:
    Type: AWS::Serverless::Function
    Properties:
    CodeUri: ./PostConfirmation
    Handler: main.handler
    MemorySize: 128
    Runtime: python3.8
    Timeout: 60
    Role: !GetAtt PostConfirmationLambdaRole.Arn
    Environment:
        Variables:
        TABLE_NAME: !Ref UserTable
The PostConfirmation Lambda is a Python function which creates an API key and stores it in the DynamoDB table:
import boto3
import os

dynamodb = boto3.resource('dynamodb')
TABLE_NAME = os.environ['TABLE_NAME']
table = dynamodb.Table(TABLE_NAME)

def handler(event, context):
try:
    username = event["userName"]
    table.put_item(
        Item={
                'Id': username,
                'Key': os.urandom(64).hex(),
                'Count': 0
        }
        )
except Exception as err:
    print("ERR: ", err)
return event
User API
Endpoints created for users to access their profile and generate an API key are authenticated for the logged in user. Authentication is easily added to API gateway with Cognito (CORS are set open for development purposes).
UserApi:
    Type: 'AWS::ApiGateway::RestApi'
    Properties:
    Body:
        info:
        version: '1.0'
        title: !Ref 'AWS::StackName'
        paths:
        /user:
            options:
            x-amazon-apigateway-integration:
                type: mock
                requestTemplates:
                application/json: |
                    {
                    "statusCode" : 200
                    }
                responses:
                default:
                    statusCode: '200'
                    responseTemplates:
                    application/json: |
                        {}
                    responseParameters:
                    method.response.header.Access-Control-Allow-Origin: '''*'''
                    method.response.header.Access-Control-Allow-Methods: '''*'''
                    method.response.header.Access-Control-Allow-Headers: '''*'''
            consumes:
                - application/json
            summary: CORS support
            responses:
                '200':
                headers:
                    Access-Control-Allow-Origin:
                    type: string
                    Access-Control-Allow-Headers:
                    type: string
                    Access-Control-Allow-Methods:
                    type: string
                description: Default response for CORS method
            produces:
                - application/json
            get:
            x-amazon-apigateway-integration:
                httpMethod: GET
                type: aws_proxy
                uri: !Sub >-
                arn:aws:apigateway:${AWS::Region}:lambda:path/2015-03-31/functions/${GetUserFunction.Arn}/invocations
            security:
                - CognitoUserPoolAuthorizer: []
            responses: {}
        swagger: '2.0'
        securityDefinitions:
        CognitoUserPoolAuthorizer:
            in: header
            type: apiKey
            name: Authorization
            x-amazon-apigateway-authorizer:
            providerARNs:
                - !ImportValue UserManagerApp-CognitoUserPoolArn
            type: cognito_user_pools
            x-amazon-apigateway-authtype: cognito_user_pools
The code for getting and generating keys is very similar to the post-confirmation Lambda code.
Service API — Test
The API I’ve created with ALB is for the high traffic volume endpoints which are authenticated using an API key. This API key is sent in a POST request to the service.
LoadBalancer:
    Type: AWS::ElasticLoadBalancingV2::LoadBalancer
    Properties:
    SecurityGroups:
        - !Ref LoadBalancerSecGroup
    Subnets:
        - !ImportValue UserManagerApp-PublicSubnetA
        - !ImportValue UserManagerApp-PublicSubnetB

LoadBalancerTargetGroup:
    Type: AWS::ElasticLoadBalancingV2::TargetGroup
    Properties:
    TargetType: lambda
    Targets:
        - AvailabilityZone: all
        Id: !GetAtt Lambda.Arn

LoadBalancerListener:
    Type: AWS::ElasticLoadBalancingV2::Listener
    DependsOn:
    - LambdaFunctionPermission
    Properties:
    LoadBalancerArn: !Ref LoadBalancer
    DefaultActions:
        - Type: forward
        TargetGroupArn: !Ref LoadBalancerTargetGroup
    Port: 443
    Certificates:
        - CertificateArn: !ImportValue UserManagerApp-RegionalCertArn
    Protocol: HTTPS

Lambda:
    Type: AWS::Lambda::Function
    Properties:
    Code:
        S3Bucket: !ImportValue UserManagerApp-CodeBucketName
        S3Key: TestKey.zip
    Description: Test Service function
    Handler: main.handler
    MemorySize: 256
    Role: !GetAtt LambdaRole.Arn
    Runtime: python3.8
    Timeout: 60
    Environment:
        Variables:
        TABLE_NAME: !ImportValue  UserManagerApp-UserTableName
The service uses the user’s API key for a query on a GSI of the user table to get the username and Count, then increment the Count and return the updated Count. Again, I have added open CORS whilst developing. For security, these should been locked down.
import boto3
from boto3.dynamodb.conditions import Key
import os
import time
import json
from decimal import Decimal


dynamodb = boto3.resource('dynamodb')
TABLE_NAME = os.environ['TABLE_NAME']
table = dynamodb.Table(TABLE_NAME)

def handler(event, context):
response = {
    "isBase64Encoded": False,
    "headers": {
        'access-control-allow-methods': 'POST, OPTIONS',
        'access-control-allow-origin': '*',
        'access-control-allow-headers': 'Content-Type, Access-Control-Allow-Headers'
    }
}

try:
    if event['httpMethod'] == "POST":
    count = "UNKNOWN"
    key = json.loads(event["body"]).get("key")
    keySearchResp = table.query(
        IndexName='KeyLookup',
        KeyConditionExpression=Key('Key').eq(key)
    )
    item = keySearchResp["Items"][0]
    id = item["Id"]

    keyUpdateResp = table.update_item(
        Key={
            'Id': id,
        },
        UpdateExpression="set #c = #c +:num",
        ExpressionAttributeNames={
            "#c": "Count"
        },
        ExpressionAttributeValues={
            ':num': Decimal(1),
        },
        ReturnValues="UPDATED_NEW"
    )

    count =  keyUpdateResp["Attributes"]["Count"]
    response["body"] = json.dumps({ "COUNT": int(count)})
    response["statusCode"] = 200

    elif event['httpMethod'] == "OPTIONS":
    response["statusCode"] = 200

    else:
    raise Exception('Method not accepted')

except Exception as err:
    print("ERR: ", err)
    response["statusCode"] = 500

return response
Frontend
Vue JS
My choice of JavaScript framework is Vue JS and I make quite a lot of use of Vuetify, a Material Design styling framework. After installing, it’s as simple as:
vue create frontend
---step through configurations and use defaults
vue add vuetify
Amplify
AWS Amplify is a JS plugin which consists of some useful functions for serverless Auth and API, as well as some frontend components for Vue JS, enabling user authentication flows.
import Vue from 'vue'
import App from './App.vue'
import '@aws-amplify/ui-vue';
import Amplify from 'aws-amplify';
import  { Auth } from 'aws-amplify';

import store from './store'
import router from './router'
import vuetify from './plugins/vuetify';

const ROOT_DOMAIN = 't3chflicks.org';

Amplify.configure({
    Auth: {
        region: '',
        userPoolId: '',
        userPoolWebClientId: '',
        mandatorySignIn: false,
        oauth: {
            scope: [ 'email', 'openid'],
            redirectSignIn: `https://um-app.${ROOT_DOMAIN}/`,
            redirectSignOut: `https://um-app.${ROOT_DOMAIN}/`,
            responseType: 'code'
        }
    },
    API: {
        endpoints: [
            {
                name: "UserAPI",
                endpoint: `https://um-user.${ROOT_DOMAIN}`,
                custom_header: async () => {
                    return { Authorization: `Bearer ${(await Auth.currentSession()).getIdToken().getJwtToken()}` }
                }
            },
            {
                name: "TestAPIKey",
                endpoint: `https://um-test.${ROOT_DOMAIN}`,
            }
        ]
    }
});

Vue.prototype.$Amplify = Amplify;
new Vue({
    store,
    router,
    vuetify,
    render: h => h(App)
}).$mount('#app')
In the Vue App, I use Amplify’s Authenticator UI components for user authentication flows.
<template>
<v-container fluid>
    <v-row align="center">
        <v-spacer/>
        <v-col cols="10">
            <amplify-authenticator username-alias="email" initial-auth-state="signup" v-if="!signedIn">
            <amplify-sign-up username-alias="email"  :form-fields.prop="formFields" slot="sign-up"></amplify-sign-up>
            </amplify-authenticator>
            <div v-if="signedIn ">
            <user-info class="my-2" />
            <amplify-sign-out />
            </div>
        </v-col>
        <v-spacer/>
    </v-row>
</v-container>
</template>
This is what an authenticated user sees:
 *
*
Unauthenticated User Page*
With the API configured in main.js, calling an API inside a Vue component is pretty simple.
methods: {
  async testKey() {
    if(this.testAPIKey !== ""){
      const myInit = {
          body: {
            key: this.testAPIKey
          },
      };
      const response = await API.post('TestAPIKey', '/', myInit);
      this.response = JSON.stringify(response);
    }
    else {
      alert("enter your key")
    }
  }
The authorisation header is set for the current logged in user. The code for accessing the User API is just as clean.
methods: {
    async getUserKey(){
    const resp = await API.get('UserAPI', '/user');
    this.APIKey = resp.KEY;
    },
}
full code ☁️ . . . . . . . . . . . . . . . . . . . . . . . . . . .live demo 💽
Deploy
Using CloudFormation templates mean it is simple to deploy this infrastructure using the AWS CLI.
aws cloudformation deploy --template-name ./00-infra.yml
Vue JS builds a static site which is uploaded to S3 and deployed using CloudFront.
npm run build;
aws s3 cp ./dist s3://<< your bucket name >> --recursive
*
Video of Use Manager App*
After Thoughts
This Architecture is the basis for a SaaS, the next step is to link to a payment service such as Stripe to handle subscriptions, which is done in part 2:
**💸 Pay Me: Quickstart for creating a SaaS pt.2 — Stripe Payments
**C*reating a SaaS solution is fun, but creating a payment system can be a minefield. In this article, I demonstrate how…m*edium.com
Some popular APIs from Rapid API Top 100:
URL Shortener Service — Learn More
Investors Exchange (IEX) Trading — Learn More
Crime Data — Learn More
Youtube To Mp3 Download — Learn More
Web Search — Learn More
JokeAPI — Learn More
Genius — Learn More
Crypto Asset Tickers — Learn More
Thanks for reading
I hope you have enjoyed this article. If you like the style, check out T3chFlicks.org for more tech-focused educational content (YouTube, Instagram, Facebook, Twitter).
The full code for this project can be found here ☁️
The live demo can be found here 💽
Resources:

Top comments (0)