Introduction
webMethods.io Integration is an integration platform as a service (iPaaS) that lets you connect web apps, on-premise systems, and devices to create customized integrations and automate tasks. Using the Connector Builder feature, you can create custom web connectors and use them in your workflows.
What is a Connector Builder App?
The Connector Builder app is a custom Node.js application that you can build using a web application’s APIs. So, for example, if you have a private API or an API that is not yet available in webMethods.io Integration, you can create custom actions and triggers for those APIs. Once you have created these actions and triggers, you can work with them in the same way you use existing actions and triggers.
Below is the list of basic terms you should be familiar with before you start creating your first Connector Builder app:
- Trigger: It reads data from the specified API and can be used to execute a workflow execution.
- Action: It sends data to the specified API to perform CRUD operations.
- Authentication: It specifies what credentials are required from the user.
- Lookup: It searches for specific records in your system or account.
How the Connector Builder App Works?
Once you deploy the app on webMethods.io Integration, it is validated by webMethods.io Integration platform. If the app contains any errors, you will see an error message and the error details on the console. If not, the app will be successfully validated and made available to you locally. You can then share this app with specific users or publish it to webMethods.io Integration to make it available to all users of webMethods.io Integration.
Connector Builder vs. Node.js Block
Both the Connector Builder and Node.js block serve the same purpose, that is, to let you customize your workflows.
However, the major difference between the two is that the Connector Builder works more like a programming project, wherein you have to create your application from scratch. The Connector Builder lets you create actions, triggers and lookups along with custom authentications.
On the other hand, the Node.js block offers you a ready-to-use interface where you just have to enter the core logic for your application. It lets you create only actions.
Based on your business requirements, you can choose any one of these options and start creating your custom workflows.
Requirements
The app can be developed using any Node version between 4.x.x and 8.14.X.
If you have installed any other Node version (for example, v8.9.4.) on your system, you can choose from one the following options:
- Switch to one of the Node versions between 4.x.x and 8.14.x using tools such as node-windows, nvm, n, and run the app locally.
For Windows, use:
Note: Please use default command prompt. GitBash and MINGW64 are not supported.
For nvm on Mac (via homebrew), use:
brew install nvm
nvm install v6.10.2
OR
- Build the app using your existing Node version (for example, v8.9.4.) and then transpile it using Babel or another similar transpiler.
Installing the Connector Builder Package
In order to get started with Connector Builder, you will first need to install it on your system. To do so, run the following command:
npm install -g @webmethodsio/wmiocli
Once this is done, you can start building your app.
Creating a Local App
Note: This section contains a detailed explanation of how to create a local app using the Connector Builder along with an example. If you are familiar with how an iPaaS Connector Builder works, jump to the Quick Setup Guide.
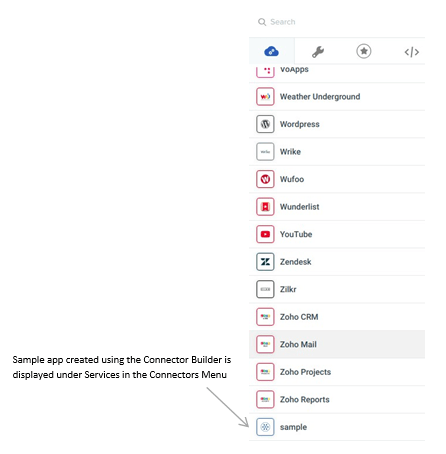
Once you have installed the Connector Builder package, you can install Connector Builder and set up your authentication to create a working app. It will be private and visible under the Services tab in your Connectors panel.
Here is a look at the blocks that make up the app:
1. Triggers
Triggers read data from the external app and execute the workflow in webMethods.io Integration.
The basic structure for creating a trigger using Connector Builder is given below. You can add your custom code in this structure to create your own triggers.
a. Creating a Polling Trigger:
If you want to create a polling trigger, refer to the structure given below:
module.exports = { name: “sample\_trigger”, label: “Sample Trigger”, input: { type: ‘object’, title: ‘Sample Trigger’, description: “Short description”, properties: { event: { type: ‘string’, enum: [‘sample\_trigger’] }, polling: { type: ‘boolean’, default: true, options: { hidden: true } }, } }, output: { “sample\_trigger”: { type: ‘object’, properties: {} } }, mock\_data: {}, // add the sample output data for testing execute: function(input, options, output) { // will be called every 5 minutes // your code here }, activate: function(input, options, output) { // This function will be called whenever a user activates the trigger/workflow. // This function is useful in scenarios where you save cursor to figure out newly added/changed data in // 3<sup>rd</sup> party services. You can update your cursor so that trigger won't fetch data of the period // during which the trigger was deactivated. }, validate: function(input, options, output) { // This function will be called when the trigger is created. // This function validates all inputs provided by the user and sends an error if any of the details (including auth) are incorrect. In case of an error, trigger server won't create the trigger. } }
b. Creating a webhook trigger
If you want to create a webhook trigger, refer to the structure given below:
module.exports = { name: “sample\_trigger”, label: “Sample Trigger”, input: { type: ‘object’, title: ‘Sample Trigger’, description: “Short description”, properties: { event: { type: ‘string’, enum: [‘sample\_trigger’] }, polling: { type: ‘boolean’, default: false, options: { hidden: true } }, } }, output: { “sample\_trigger”: { type: ‘object’, properties: {} } }, mock\_data: {}, // add sample output data for testing execute: function(input, options, output) { // will be called every 5 minutes // your code here }, activate: function(input, options, output) { // This function will be called whenever a user activates the trigger/workflow. // This function is useful in scenarios where you save cursor to figure out newly added/changed data in the // 3<sup>rd</sup> party services. You can update your cursor so that trigger won't fetch data of the period // during which the trigger was deactivated. }, validate: function(input, options, output) { // This function will be called when the trigger is created. // This function validates all inputs provided by the user and sends an error if any of the details (including auth) are incorrect. In case of an error, trigger server won't create the trigger. } }
Learn more about triggers.
2. Actions
Actions refer to the tasks you want to perform. Learn more about Actions.
The basic structure for creating an action is given below. You can add your custom code in this structure to build your own actions.
module.exports = { title: “sample\_action”, description: “”, version: “v1”, input: { title: ‘sample\_action’, type: ‘object’, properties: {} }, output: { title: ‘output’, type: ‘object’, properties: {} }, execute: function(input, output) { // your code here } }
3. Authentications
In order to function correctly, actions and triggers need authentication from the users. webMethods.io Integration provides 4 methods to add authentication for your actions and triggers. These methods are listed below:
a. Basic
If your action/trigger only needs two pieces of information from the user, that is, email ID and password, you can use the basic authentication method.
Below is the structure that should be used for basic authentication. You can add your custom code in this structure to create your own basic authentication mechanism.
module.exports = { label : ‘Connect to Demo’, mock\_input: { “username” : “myuser”, “password” : “mypassword” }, validate : function (input, output) { // auth data will be available in input.auth // var username = input.auth.username // var password = input.auth.password // make call to third party api to validate user credentials // and return callback output(null, true) in case of successful validation // or return callback output(‘error message’) in case of unsuccessful validation } }
View the template for basic authentication.
b. OAuth
OAuth is a token-based authentication method. It allows an external service to a use an individual’s account information and subsequently provides secure access, without exposing the password. For example, many websites support multiple login methods. One of the login methods you commonly see is Login via Gmail or Login via Facebook. This is an example of OAuth. webMethods.io Integration provides built-in OAuth authentication modules for a number of services. You can either use these built-in modules or create custom OAuth authentication modules, as per your requirements.
Given below is the basic structure for the OAuth authentication.
Built-in Module:
module.exports = { label : ‘Connect to Twitter’, mock\_input: { access\_token: ‘token’ }, //can be obtained from https://flowoauth.built.io oauth: ‘twitter’, input: {}, validate : function (input, output){ // auth data will be available in input.auth } }
Custom OAuth Module:
You can also create custom OAuth modules to use your own credentials for authentication. To do this, run the wmio auth command, select the OAuth authentication method, and then select OAuth 1 or OAuth 2 , as per your requirements.
Here's an example code for creating Custom OAuth for GitLab:
{ “type”: “oauth2”, “title”: “GitLab”, “clientId”: “CLIENT\_ID”, “clientSecret”: “CLIENT\_SECRET”, “authURL”: “https://gitlab.com/oauth/authorize”, “tokenURL”: “https://gitlab.com/oauth/token”, “authQueryParams”: { “client\_id”: “{client\_id}”, “redirect\_uri”: “{redirect\_uri}”, “response\_type”: “code”, “state”: “{state}” }, “tokenParams”: { “method”: “POST”, “headers”: {}, “data”: { “client\_id”: “{client\_id}”, "client\_secret": "{client\_secret}", “redirect\_uri”: “{redirect\_uri}”, “grant\_type”: “authorization\_code”, “code”: “{code}” } }, “refreshParams”: { “client\_id”: “{client\_id}”, “client\_secret”: “{client\_secret}”, “redirect\_uri”: “{redirect\_uri}”, “grant\_type”: “refresh\_token” }, “requiredParams”: [], “refreshURL”: “https://gitlab.com/oauth/token”, “scope”: {}, “validate”: { “url”: “https://gitlab.com/api/v4/user”, “headers”: { “Authorization”: “Bearer {access\_token}” }, “query”: {} }, “redirectURL”: “REDIRECT\_URL\_WILL\_BE\_PROVIDED\_ON\_CREATION” }
Note: Values within the curly braces will be interpolated during runtime.
c. API Key
If your action/trigger requires an API Key to authenticate the user, you can use this method. With API Key authentication, users can pass the API Key as a query string parameter or via an HTTP header.
Below is the basic structure for the API Key authentication. You can add your custom code in this structure to create your own API Key authentication mechanism.
module.exports = { label: ‘Connect to Demo’, mock\_input: { “api\_key” : “my api key” }, input: {}, validate: function (input, output) { // this function will be executed while running unit test cases and the authData will // be available in input.auth } }
View the template for API Key authentication.
d. Custom
Along with the account credentials, if your action/trigger requires extra information such as access token, client ID and client secret from the user, you can use the custom authentication method.
Given below is the basic structure for custom authentication. You can add your custom code in this structure to create your own custom authentication mechanism.
module.exports = { label : ‘Connect to Test’, mock\_input: { “username” : “myuser”, “apikey” : “my api key”, “pass” : “my password” }, input: { type: “object”, properties: { //input field definition } }, validate : function (input, output) { // auth data will be available in input.auth // var username = input.auth.username // var password = input.auth.pass // var apiKey = input.auth.apikey } }
View the template for custom authentication.
4. Lookups
Lookups help you autofill fields with the data from your account. It retrieves the list of records associated with the specified account. While creating the individual scaffoldings, it is important to define the lookup function in the action source code.
The basic structure for creating a lookup is given below. You can add your custom code in this structure to create your own lookups.
module.exports = { ‘name’: ’sample\_lookup’, ‘label’: ‘label’, ‘search’: ‘false’, ‘execute’: function (input, options, output) { // your code goes here } }
Example
Now that we have covered how to create a local app, let us understand how this works in practice.
Suppose that you want to create a new operation for Evernote. To do this, follow the steps given below:
Note: Before attempting to create an app, ensure that you have installed Node.js version 4.x.x or higher on your machine and you are currently in the Connector Builder directory.
1. Install the Connector Builder globally
npm install -g @webmethodsio/wmiocli
2. Configure the deploy key and log in to webMethods.io Integration.
wmio login
You will be prompted to enter the tenant URL, email associated with your tenant and the tenant developer key.

To retrieve the developer key, login to webMethods.io Integration and navigate to the Profile icon > Settings.

Once you have entered these details, you will be logged in to the webMethods.io Integration.
Your Connector Builder package will be installed and ready to go at this point.
3. Create a directory for your app with the minimum required files
wmio init
You will be prompted to provide a name and description for your app, which will be displayed in the Services tab.
Once you have entered these details, it will automatically download the required files for your app and will create an app directory inside the Connector Builder folder.
4. Move into the newly created app directory
cd evernote
5. Install all the libraries needed for your app
npm install
You should now have a working local app in which you can start adding codes for your actions and triggers.
6. Add new operation
wmio create action
Example: wmio create action create_issue
You will notice that the action scaffolding has been created in your Evernote directory and it contains the newly created javascript file, evernote-notebook-create-.js. This file will already have the basic structure that you need to follow to create a new operation. To create an action, write the custom code in this file. Similarly, you can add scaffoldings and relevant codes for lookups and triggers using these commands:
wmio create lookup
and
wmio create trigger <trigger_name></trigger_name>
7. Add authentication to your operation/trigger
wmio auth
You will be prompted to select the type of authentication method (Basic/OAuth/API Key/Custom) that you want to use. Once you have selected an authentication method, the file “authentication.js” will be created in your app Cdirreecattoirny.gYaouLcoacnaaldAdpthpe authentication logic for your operations and/or triggers in this file.
8. Test your app once all the codes are added
wmio test
The testing will be done against the mock data that you provided in the code. This is an optional step. However, we recommend performing it to ensure that the code you have written is working as expected. At this stage, the directory structure of your app will look something like this:
EvernoteConnector

9. Deploy the app
wmio deploy
Use this command to deploy your app to webMethods.io Integration. Once deployed, it will be automatically registered with webMethods.io Integration and made available to you locally under the Services tab in the Connectors panel.
10. Adding a custom icon
You can also add a custom icon for your application. To do this, navigate to your application directory and place the required icon inside the icon folder.
Note: The custom icon should be a square (up to 128x128 pixels) and lesser than 1 MB in size.
Quick Setup Guide
Note: The Quick Setup Guide is for users who are familiar with how an iPaaS Connector Builder works. For a detailed explanation, jump to the Creating a Local App section.
1. Install the Connector Builder globally
npm install -g @webmethodsio/wmiocli
2. Login to webMethods.io Integration
wmio login
On running this command, you will be prompted to enter your tenant URL, email ID associated with the tenant, and the tenant developer key.

Once you enter these details, you will be logged in to webMethods.io Integration and your Connector Builder package will be installed and ready to go!
3. Create a new app with the minimum required files
wmio init
You will be prompted to provide a name for the app.
4. Move into the newly created directory
cd <app_name></app_name>
5. Install all the required libraries for your Connector Builder app
npm install
You should now have a local working app in which you can start adding codes for your actions, triggers, lookups and authentications.
6. Add actions, triggers and lookups
To add a new action in your application, use:
wmio create action <action_name></action_name>
When you execute this command, a new action folder is created in your app’s directory containing the “.js” file. Based on your requirements, you can add the action code in this file’s execute function and update the input and output schema.
To add a new lookup in your application, use:
wmio create lookup <lookup_name></lookup_name>
When you execute this command, a new lookup folder is created in your app’s directory containing the “.js” file. You can add your lookup code in this file.
To add a new trigger in you application, use:
wmio create trigger <trigger_name></trigger_name>
When you execute this command, a new trigger folder is created in your app’s directory containing the “.js” file in it. You can add your trigger code in this file.
Note: The action/trigger/lookup name should consist of only alphanumeric characters and underscores.
7. Create authentication for actions/triggers/lookups
wmio auth
When you run this command, you will be prompted to select the authentication type (basic/apikey/oauth/custom). Once you select a particular type of authentication, the “authentication.js” file will be created in your app’s directory. You can then add authentication logic to this file.
8. Test the app once all codes are added
This is an optional step but we recommend that you perform it. The testing will be done against the mock data that you provided in your code.
wmio test
9. Deploy the app to webMethods.io Integration
wmio deploy
Once you have deployed the app, refresh the window. The deployed app will be added under the Services tab in the Connectors panel and made available to you locally.
You can then download, share, unshare, or publish this app.
If you wish to make your app public, that is, accessible to all webMethod.io Integration users, kindly contact our support team on support-wmio@softwareag.com.
Error Validations
webMethods.io Integration has implemented a number of test validations for Connector Builder. They are listed in the table given below:
| Error Response | Description |
| NO_CONNECTORS | No connectors are created yet |
| INVALID_COMMAND_EXECUTION | Entered command input is invalid |
| ILLEGAL_CHARS | Special characters are not allowed in connector/operation/trigger/lookup name |
| UNAUTHORIZED | You are not logged in. Try using wmio login command |
| UNDEPLOYED_CONNECTOR | Connector is not yet deployed. Try using wmio deploycommand |
| INVALID_COMMAND | Entered command does not exist. Try using wmio helpcommand to see the list of supported commands |
| HISTORY_EMPTY | History is not available |
| SWAGGER_IMPORT_FAILURE | Swagger version is not supported |
| INVALID_CONNECTOR_NAME | Special characters are not allowed in the connector name |
| USER_LOGGED_IN_ERROR | You are already logged in to webMethods.io Integration. Please use wmio logout command to logout, and then relogin with a different account |
| INVALID_EMAIL | Entered email address is invalid |
| INVALID_PASSWORD | Entered password is invalid |
| LOGOUT_FAILURE | You are logged in to webMethods.io Integration |
| INVALID_SET_PARAMS | Entered command is invalid. Try using wmio set lookup |
| EMPTY_LOOKUP_LINK_FIELDS | No fields available to link lookup |
| LOOKUP_NOT_FOUND | No lookup found in your current application |
| VERSION_FAILURE | No connector is registered yet. Use wmio deploy command to deploy your connector |
| INVALID_AUTH | Error validating authentication |
| NO_AUTH_FILE | Authentication file is missing |
| CONNECTOR_VERSION_NOT_FOUND | Current application does not have any version |
| CONNECTOR_VERSION_ERROR | Connector version must be greater than the currently deployed version |
| LOOKUP_EXIST_ERROR | Lookup module already exists |
| INVALID_TRIGGER | Invalid trigger entry found in the index |
| INVALID_OAUTH_PARAM | Invalid command parameter. Try using wmio oauth deploy |
| OAUTH_MANDATORY_FIELD | Missing mandatory field in the oauth.json file |
| OAUTH_EMPTY_FIELD | OAuth field must have at least one property |
| OAUTH_FILE_ERROR | Unable to find oauth.json in your application directory |
| OAUTH_PARSE_ERROR | Failed to parse oauth.json |
| OAUTH_SCOPE_FAIL | Scope property should be an object |
| LOOKUP_ATTACH_ERROR | Select at least one component to attach lookup |
| LOOKUP_ENTRY_EXIST | Lookup entry already exists for the specified field |
| LOOKUP_DEPENDENCY | Lookup needs dependencies of other input fields |
| NO_FIELDS | No fields found |
| DETACH_ERROR | No lookup found to detach |
| DETACH_ACTION_FAIL | No operations to detach skipping |
| DETACH_TRIGGER_FAIL | No triggers to detach skipping |
| LOOKUP_ENTRY_NOT_EXIST | No entry exists for selected lookup |
Downloading Your App
Once you have deployed the app, you can download its ZIP file in your current directory. To do this, use the following command:
wmio download
When you run this command, a drop down list will appear on the screen from which you can select the app that you want to download.
App Versioning
Every time you update your app, a new version will be created. You can get a list of all the versions of your app using the following command:
wmio versions
Deleting the Deployed Action or Trigger
To delete any deployed action or trigger, follow the steps given below.
- Download the app that contains the action or trigger that you want to delete.
- Unzip the downloaded file.
- Delete the file associated with the action/trigger from the action/trigger folder and delete the name of the action/trigger from the “index.json” file.
- Deploy the app using wmio deploy command.
This will remove the specified action/trigger from your app.
Create Custom Connectors using Postman Collections
A Postman Collection is an executable API description that houses a set of API requests as a group.
With Connector Builder, you can use these existing collections or set of APIs to create custom connectors.
To do this, follow the steps given below:
1. Go to your Postman tool and navigate to the Collections section
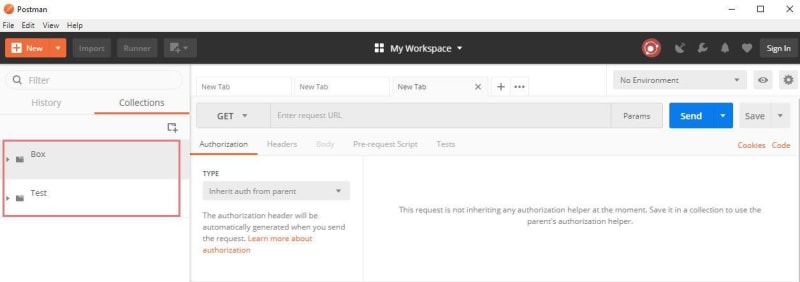
You will see the list of existing collections.
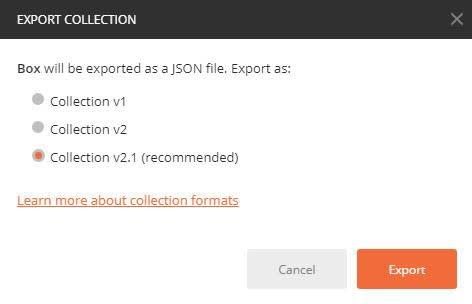
2. Locate the collection for which you want to create custom actions
Click on the ellipsis icon (three tiny dots) given beside its name and click on Export.

3. Specify the Collection version
4. Specify the location where you want to save the exported Collection
Note: It is recommended that you save the collection inside the app directory for ease of use.
5. Open the command prompt, navigate to your app directory and enter the following command:
wmio postman

This will create an action file for each API call included in the specified Collection.
You can then redeploy your app to start using these operations like you do with the other operations in the Operations panel.
Additional Information
To get the list of all the webMethods.io Integration-CLI commands along with their details, run the following in the command prompt:
wmio help
or
wmio
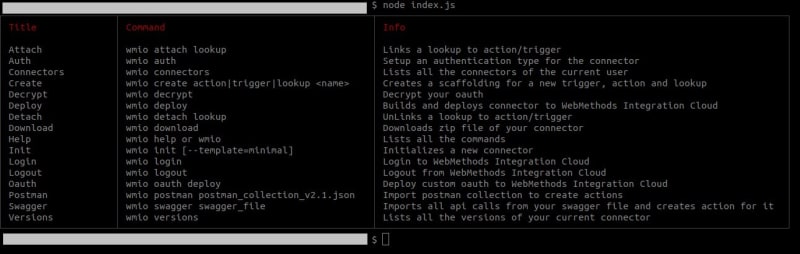
Given below is the list of all Connector Builder commands:
1. wmio login Configures the deploy key and logs you into webMethods.io Integration 2. wmio logout Logs you out from webMethods.io Integration by deleting your access token from the home directory 3. wmio connectors Displays the list of all apps for the current user 4. wmio init Initializes a new webMethods.io Integration app in your directory Example: wmio init sample\_app 5. wmio create Creates a scaffolding for trigger, action and lookup in app directory Example: wmio create trigger new\_mail 6. wmio auth Creates an authentication scaffolding in the app directory 7. wmio attach lookup Attaches lookup to action or trigger field interactively 8. wmio detach lookup Detaches lookup from action or trigger field interactively 9. wmio deploy Builds an app and deploys it to webMethods.io Integration Connector Builder will update the existing version of your app unless you change or increase the version before re- deploying it 10. wmio download Downloads the ZIP file for your app to your current directory 11. wmio versions Displays the list of all the versions for the current app 12. wmio history Displays the complete history of the current app 13. wmio swagger <swagger_file> Converts a Swagger to an action
14. wmio help or wmio
Displays the list of all Connector Builder commands along with their details
15. wmio postman <collection_file_name>
Creates an action file under the action folder of your app directory for each API call
</collection_file_name></swagger_file>
Conclusion
Resources
Support
For any assistance, contact us at support-wmio@softwareag.com or visit our Supportpage.
You can also reach out to us via our social media pages on Facebook, LinkedIn, Twitter, YouTube and Instagram.

Oldest comments (0)