
Introduction
Most mobile apps need to store persistence data locally. There are many reasons to do so, from restoring the app state at the last session, to improve app performance. Therefore, Flutter offers us several ways to accomplish this feature. In this post, I will introduce to you 3 different ways to store persistence data in Flutter:
- Store key-value to shared_preference
- Saving data to a local database
- Writing and reading a file
Prerequisites
Before starting, I assume you already know the very basic Flutter things as below:
- Getting Start Guide.
- Have your own favorite IDE and already install Flutter plugin (I recommend VSCode or Android Studio).
What if you haven’t known these things yet. No problem! You only need 10 minutes to finish the Getting Start Guide.
Setup Project
Let’s create a new Flutter project for this tutorial. I use VSCode to create my project called flutter_data_persisitence. Anytime you can get the source code of this tutorial repository.
Data Persistence with Shared Preference
I will use shared_preference plugin to store a small amount of data under key-value format.
The most important thing you should remember while using shared_preferences is SMALL DATA. Do not use it for storing large data or complicated data, it will make your code super complicated because of reading and writing this data from shared_preferences.
I can list down here some use cases that shared_preferences is useful:
- User changes view mode (night mode).
- Changing the app’s language.
- Select the app theme.
So when does the data in SharedPreference was clear? The system will erase your data in SharedPreference whenever the user uninstalls your app. Data still remains after the app closes and reopens.
Installing
Firstly, we add shared_preferences as dependencies inpubspec.yaml as below:
dependencies:
  flutter:
    sdk: flutter
  shared_preferences: ^0.5.7
Run command to install dependencies. Or it will automatically install if you use VSCode.
flutter pub get
[FYI]: For anyone who doesn’t know character ^ yet. ^version means “the range of all versions guaranteed to be backward compatible with the specified version”. For example, ^2.1.0 is equivalent to ‘ >=2.1.0 <3.0.0 ’. The number version must follow the semantic versioning. Back to our project, we are about using shared_preferences which version is ^0.5.7 , it means >=0.5.7 and < 1.0.0.
Build An Example
Because of learning purposes, we will just make a simple example.
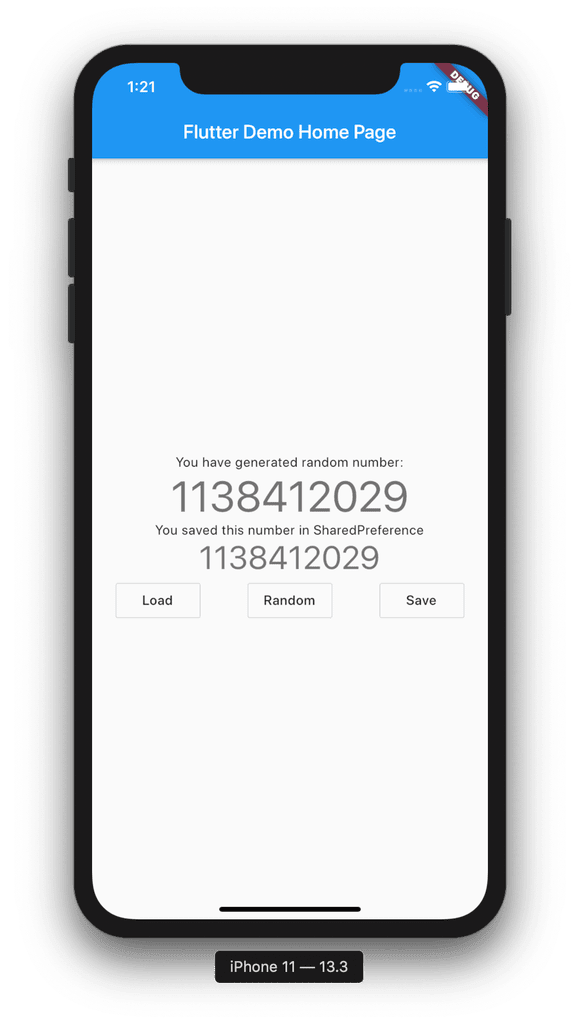
We have three buttons here. One for generating a random number, one for storing current number to the SharedPreference. And the last one is to read the saving number and show it to UI.
Implementation
Now open main.dart and add below code, I will explain this code clearly in next section:
import 'dart:math';
import 'dart:async';
import 'package:flutter/material.dart';
import 'package:shared_preferences/shared_preferences.dart';

void main() => runApp(MyApp());

class MyApp extends StatelessWidget {
  // This widget is the root of your application.
  @override
  Widget build(BuildContext context) {
    return MaterialApp(
      title: 'Flutter Demo',
      theme: ThemeData(
        primarySwatch: Colors.blue,
      ),
      home: MyHomePage(title: 'Flutter Demo Home Page'),
    );
  }
}

class MyHomePage extends StatefulWidget {
  MyHomePage({Key key, this.title}) : super(key: key);
  final String title;
  @override
  _MyHomePageState createState() => _MyHomePageState();
}

class _MyHomePageState extends State<MyHomePage> {
  Future<SharedPreferences> _prefs = SharedPreferences.getInstance();
  int _savedNumber;
  int _randomNumber;

  @override
  void initState() {
    super.initState();
    _savedNumber = 0;
    _randomNumber = 0;
  }

  void _generateRandomNumber() {
    setState(() {
      _randomNumber = Random().nextInt(pow(2, 31));
    });
  }

  void _saveNumber() async {
    final SharedPreferences prefs = await _prefs;
    prefs.setInt('savedNumber', _randomNumber);
    setState(() {
      _savedNumber = _randomNumber;
    });
  }

  void _loadNumber() async {
    final SharedPreferences prefs = await _prefs;
    final savedNumber = prefs.getInt('savedNumber') ?? 0;
    setState(() {
      _randomNumber = savedNumber;
    });
  }

  @override
  Widget build(BuildContext context) {
    return Scaffold(
        appBar: AppBar(
          title: Text(widget.title),
        ),
        body: Center(
          child: Column(
            mainAxisAlignment: MainAxisAlignment.center,
            children: <Widget>[
              Text(
                'You have generated random number:',
              ),
              Text(
                '$_randomNumber',
                style: Theme.of(context).textTheme.display2,
              ),
              Text(
                'You saved this number in SharedPreference',
              ),
              Text(
                '$_savedNumber',
                style: Theme.of(context).textTheme.display1,
              ),
              Row(
                mainAxisAlignment: MainAxisAlignment.spaceAround,
                children: <Widget>[
                  OutlineButton(
                      onPressed: () => _loadNumber(), child: Text('Load')),
                  OutlineButton(
                      onPressed: () => _generateRandomNumber(),
                      child: Text('Random')),
                  OutlineButton(
                      onPressed: () => _saveNumber(), child: Text('Save')),
                ],
              ),
            ],
          ),
        ) // This trailing comma makes auto-formatting nicer for build methods.
        );
  }
}
Explanation
Although the code is not too long, it’s still hard to focus on the main point. So in this section, I will explain the important block of code.
Because we are talking about SharedPreference, so I will focus on it mostly. After install shared_preference plugin, we need to import and initialize it first.
import 'package:shared_preferences/shared_preferences.dart';

...

Future<SharedPreferences> _prefs = SharedPreferences.getInstance();
For saving data to SharedPreference, we create a new function. Because getInstance() return a Future object, it means everything is doing asynchronously. Therefore, we have to use await syntax to wait until getInstance() function finishes before doing anything.
 void _saveNumber() async {
    final SharedPreferences prefs = await _prefs;
    prefs.setInt('savedNumber', _randomNumber);
    setState(() {
      _savedNumber = _randomNumber;
    });
  }
shared_preference offers us many handy built-in functions to set and get persistence data. In my example, I use setInt('savedNumber', _randomNumber) to save a key savedNumber that has an integer value to ShareReference.
Now we create a new function that uses getInt('savedNumber')to get what I have saved.
 void _loadNumber() async {
    final SharedPreferences prefs = await _prefs;
    final savedNumber = prefs.getInt('savedNumber') ?? 0;
    setState(() {
      _randomNumber = savedNumber;
    });
  }
Saving to a local database
To develop an app that needs to persist a large amount of data, structure data, you should consider using a local database. Basically, we can query and write easier.
In Android, developer can use SQLite to serve as a local database. With iOS, it is Core Data. However, we’re still able to use the SQLite database in iOS to avoid the complicated of handling Core Data. In Flutter, we simply use a plugin named sqflite for both iOS and Android app.
Installing
Add sqflite and path dependencies in pubspec.yaml
dependencies:
  flutter:
    sdk: flutter
  sqflite: ^1.3.0
  path: ^1.6.4
I usually use sqflite with path plugin. While sqflite interacts with SQLite database, path helps us get exactly directory where the database is.
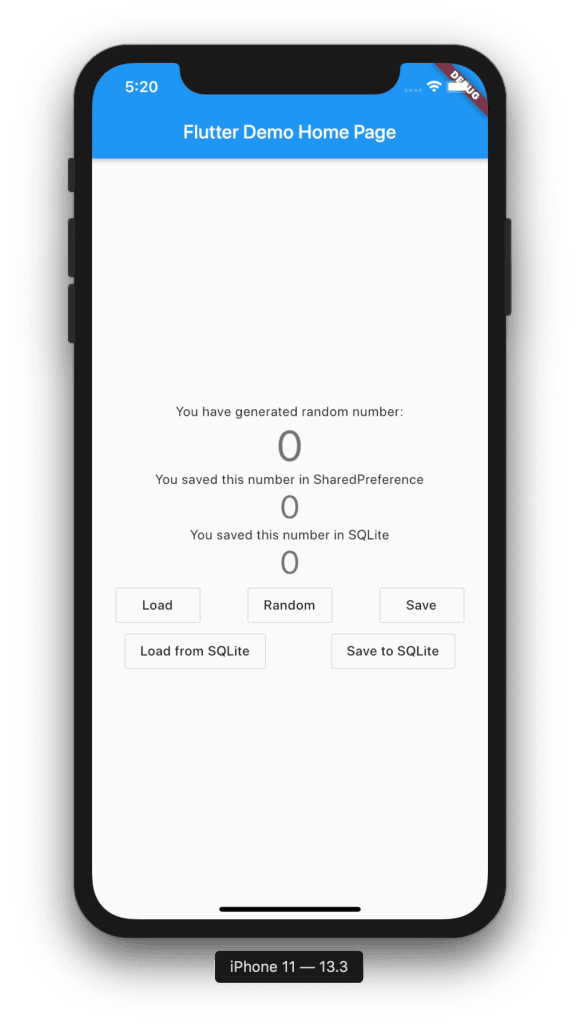
Build An Example
Continue with the previous example app, we add two more buttons to insert and load data from database.
Implementation
Now we implement a simple example to show how sqflite works. When working with SQLite database, we should follow these points:
- You should create a Database Service to interact with the database. Keep it separated with other files for clear and maintain it.
- It’s highly recommended to make Database Service as a singleton object. It means we will open only a connection to the database. Avoid too many connections can reduce your app performance.
Firstly, we create a model class to reflect the data structure of a table. Although, it’s not required to work with SQLite, we can use data easier within the model. It is also great to define some helper function to verify data or converting data to Map before insert to database.
Now we define a model class RandomNumber, named the file as random_number.dart
class RandomNumber {
  int value;
  DateTime createdTime;
  RandomNumber(this.value, this.createdTime);

  RandomNumber.fromMap(Map<String, dynamic> map)
      : assert(map["value"] != null),
        assert(map["createdTime"] != null),
        value = map["value"],
        createdTime = map["createdTime"] is String
            ? DateTime.parse(map["createdTime"])
            : map["createdTime"];

  Map<String, dynamic> toMap() {
    return {
      "value": this.value,
      "createdTime": this.createdTime.toString(),
    };
  }
}
And then, we will create a Service to do database action such as open connection, insert, update, delete, or close the connection.
So why we define a separate service to do these jobs. We define a database service because of two below points:
- Firstly, every business code that related together should be placed in one file. So it makes a clean, clear, and readable code. Furthermore, if we change plugin from
sqfliteto another one day, we just need to update this service. - And then, we will make this service as a singleton class. It means we only open one connection to the database and we can use this service everywhere around your app.
Below is my example for a database service:
import 'dart:async';
import 'package:path/path.dart';
import 'package:sqflite/sqflite.dart';
import 'random_number.dart';

final tableRandomNumber = "randoms";

class DatabaseService {
  static final DatabaseService _instance = DatabaseService._internal();
  Future<Database> database;

  factory DatabaseService() {
    return _instance;
  }

  DatabaseService._internal() {
    initDatabase();
  }

  initDatabase() async {
    database = openDatabase(
      join(await getDatabasesPath(), 'beautiful_alarm.db'),
      // When the database is first created, create a table to store data.
      onCreate: (db, version) {
        db.execute(
          '''CREATE TABLE $tableRandomNumber(
            id INTEGER PRIMARY KEY AUTOINCREMENT,
            value INTEGER,
            createdTime DATETIME)
          ''',
        );
      },
      // Set the version. This executes the onCreate function and provides a
      // path to perform database upgrades and downgrades.
      version: 1,
    );
  }

  Future<int> insertNumber(RandomNumber number) async {
    Database db = await database;
    int id = await db.insert(tableRandomNumber, number.toMap());
    return id;
  }

  Future<RandomNumber> getNumber(int id) async {
    Database db = await database;
    List<Map> datas = await db.query(tableRandomNumber,
        where: 'id = ?',
        whereArgs: [id]);
    if (datas.length > 0) {
      return RandomNumber.fromMap(datas.first);
    }
    return null;
  }
}
And the last one is adding an insert and query button to main.dart. When user clicks to button, it calls database service to get saved number.
import 'dart:math';
import 'dart:async';
import 'package:flutter/material.dart';
import 'package:shared_preferences/shared_preferences.dart';
import 'database_service.dart';
import 'random_number.dart';

void main() async {
  WidgetsFlutterBinding.ensureInitialized();
  DatabaseService();
  runApp(MyApp());
}

class MyApp extends StatelessWidget {
  // This widget is the root of your application.
  @override
  Widget build(BuildContext context) {
    return MaterialApp(
      title: 'Flutter Demo',
      theme: ThemeData(
        primarySwatch: Colors.blue,
      ),
      home: MyHomePage(title: 'Flutter Demo Home Page'),
    );
  }
}

class MyHomePage extends StatefulWidget {
  MyHomePage({Key key, this.title}) : super(key: key);
  final String title;

  @override
  _MyHomePageState createState() => _MyHomePageState();
}

class _MyHomePageState extends State<MyHomePage> {
  Future<SharedPreferences> _prefs = SharedPreferences.getInstance();
  DatabaseService dbService = DatabaseService();
  int _savedNumber;
  int _randomNumber;
  int _numberInDatabase;
  int _numberInDatabaseId;

  @override
  void initState() {
    super.initState();
    _savedNumber = 0;
    _randomNumber = 0;
    _numberInDatabase = 0;
    _numberInDatabaseId = 0;
  }

  void _generateRandomNumber() {
    setState(() {
      _randomNumber = Random().nextInt(pow(2, 31));
    });
  }

  void _saveNumber() async {
    final SharedPreferences prefs = await _prefs;
    prefs.setInt('savedNumber', _randomNumber);
    setState(() {
      _savedNumber = _randomNumber;
    });
  }

  void _loadNumber() async {
    final SharedPreferences prefs = await _prefs;
    final savedNumber = prefs.getInt('savedNumber') ?? 0;
    setState(() {
      _randomNumber = savedNumber;
    });
  }

  void _saveNumberToDb() async {
    final number = RandomNumber.fromMap({
      "value": _randomNumber,
      "createdTime": DateTime.now()
    });
    final int id = await dbService.insertNumber(number);
    setState(() {
      _numberInDatabase = _randomNumber;
      _numberInDatabaseId = id;
    });
  }

  void _loadNumberFromDb() async {
    final RandomNumber number = await dbService.getNumber(_numberInDatabaseId);
    setState(() {
      _randomNumber = number.value;
    });
  }

  @override
  Widget build(BuildContext context) {
    return Scaffold(
        appBar: AppBar(
          title: Text(widget.title),
        ),
        body: Center(
          child: Column(
            mainAxisAlignment: MainAxisAlignment.center,
            children: <Widget>[
              Text(
                'You have generated random number:',
              ),
              Text(
                '$_randomNumber',
                style: Theme.of(context).textTheme.display2,
              ),
              Text(
                'You saved this number in SharedPreference',
              ),
              Text(
                '$_savedNumber',
                style: Theme.of(context).textTheme.display1,
              ),
              Text(
                'You saved this number in SQLite',
              ),
              Text(
                '$_numberInDatabase',
                style: Theme.of(context).textTheme.display1,
              ),
              Row(
                mainAxisAlignment: MainAxisAlignment.spaceAround,
                children: <Widget>[
                  OutlineButton(
                      onPressed: () => _loadNumber(), child: Text('Load')),
                  OutlineButton(
                      onPressed: () => _generateRandomNumber(),
                      child: Text('Random')),
                  OutlineButton(
                      onPressed: () => _saveNumber(), child: Text('Save')),
                ],
              ),
              Row(
                mainAxisAlignment: MainAxisAlignment.spaceAround,
                children: <Widget>[
                  OutlineButton(
                      onPressed: () => _loadNumberFromDb(), child: Text('Load from SQLite')),
                  OutlineButton(
                      onPressed: () => _saveNumberToDb(), child: Text('Save to SQLite')),
                ],
              ),
            ],
          ),
        ) // This trailing comma makes auto-formatting nicer for build methods.
        );
  }
}
Writing and reading a file
In some cases, database can’t fit well your data. You may need to write to a local file and read it later. I can list down here the cases:
- Save data across app launches.
- Save log file.
- Export database as a CSV file
To write and read a file, we use path_provider plugin to get the directory to save file and write file by using dart:io built-in library.
We should note that there are two types of local directory:
- Temporary directory : It usually use for cache. It can be clear anytime. On iOS, it called NSCachesDirectory. And cache directory in Android.
- Document directory : A directory that app can store files that only it can read. We should use this type to persist data. It’s named AppData on Android, and NSDocumentDirectory on iOS.
Installing
We add path_provider as project dependencies:
dependencies:
  path_provider: ^1.6.7
Build An Example
Now continue to add the other two buttons to this example which allow us to write and read data. Below is an example image

Implementation
We add below function to main.dart to get the document directory and the specific file to read and write.
  Future<String> get _localPath async {
    final directory = await getApplicationDocumentsDirectory();
    return directory.path;
  }

  Future<File> get _localFile async {
    final path = await _localPath;
    return File('$path/randoms.txt');
  }
In the code, we use getApplicationDocumentsDirectory() function to get the document directory which was discussed above. You can get temporary directory by using getTemporaryDirectory().
We also hard-coded file path as $path/randoms.txt, you can change to whatever you want. Now create two buttons to read and write data to file.
You can get full source code from the repository.
Conclusion
After a long post, we know three different methods to persist data in Flutter. Each method shows its pros and cons in a specific circumstance. Therefore, understand it well can help you choose your best option and make your app performance better.
The post Step by step to store data locally in Flutter appeared first on Python Geeks.

Oldest comments (1)
Flutter now has package called FlutterSession pub.dev/packages/flutter_session