

This How-to describes how to generate early-bound C# or Visual Basic (or C++) classes that represent the entity data model used by Dynamics 365 for Customer Engagement with Unchase Dynamics365 Connected Service to Visual Studio 2017/2019 projects.
Generate entity classes
The Connected Service creates a
Microsoft Visual C#orVisual Basic.NET (orC++) output file that contains strongly-typed classes for entities in your organization. This includes custom entities and attributes. This output file contains one class for each entity, providing early binding and IntelliSense support in Visual Studio to aid you as you write code.The generated classes are partial classes that can be extended with custom business logic in separate files.
Generate an OrganizationServiceContext class
The Connected Service can also be used to generate a class derived from the OrganizationServiceContext class that acts as an entity container in the entity data model. This service context provides the facilities for tracking changes and managing identities, concurrency, and relationships.
This class also exposes a SaveChanges() method that writes inserts, updates, and deletes records in
Common Data Service.For more information, see Use OrganizationServiceContext.
Use generated classes
The classes created by the Connected Service are designed to be built into a class library that can be referenced by projects that use
Common Data Service. After you have generated the class file using the Connected Service, you must also add references to several assemblies that the generated classes are dependent upon.The following lists assemblies that must be referenced in your project when you use the generated code file.
Microsoft.Crm.Sdk.Proxy.dllMicrosoft.Xrm.Sdk.dll
These assemblies are part of the Microsoft.CrmSdk.CoreAssemblies NuGet package. Use this Nuget packages to add these assemblies to your Visual Studio project.
Follow 4 steps to achieve this.
Step 1. Install the Connected Service
Launch the installed Visual Studio 2017/2019. Open the menu to manage Visual Studio extensions:
- For Visual Studio 2017:
Tools -> Extensions and Updates...

- For Visual Studio 2019:
Extensions -> Manage Extensions

Choose Online -> Visual Studio Marketplace tab. In search field type unchase, then install Unchase Dynamics365 Connected Service (just click Download button):

After all, restart the Visual Studio to install the Connected Service.
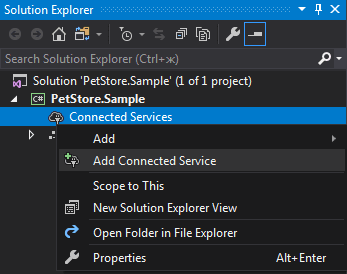
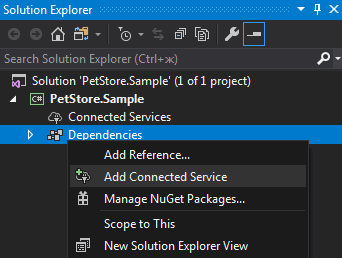
Step 2. Open the Connected Service wizard for Visual Studio project
Open the Visual Studio solution with project to generate client code in. In Solution Explorer make right-click on Connected Services or Dependencies item in the project for which you need to generate client code, and click on Add Connected Service:
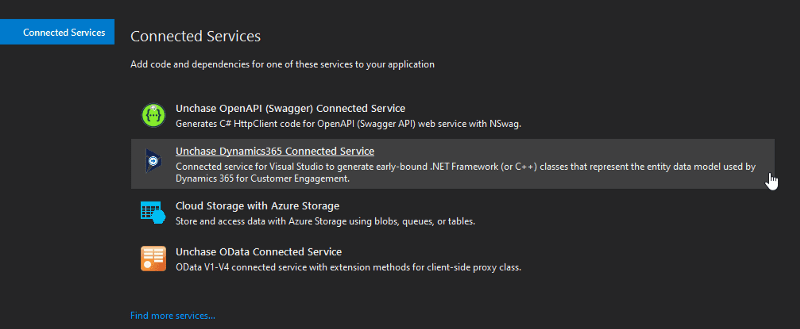
Then choose Unchase Dynamics365 Connected Service to show the Connected Service wizard:
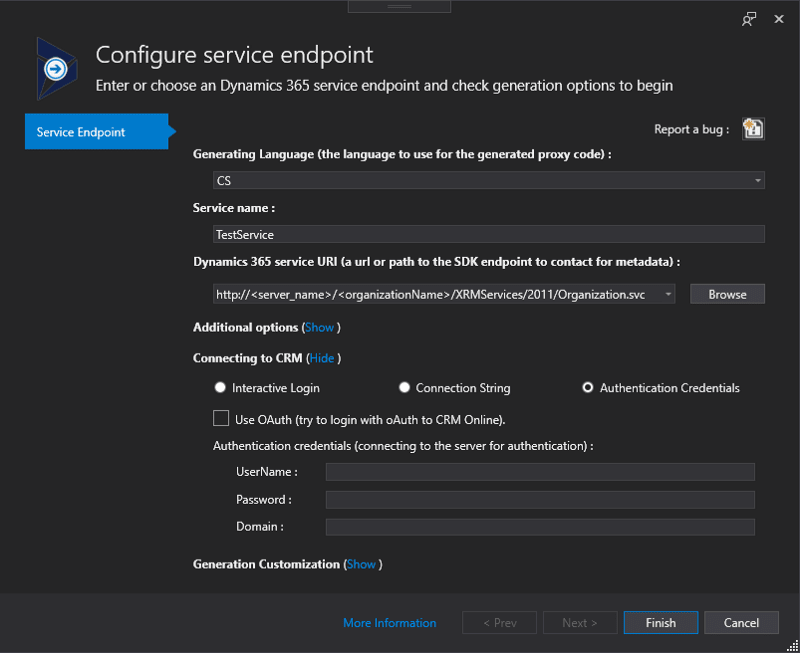
Step 3. Configure Dynamics 365 organization service endpoint
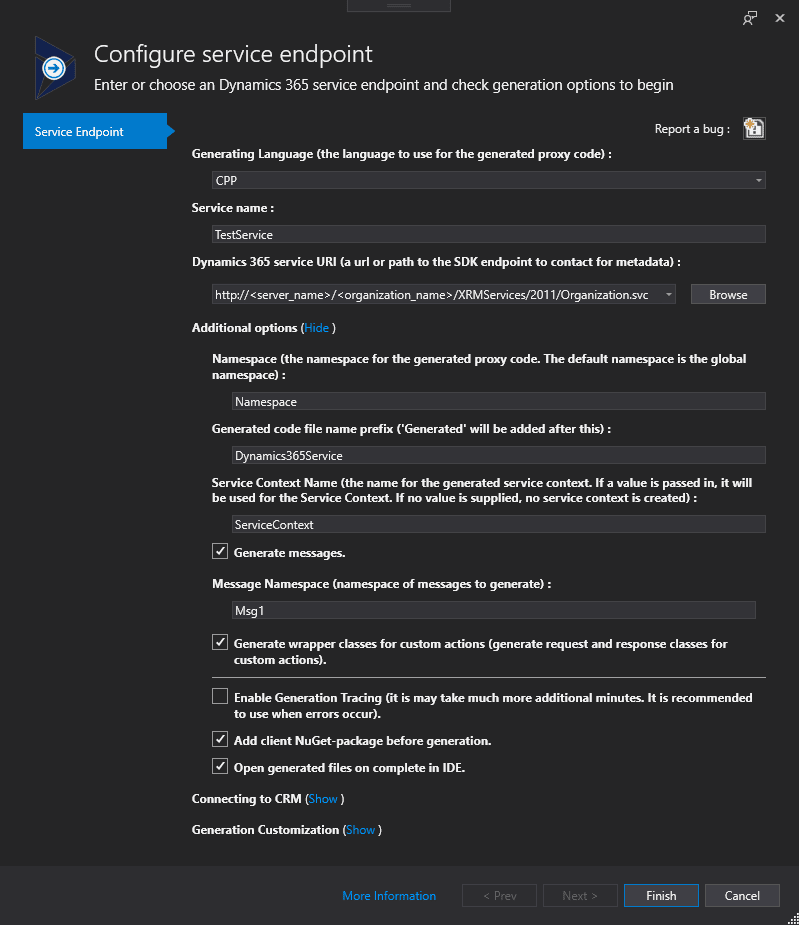
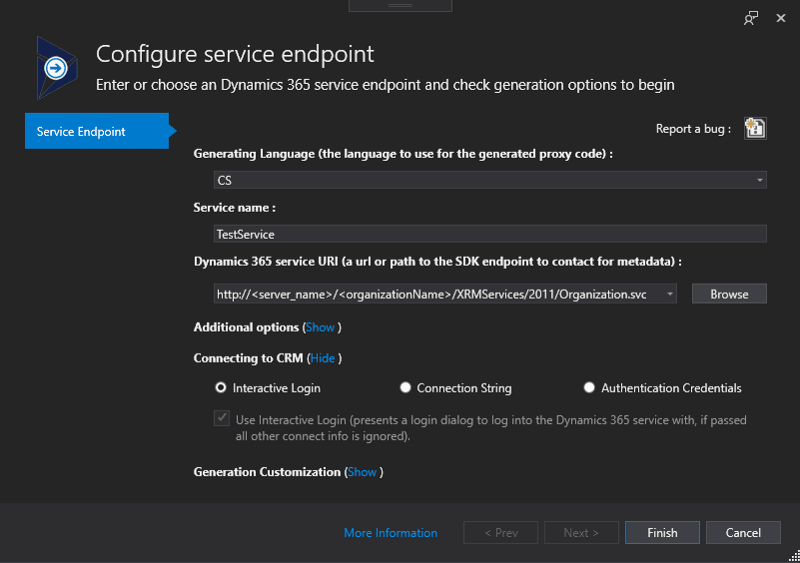
In the first page of the wizard you need to configure some necessary options:
Generating Languageoption - the language to generate the code in. C# or Visual Basic or C++;Service name- the name of the folder (after generation) in Connected Service directory in the project (by default, if field is empty - Dynamics365Service);Dynamics 365 service URI- The URI for the Organization service endpoint (URL or local file).
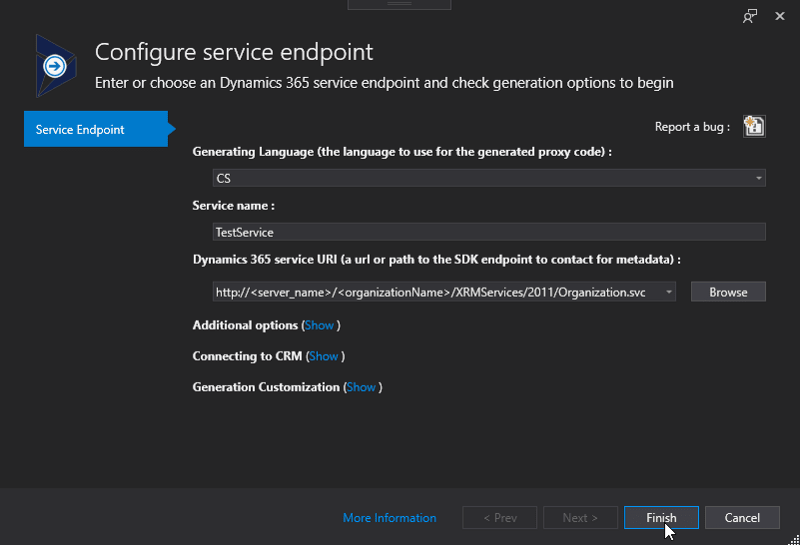
After setting the necessary options, you can immediately start connecting to the organization endpoint to generate the code by clicking the Finish button. In this case, there will choose default code generation options.
If you find a bug in the Connected Service, you can use the "Report a bug" button.
There are a few optional options you can specify before start generation process:
Additional Generation Options
Namespace- the namespace for the generated code. The default namespace is the global namespace;Generated code file name prefix- the file name prefix for the generated code ('Generated' will be added after this);Service Context Name- the name for the generated service context class. If a value is passed in, it will be used for the Service Context. If no value is supplied, no service context is created);Generate messagescheckbox - generate messages;Message Namespace- namespace of messages to generate;Generate wrapper classes for custom actionscheckbox - generate request and response classes for custom actions;Enable Generation Tracingcheckbox - it is may take much more additional minutes. It is recommended to use when errors occur;Add client NuGet-package before generationcheckbox - allows automatically add Microsoft.CrmSdk.CoreAssemblies NuGet package to the client project;Open generated files on complete in IDEcheckbox - allows automatically open the generated files in IDE after generation process.
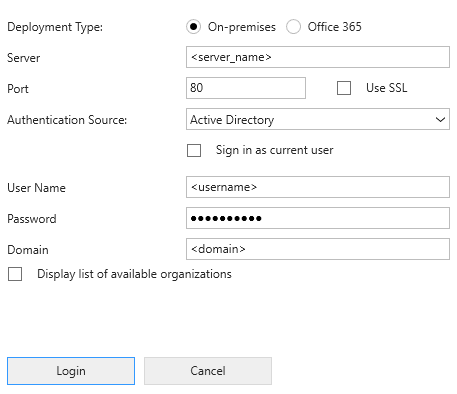
Connecting to the CRM
There are several ways to connect to the CRM:
-
Interactive Login- when used, a dialog to log into the Common Data Service is displayed. All other connection related parameters specified on the Connected Service options are ignored;
-
Connection String- contains information, provided as a single string, for connecting to a Common Data Service organization. All other connection related parameters specified on the Connected Service options are ignored;
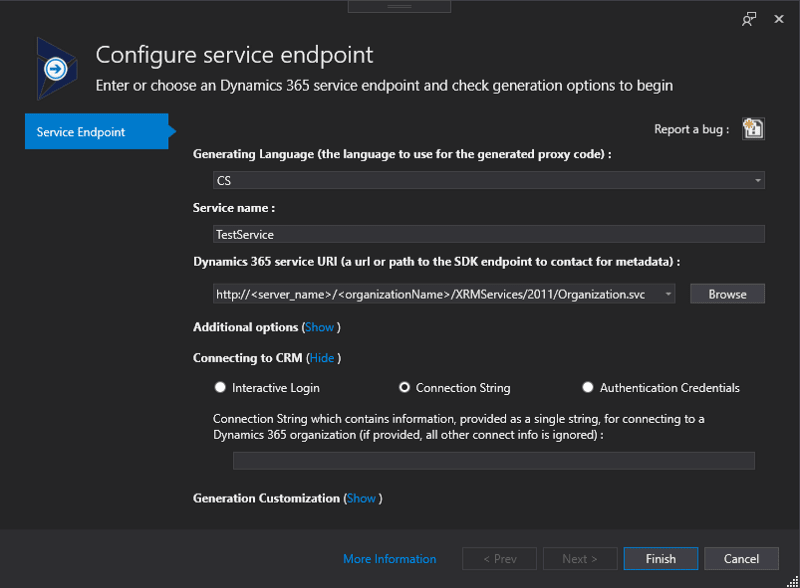
For more information see Use connection strings in XRM tooling to connect to Common Data Service.
-
Authentication Credentials- connecting to the server for authentication with:-
Use OAuthcheckbox - try to login with oAuth to CRM Online; -
UserName- the user name to use when you connect to the server for authentication; -
Password- the password to use when you connect to the server for authentication; -
Domain- the domain to authenticate against when you connect to an on-premises server.
-
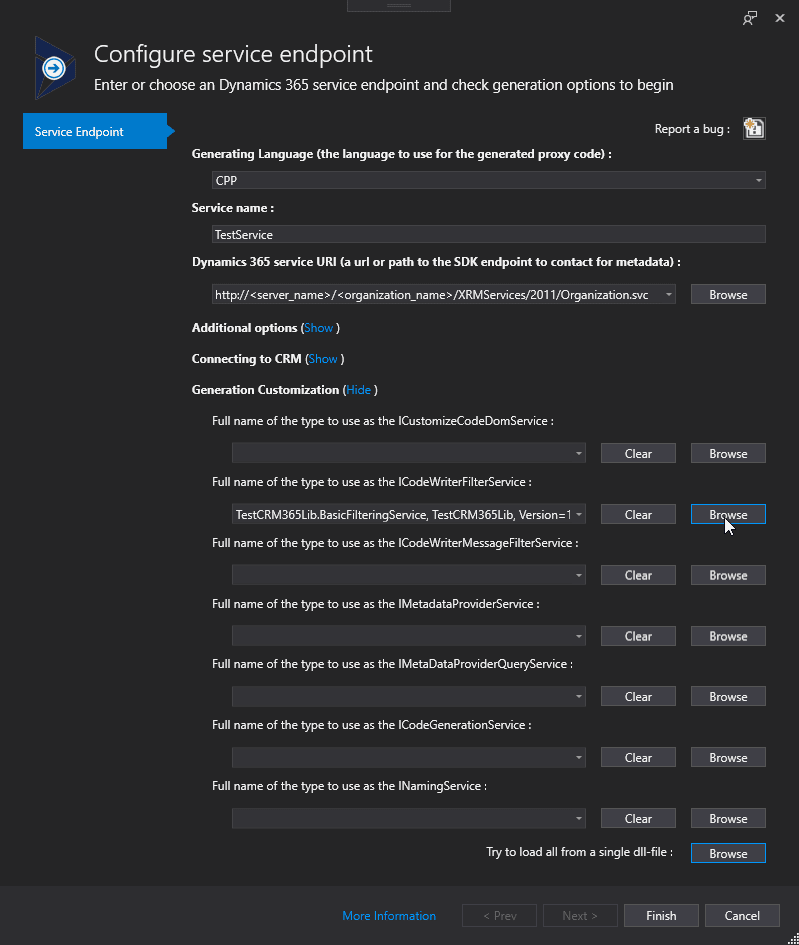
Step 4 (Optional). Create Connected Service extensions
You can also create extensions and use it in this tool.
1) Create a .NET Framework 4.7.2 library project;
2) Add Unchase.Dynamics365.Customization NuGet package to your project;
3) Add a custom public class that implements one of interfaces from NuGet package:
ICustomizeCodeDomService- called after the CodeDOM generation has been completed, assuming the default instance ofICodeGenerationService. It is useful for generating additional classes, such as the constants in picklists;ICodeWriterFilterService- called during the process of CodeDOM generation, assuming the default instance ofICodeGenerationService, to determine whether a specific object or property should be generated;ICodeWriterMessageFilterService- called during the process of CodeDOM generation, assuming the default instance ofICodeGenerationService, to determine whether a specific message should be generated. This should not be used for requests/responses as these are already generated in Microsoft.Crm.Sdk.Proxy.dll and Microsoft.Xrm.Sdk.dll;IMetadataProviderService- called to retrieve the metadata from the server. This may be called multiple times during the generation process, so the data should be cached;IMetaDataProviderQueryService;ICodeGenerationService- core implementation of the CodeDOM generation. If this is changed, the other extensions may not behave in the manner described;INamingService- called during the CodeDOM generation to determine the name for objects, assuming the default implementation.
The following sample code demonstrates how to write an extension:
using System;
using System.Threading.Tasks;
using Microsoft.Xrm.Sdk.Metadata;
using Unchase.Dynamics365.Customization;

namespace TestDynamics
{
    /// <summary>
    /// Sample extension for the "Unchase Dynamics365 Connected Service" that generates early-bound
    /// classes for custom entities.
    /// </summary>
    public sealed class BasicFilteringService : ICodeWriterFilterService
    {
        public BasicFilteringService(ICodeWriterFilterService defaultService)
        {
            this.DefaultService = defaultService;
        }

        private ICodeWriterFilterService DefaultService { get; set; }

        public async Task<bool> GenerateAttributeAsync(AttributeMetadata attributeMetadata, IServiceProvider services)
        {
            return await this.DefaultService.GenerateAttributeAsync(attributeMetadata, services);
        }

        public async Task<bool> GenerateEntityAsync(EntityMetadata entityMetadata, IServiceProvider services)
        {
            if (!entityMetadata.IsCustomEntity.GetValueOrDefault()) { return false; }
            return await this.DefaultService.GenerateEntityAsync(entityMetadata, services);
        }

        public async Task<bool> GenerateOptionAsync(OptionMetadata optionMetadata, IServiceProvider services)
        {
            return await this.DefaultService.GenerateOptionAsync(optionMetadata, services);
        }

        public async Task<bool> GenerateOptionSetAsync(OptionSetMetadataBase optionSetMetadata, IServiceProvider services)
        {
            return await this.DefaultService.GenerateOptionSetAsync(optionSetMetadata, services);
        }

        public async Task<bool> GenerateRelationshipAsync(RelationshipMetadataBase relationshipMetadata, EntityMetadata otherEntityMetadata, IServiceProvider services)
        {
            return await this.DefaultService.GenerateRelationshipAsync(relationshipMetadata, otherEntityMetadata, services);
        }

        public async Task<bool> GenerateServiceContextAsync(IServiceProvider services)
        {
            return await this.DefaultService.GenerateServiceContextAsync(services);
        }
    }
}
4) Build the project so that the output dll file is created;
5) Browse created dll file with one or all classes that implements interfaces to add them into generation process:
Enjoy programming with Unchase!

Top comments (0)