A step-by-step guide on how to configure an ExpressJS application with Winston and Morgan loggers using Typescript
A great log system is one of the easiest ways to check your application behavior and it’s our first weapon to look into bugs
If you are starting or have already started an ExpressJS application, you may have wondered, how can I create a great and well-organized log system?
The problem is that a lot of applications don’t have a comprehensive log system, or even worse, they use simple console.log everywhere.
In this article, you’ll find out how to configure logs using Winston and Morgan.
TL;DR;
Here you can find the fully configured project (Use the branch called complete)
I didn’t add unit tests in this article but the code below is fully tested. You can find all the tests inside the repository above.
Do you need a great template to start your ExpressJS GraphQL APIs? Use mine: https://github.com/vassalloandrea/express-template
Let’s start
First of all, we need an ExpressJS application. You can clone this repository.
git clone https://github.com/vassalloandrea/medium-morgan-winston-example.git
Start the server
The project was created using a from-scratch basic configuration. Start the server using this command:
cd medium-morgan-winston-example
npm install
npm run dev
Install Winston
Winston is a useful library that is needed to configure and customize the application logs accessing a lot of helpful features.
To use the plainconsole.log without a third-party library, we need to write a lot of code and reinvent the wheel understanding all the edge cases caught by Winston in these years.
Here there are the main features that we should implement inside our project:
Differentiate log levels: error, warn, info, HTTP, debug
Differentiate colors adding one to each log level
Show or hide different log levels based on the application ENV; e.g., we won’t show all the logs when the application runs in production.
Adding a timestamp to each log line
Save logs inside files
npm install winston
Configure Winston
In the lines below, there is a simple configuration of our logger. Copy and paste them inside your project. You can use this path: src/lib/logger.ts or something similar.
I’ll explain every single row later.
import winston from 'winston'

const levels = {
  error: 0,
  warn: 1,
  info: 2,
  http: 3,
  debug: 4,
}

const level = () => {
  const env = process.env.NODE_ENV || 'development'
  const isDevelopment = env === 'development'
  return isDevelopment ? 'debug' : 'warn'
}

const colors = {
  error: 'red',
  warn: 'yellow',
  info: 'green',
  http: 'magenta',
  debug: 'white',
}

winston.addColors(colors)

const format = winston.format.combine(
  winston.format.timestamp({ format: 'YYYY-MM-DD HH:mm:ss:ms' }),
  winston.format.colorize({ all: true }),
  winston.format.printf(
    (info) => `${info.timestamp} ${info.level}: ${info.message}`,
  ),
)

const transports = [
  new winston.transports.Console(),
  new winston.transports.File({
    filename: 'logs/error.log',
    level: 'error',
  }),
  new winston.transports.File({ filename: 'logs/all.log' }),
]

const Logger = winston.createLogger({
  level: level(),
  levels,
  format,
  transports,
})

export default Logger
Now you have the ability to use the Logger function anywhere inside your application importing it.
Go to the index.ts file where the ExpressJS server is defined and replace all the console.log with the custom Logger methods.
import express from "express";

import Logger from "./lib/logger";

const app = express();
const PORT = 3000;

app.get("/logger", (_, res) => {
  Logger.error("This is an error log");
  Logger.warn("This is a warn log");
  Logger.info("This is a info log");
  Logger.http("This is a http log");
  Logger.debug("This is a debug log");

  res.send("Hello world");
});

app.listen(PORT, () => {
  Logger.debug(`Server is up and running @ http://localhost:${PORT}`);
});
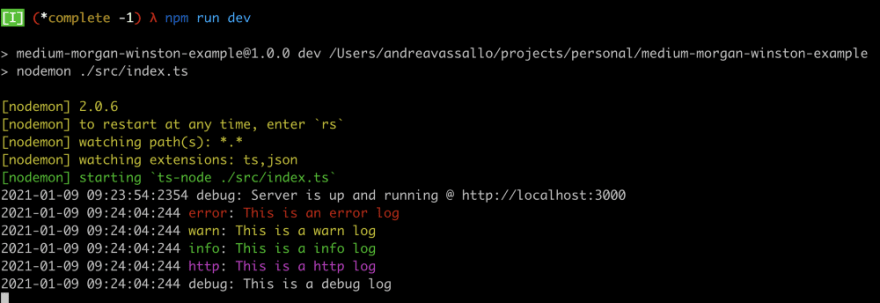
See the result starting the server and navigating through the logger endpoint:
As you can see, the logger shows logs using different colors based on their severity, and another important feature is that all these logs are also printed out inside the all.log and error.log files under the logs directory.
Learn more about the configuration
The configuration file is straightforward. Check the comments inside the file below.
import winston from 'winston'

// Define your severity levels.
// With them, You can create log files,
// see or hide levels based on the running ENV.
const levels = {
  error: 0,
  warn: 1,
  info: 2,
  http: 3,
  debug: 4,
}

// This method set the current severity based on
// the current NODE_ENV: show all the log levels
// if the server was run in development mode; otherwise,
// if it was run in production, show only warn and error messages.
const level = () => {
  const env = process.env.NODE_ENV || 'development'
  const isDevelopment = env === 'development'
  return isDevelopment ? 'debug' : 'warn'
}

// Define different colors for each level.
// Colors make the log message more visible,
// adding the ability to focus or ignore messages.
const colors = {
  error: 'red',
  warn: 'yellow',
  info: 'green',
  http: 'magenta',
  debug: 'white',
}

// Tell winston that you want to link the colors
// defined above to the severity levels.
winston.addColors(colors)

// Chose the aspect of your log customizing the log format.
const format = winston.format.combine(
  // Add the message timestamp with the preferred format
  winston.format.timestamp({ format: 'YYYY-MM-DD HH:mm:ss:ms' }),
  // Tell Winston that the logs must be colored
  winston.format.colorize({ all: true }),
  // Define the format of the message showing the timestamp, the level and the message
  winston.format.printf(
    (info) => `${info.timestamp} ${info.level}: ${info.message}`,
  ),
)

// Define which transports the logger must use to print out messages.
// In this example, we are using three different transports
const transports = [
  // Allow the use the console to print the messages
  new winston.transports.Console(),
  // Allow to print all the error level messages inside the error.log file
  new winston.transports.File({
    filename: 'logs/error.log',
    level: 'error',
  }),
  // Allow to print all the error message inside the all.log file
  // (also the error log that are also printed inside the error.log(
  new winston.transports.File({ filename: 'logs/all.log' }),
]

// Create the logger instance that has to be exported
// and used to log messages.
const Logger = winston.createLogger({
  level: level(),
  levels,
  format,
  transports,
})

export default Logger
Take stock of the situation
Now we have the ability to instrument the application code adding logs based on the complexity of the feature.
With Winston, you can also change the log severity at the runtime using an ENV variable.
Since ExpressJS is made to handle requests, we should add a request logger that automatically logs every request information. The goal should be reached using a library that can be easily integrated with the Winston configuration.
Install Morgan
Morgan is a NodeJS middleware that is needed to customize request logs.
The integration with Winston it’s very simple. Do you remember the HTTP severity level that we added to the Winston configuration? Well, it was made to be used only from the Morgan middleware.
npm install morgan @types/morgan
Configure Morgan
In the lines below, there is a simple configuration of the Morgan middleware. Copy and paste them inside your project. You can use this path: src/config/morganMiddleware.ts or something similar.
Read the comments to understand or extend the configuration below.
import morgan, { StreamOptions } from "morgan";

import Logger from "../lib/logger";

// Override the stream method by telling
// Morgan to use our custom logger instead of the console.log.
const stream: StreamOptions = {
  // Use the http severity
  write: (message) => Logger.http(message),
};

// Skip all the Morgan http log if the
// application is not running in development mode.
// This method is not really needed here since
// we already told to the logger that it should print
// only warning and error messages in production.
const skip = () => {
  const env = process.env.NODE_ENV || "development";
  return env !== "development";
};

// Build the morgan middleware
const morganMiddleware = morgan(
  // Define message format string (this is the default one).
  // The message format is made from tokens, and each token is
  // defined inside the Morgan library.
  // You can create your custom token to show what do you want from a request.
  ":method :url :status :res[content-length] - :response-time ms",
  // Options: in this case, I overwrote the stream and the skip logic.
  // See the methods above.
  { stream, skip }
);

export default morganMiddleware;
Add this middleware to the ExpressJS server inside the index.ts file:
import morganMiddleware from './config/morganMiddleware'

...
...

const PORT = 3000;

app.use(morganMiddleware)

app.get("/logger", (_, res) => {

...
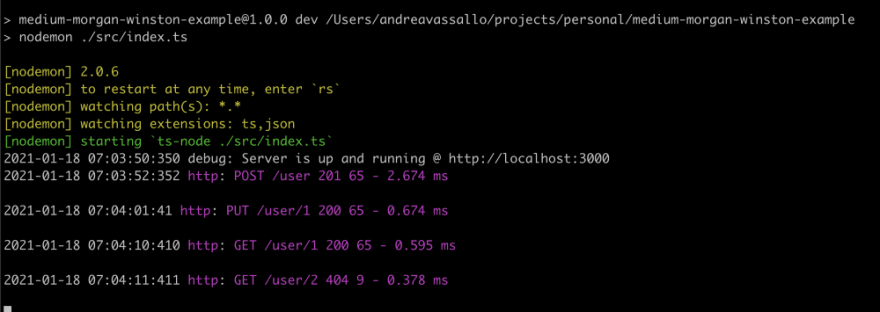
Start the server and make the request visiting the logger endpoint:
Here are other examples of request logs:
Enjoy the configuration
That’s all! I hope that this configuration will help you all to instrument your code, finding hidden bugs more easily. 🐛
Did you like this article? Let me know with a clap and a comment 🙏
Do you need help with your ExpressJS app? Hire me
Deepening with the GraphQL Morgan configuration
This section is just a deepening for projects that use GraphQL.
GraphQL has just one route by default, so we need to change the Morgan configuration to make sense.
import morgan, { StreamOptions } from "morgan";

import { IncomingMessage } from "http";

import Logger from "../lib/logger";

interface Request extends IncomingMessage {
  body: {
    query: String;
  };
}

const stream: StreamOptions = {
  write: (message) =>
    Logger.http(message.substring(0, message.lastIndexOf("\n"))),
};

const skip = () => {
  const env = process.env.NODE_ENV || "development";
  return env !== "development";
};

const registerGraphQLToken = () => {
  morgan.token("graphql-query", (req: Request) => `GraphQL ${req.body.query}`);
};

registerGraphQLToken();

const morganMiddleware = morgan(
  ":method :url :status :res[content-length] - :response-time ms\n:graphql-query",
  { stream, skip }
);

export default morganMiddleware;


Latest comments (5)
Very informative blog! Thank you.
Thanks, it was very clear and easy to understand. It worked for me.
Amazing & super detailed info.
Works like a charm.
Thanks for your time to write this article.
Regards,
Johnny - Belgium
Thank you it worked for me.
I was applying the same implementation of this logger setup that I had in a js based project.
Thank you for sharing this productive information. It has helped a lot!