Getting Started with Socket.io
Socket.io is an easy-to-use JavaScript library for enabling WebSocket connections. WebSocket is a computer communications protocol that provides two-way, or full-duplex, communication channels over a single TCP connection.
Once a connection between the server and client is established, the server can push information to a client without a request. This is opposed to the standard HTTP request-response cycle in which the server returns information to a client in a response only after receiving a request from the client.
Once multiple clients are connected, the server can facilitate low-latency, peer-to-peer connections between these clients. Common applications of P2P networks include text chat, video chat, and file sharing. Networks of clients can be connected for group applications. Socket.io was exciting to learn because it greatly expanded my range as a developer.
Dependencies
The Socket.io library is split into two modules, one for server and one for client. Before starting any Socket.io project, make sure to install both of these dependencies. If you’re using TypeScript, there are useful type libraries for each.
# server library
npm i socket.io
# client library
npm i socket.io-client
# server types library
npm i @types/socket.io
# client types library
@types/socket.io-client
Server Setup
Here’s a bare minimum server setup in Express.
const app = express();
const server = http.createServer(app);
const io = socketConnect(server);

io.on('connection', socket => {
  socket.on('any event you want', () => {
    /* Code to run upon hearing an emit from the client */
  });
  socket.on('another event', () => {
    /* Code to run upon hearing an emit from the client */
  });
  socket.on('disconnect', () => {
    console.log(`user ${socket.id} disconnected`);
  });
});

server.listen(process.env.PORT || 8000, () => console.log('server is running on port 8000'));
All of the .on listeners should correspond to an .emit method on the client side, except the disconnect listener will run anytime a client disconnects from the server. This emit signal is sent automatically by the client.
Next I’ll discuss the similarities and differences between Namespaces and Rooms, two different server logic compartmentalization strategies. If you feel a little lost at this point, check out (this tutorial)[https://socket.io/get-started/chat/] for setting up a simple chat application with socket-io.
Socket.io Namespaces
Once you have a basic server setup, and a socket connection initialized and assigned to a variable, typically io, it’s time to start thinking about namespaces. By default, if a namespace is not specified, they will be attached to the default namespace /.
Namespaces are used to separate server logic over a single shared connection. A common use may be to separate admin concerns from those of regular users.
I recently built a video chat application that also had a text chat. In order to modularize the code I used two different namespaces.
const chatNsp = io.of('/chat');
chatNsp.on('connection', socket => {
  console.log(`${socket.it} connected to chat namespace`);
  /* chat namespace listeners here */
});

const videoNsp = io.of(‘/video’);
videoNsp.on('connection', socket => {
  console.log(`${socket.it} connected to video namespace`);
  /* video namespace listeners here */
})
On the client-side, I can tell the Socket.io client to connect to my custom namespaces:
const videoSocket = io('/chat');
const chatSocket = io('/video');’
Although it is possible to dynamically create namespaces, it is not common practice. Rooms are usually better suited for this purpose.
Socket.io Rooms
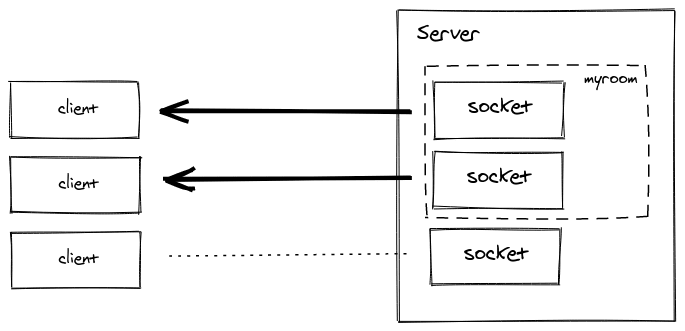
Rooms are subdivisions of namespaces that can be created by the server. This allows you to broadcast data to a subset of related sockets.
Two useful methods are provided for joining and leaving rooms, .join(room, callback) and .leave(room, callback) respectively. Both take two parameters, the room name and a callback.
My video chat application had several rooms and users were free to switch between them. Each time a user would switch, the client would emit the previous room and the new room.
The listener on the server would start by leaving the previous room with socket.leave(). Then, within the callback, the server connects the client to the new room with socket.join().
socket.on('switch room', (previousRoom, newRoom) => {
  socket.leave(previousRoom, () => {
    // use socket.to() to target users within a specific room
    socket.to(previousRoom).emit('user left room', socket.id);
    socket.join(newRoom, () => {
      socket.to(newRoom).emit('user joined room', socket.id);
    });
  });
});
The great thing about rooms is that there is no need to create them before they are needed. Socket.io handles room creation automatically if the room doesn’t exist yet and tears them down automatically if all users leave.
Conclusion
Socket.io is a great library to learn WebSocket communication technology. Namespaces and rooms provide quick ways to modularize code and communicate between different networks of clients. For more useful server methods, I recommend this cheatsheet from the Socket.io docs. Thanks for reading.


Oldest comments (2)
Short, Sweet and Simple.
Don’t you have YT channel you explained it in simple words. You’re great and well-educated