
In today's fast-paced software world, delivering updates quickly and reliably is crucial. Traditional deployment methods were slow, error-prone, and inconsistent, leading to frustrated developers and unhappy users. This is where CI/CD (Continuous Integration & Continuous Deployment) comes in a game changing approach that automates testing and deployment, ensuring smooth and efficient software delivery.
Why We Use CI/CD?
Traditional software deployment had challenges like:
❌ Manual Errors – Deployments were prone to mistakes.
⏳ Slow Releases – Weeks/months to deliver updates.
🔄 Inconsistent Environments – "Works on my machine" issues.
🚧 Difficult Rollbacks – Fixing bugs took too long.
How CI/CD Solves These Issues
✅ Automation – Code is tested & deployed without manual intervention.
⚡ Speed – Continuous updates, no waiting for big releases.
🔍 Consistency – Same environment for dev, test & production.
🔄 Quick Rollbacks – Issues? Revert to the last stable version easily.
Real-Life Example
Imagine an E-commerce App during Black Friday. A bug in the checkout process could mean huge revenue loss. With CI/CD:
🚀 Developers push a quick fix → ✅ Automated tests run → 🌍 Fix is deployed instantly without downtime → 💰 Sales continue smoothly!
In this blog, we'll explore how to implement a CI/CD pipeline using Bitbucket, automating deployments to Azure App Service to ensure seamless and hassle-free software delivery. 🚀
What We'll Cover in This Blog
In this guide, we’ll walk through setting up a CI/CD pipeline using Bitbucket Pipelines to deploy a Node.js application to Azure App Service.
🔹 Configuring the Azure Environment
🔹 Setting Up Bitbucket Pipelines
🔹 Deploying a Node.js App Automatically
Prerequisites
- An Azure App Service has already been created.
- Your Node.js application is hosted in a Bitbucket repository.
- Basic knowledge of Azure and Bitbucket Pipelines.
Step 1: Configure the Azure Environment
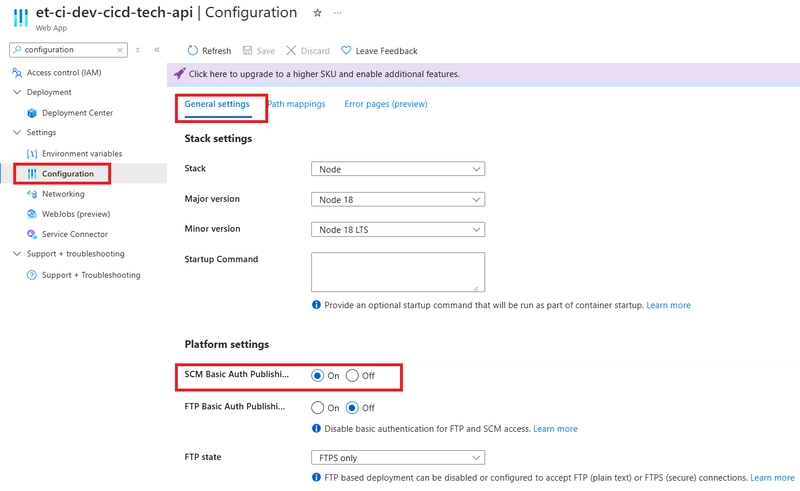
1. Enable SCM Basic Auth Publishing Credentials
Go to your Azure App Service settings and enable SCM Basic Auth Publishing Credentials.
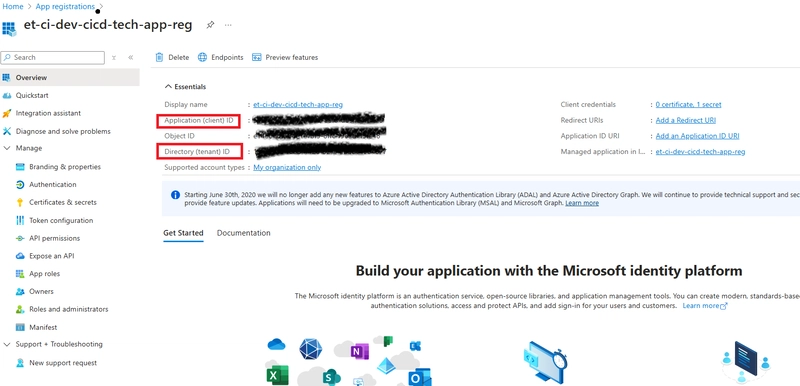
2. Create an Azure App Registration:
To securely deploy your app, create an Azure App Registration to generate credentials for authentication.
🔹 Navigate to Azure Portal and search for App registrations.
🔹 Click New Registration and provide a name for your app.
🔹 Generate a Client Secret under "Certificates & Secrets".
🔹 Note down the Application (Client) ID, Directory (Tenant) ID, and Client Secret Value for later use.
Refer to the snapshots below for details:

3. Assign the App registration as a contributor to the App Service.

Step 2: Set Up Bitbucket Pipelines
Create a bitbucket-pipelines.yml File: Add the following YAML configuration file to the root of your Bitbucket repository. This file defines the CI/CD pipeline for your Node.js app
# Bitbucket Pipeline for deploying a Node.js app to Azure App Service.
# This workflow runs build and security scans before deployment.
# Environment variables: AZURE_APP_ID, AZURE_PASSWORD, AZURE_TENANT_ID, AZURE_RESOURCE_GROUP, AZURE_APP_NAME.
# For advanced cases, please, follow examples from the pipe's README https://bitbucket.org/microsoft/azure-web-apps-deploy/src/1.0.3/README.md


image: node:18
pipelines:
  default:
    - parallel:
      - step:
          name: Install
          caches:
            - node
          script:
            - npm install
  branches:
    master:
      - parallel:
        - step:
            name: Build
            caches:
              - node
            script:
              - npm run build
              - apt update && apt install zip
            # Create a zip file with the build output
              - zip -r app-$BITBUCKET_BUILD_NUMBER.zip build package.json package-lock.json
            artifacts:
              - "*.zip"
        - step:
            name: Security Scan
            script:
              # Run a security scan for sensitive data.
              # See more security tools at https://bitbucket.org/product/features/pipelines/integrations?&category=security
              - pipe: atlassian/git-secrets-scan:0.5.1
      - step:
          name: Deploy to Production
          deployment: Production
          script:
            - pipe: atlassian/azure-web-apps-deploy:1.0.1
              variables:
                AZURE_APP_ID: $AZURE_APP_ID
                AZURE_PASSWORD: $AZURE_PASSWORD
                AZURE_TENANT_ID: $AZURE_TENANT_ID
                AZURE_RESOURCE_GROUP: $AZURE_RESOURCE_GROUP
                AZURE_APP_NAME: $AZURE_APP_NAME
                ZIP_FILE: app-$BITBUCKET_BUILD_NUMBER.zip
                DEBUG: 'true'
📝 Note:
DEBUG: 'true' enables detailed error logging to help diagnose deployment issues. Once your pipeline is stable and running smoothly, you can remove this variable to reduce unnecessary log output.
Step 3: Update the package.json File
Ensure your package.json includes the correct build script and paths:
{
  "name": "TestAPI",
  "version": "1.0.0",
  "description": "This is Test API",
  "main": "server.ts",
  "scripts": {
    "start": "node build/dist/server.js",
    "test": "echo \"Error: no test specified\" && exit 1",
    "build": "tsc -p ."
  },
}
Step 4: Configure Environment Variables in Bitbucket
To securely pass Azure credentials to Bitbucket Pipelines:
🔹 Go to your Bitbucket repository.
🔹 Navigate to Repository settings → Repository variables.
🔹 Add the following variables:
- AZURE_APP_ID: Application (Client) ID
- AZURE_PASSWORD: Client Secret Value
- AZURE_TENANT_ID: Directory (Tenant) ID.
- AZURE_RESOURCE_GROUP: Name of the Azure resource group
- AZURE_APP_NAME: Name of your Azure App Service
Step 4: Commit and Push Changes
Once you've configured everything, commit and push your code to Bitbucket.
Bitbucket Pipelines will automatically trigger the build and deploy process, ensuring your application is deployed to Azure App Service without manual intervention.
Conclusion
By following these steps, you've successfully set up a fully automated CI/CD pipeline for deploying a Node.js application from Bitbucket to Azure App Service.
✅ Automated Builds & Deployments
✅ Secure Authentication with Azure
✅ Seamless Integration & Fast Releases
With this setup, your application deployment becomes faster, more reliable, and hassle-free!
Next Steps🚀
Now that your CI/CD pipeline is up and running, here’s how you can further enhance it:
🔹 Add Unit & Integration Tests – Improve code quality by running automated tests before deployment.
🔹 Implement Staging & Production Environments – Deploy to a staging environment first, test, and then promote to production.
🔹 Enable Deployment Monitoring & Alerts – Use Azure Monitor or Application Insights to track deployments and get notified of failures.
🔹 Optimize Performance & Security – Perform performance profiling and security audits to keep your app fast and secure.
🔹 Containerize Your App with Docker – Consider deploying using Docker and Kubernetes for scalability.

Top comments (0)