幽蓝君前几日收到了华为的邀请,正式加入鸿蒙生态。今天开始会和大家分享HarmonyOS NEXT的实战教程,包括最新的ArkTS语言和仓颉开发语言。大家对哪一方面感兴趣可以私信幽蓝君,为幽蓝君提供创作素材。
今天的实战案例是实现keep中的运动轨迹,基于ArkTS开发语言,api 12。
先看效果图:
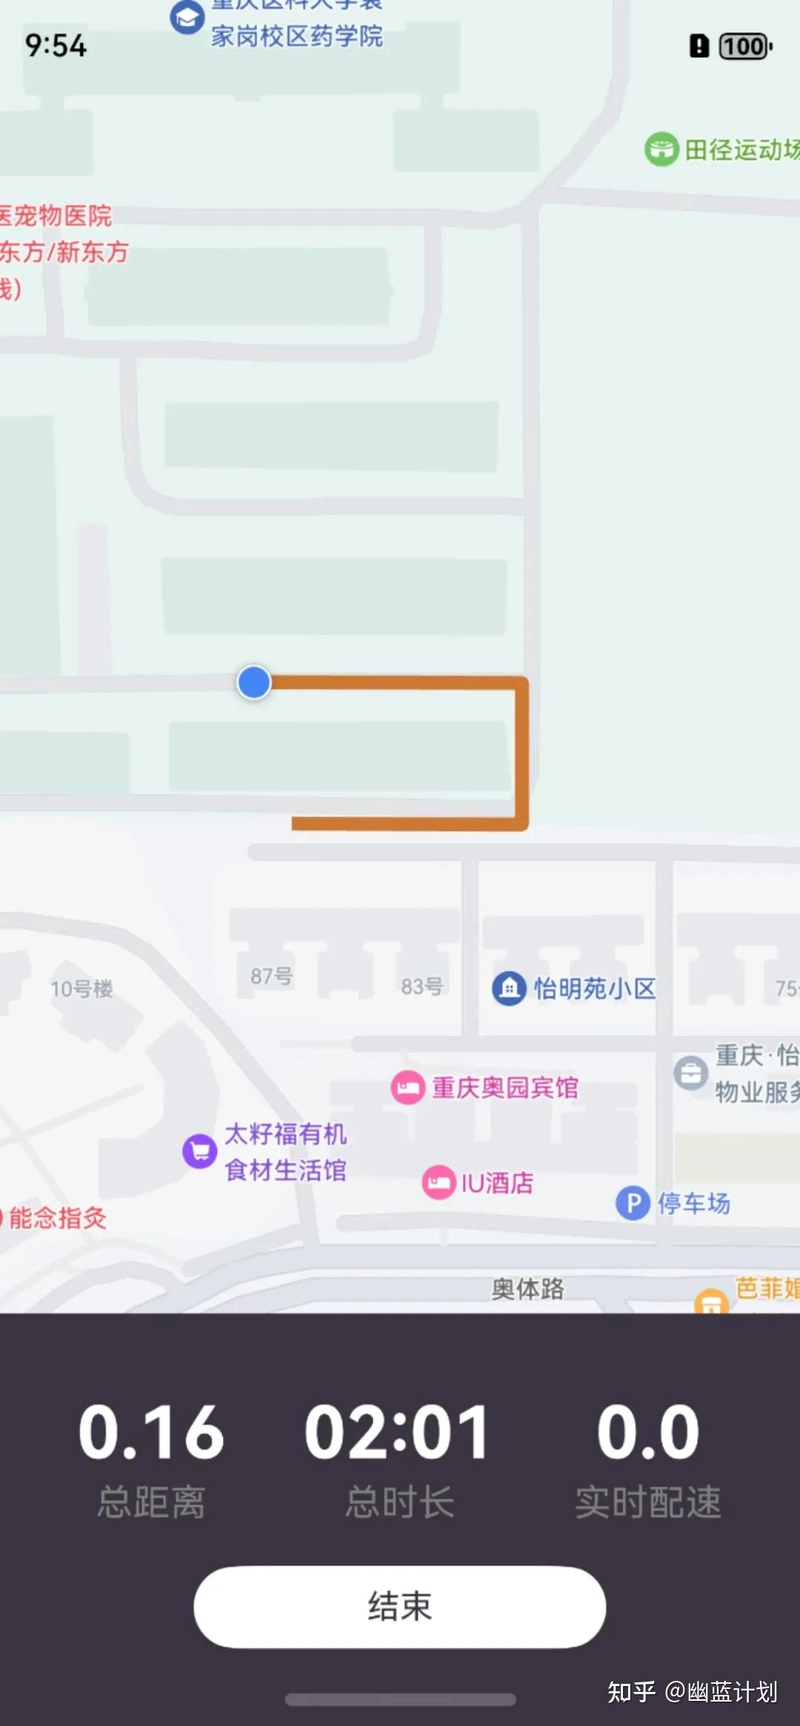
这个项目的整体思路是不断获取定位,按照获取到的定位坐标集在地图上绘制轨迹。
说起来不是很难,但是中间需要踩坑的点很多,下面为大家详细讲解。
1、显示地图
官方提供了地图组件MapComponent来显示地图,基本的参数配置如下:
import { MapComponent, mapCommon, map } from '@kit.MapKit';
import { AsyncCallback } from '@kit.BasicServicesKit';

@Entry
@Component
struct HuaweiMapDemo {

private TAG = "HuaweiMapDemo";
private mapOptions?: mapCommon.MapOptions;
private callback?: AsyncCallback<map.MapComponentController>;
private mapController?: map.MapComponentController;
private mapEventManager?: map.MapEventManager;

aboutToAppear(): void {
// 地图初始化参数
  this.mapOptions = {
      position: {
        target: {
          latitude: this.local_latitude,
          longitude: this.local_longtitude,
        },
        zoom: 15,
      },
      minZoom:2,
      maxZoom:18,
      scaleControlsEnabled: true
    };

  this.callback = async (err, mapController) => {
      if (!err) {
        this.mapController = mapController;
      }
}

build() {
  Stack() {
     MapComponent({ mapOptions: this.mapOptions, mapCallback: this.callback })
     .width('100%')
     .height('100%')
   }
   .height('100%')
  }
}
这里有一个很大的坑,很多人按照文档配置完了之后地图上一片空白,查阅文档、提交工单都解决不了,像这样:
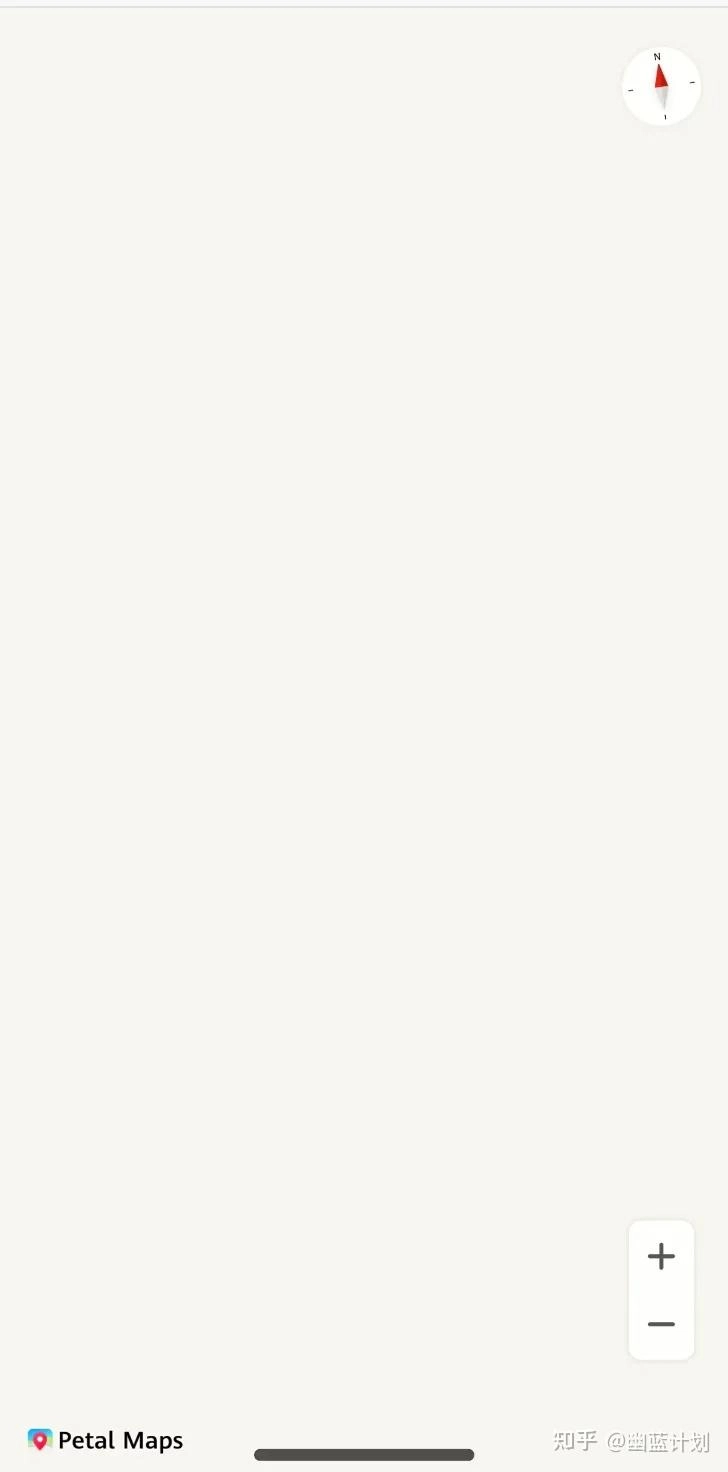
这里幽蓝君给大家提供详细的解决方案,一定要严格按照以下操作:
(1)在DecEco Studio创建项目,并在module.json5文件中添加权限:
ohos.permission.INTERNET
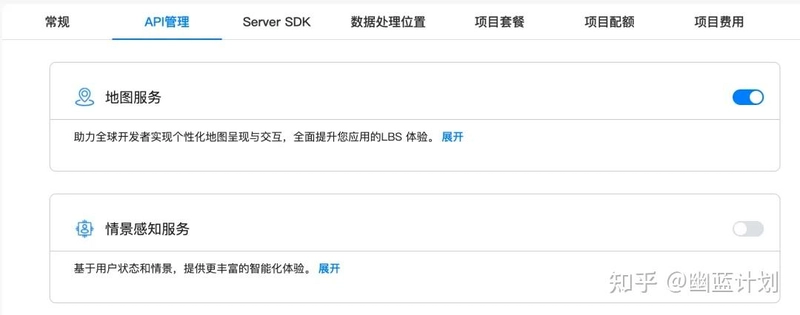
(2)在AppGallery Connect中新建应用,包名就是刚创建的项目中bundleName,在APi管理中打开地图服务开关。
(3)在module.json5文件中,requestPermissions下方添加如下配置:
"metadata": [ // 配置如下信息
{
"name": "client_id",
"value": "*********" //配置为获取的Client ID
}

],
client_id是刚才创建的应用中的Client ID
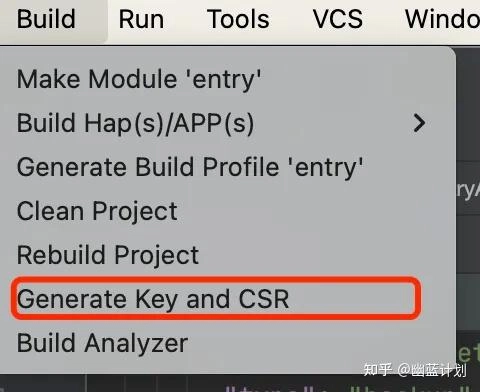
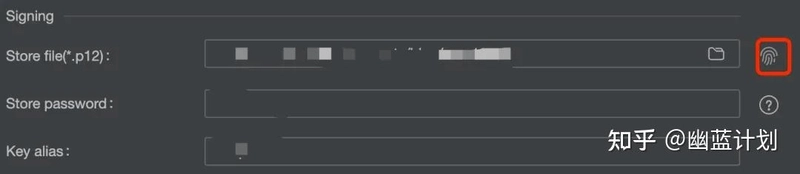
(4)在DecEco Studio中build菜单下创建p12和csr文件:
然后去AppGallery Connect创建调试证书,并在DecEco Studio中配置好。
(5)回到AppGallery Connect应用常规设置,在应用中添加公钥指纹:
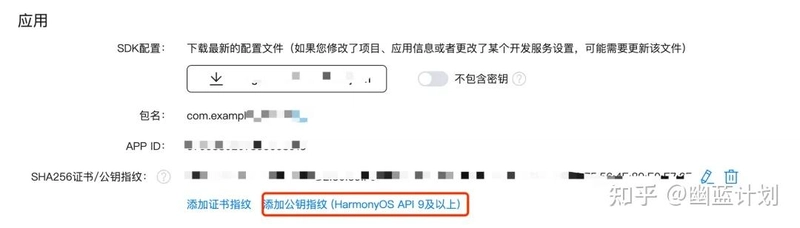
这个指纹可以在DecEco Studio中复制过来:
现在运行程序,应该能正常加载地图了。
2、获取定位
获取定位第一步,添加权限
'ohos.permission.LOCATION'

'ohos.permission.APPROXIMATELY_LOCATION'
第二步,手动获取权限:
let permissionRequestResult = await abilityAccessCtrl.createAtManager().requestPermissionsFromUser(getContext(this),
[
'ohos.permission.LOCATION', //用于精准位置权限  精准度在米级别
'ohos.permission.APPROXIMATELY_LOCATION' //用户获取模糊位置  精准度5公里
]);
第三步,获取位置
let request:geoLocationManager.SingleLocationRequest = {'locatingTimeoutMs': 1000, 'locatingPriority': geoLocationManager.LocatingPriority.PRIORITY_ACCURACY};

let location = await geoLocationManager.getCurrentLocation(request)
这里获取的数据包含经纬度、高度、速度等信息。
接下来,我们有的时候需要在地图上标明自己的位置,就是那个小蓝点,需要使用如下代码:
this.mapController?.setMyLocation(location)
this.mapController?.setMyLocationEnabled(true)
3、收集坐标
现在我们已经可以获取到定位,要记录运动轨迹,只需要不断获取定位,收集所有坐标点绘制在地图上就可以了。获取轨迹可以使用计时器,也可以使用位置订阅。
这里需要注意,我们获取到了定位,是不是把经纬度直接收集起来就可以了呢?不是的,这样位置会出现偏差,定位的经纬度需要进行转换才能使用:
let item:LocaltionItem = {latitude:location.latitude,longitude:location.longitude}
let gcj02Posion: mapCommon.LatLng =
await map.convertCoordinate(mapCommon.CoordinateType.WGS84, mapCommon.CoordinateType.GCJ02,
item);
this.location_list.push(gcj02Posion)
4、绘制轨迹
有了坐标集,我们就可以在地图上绘制了,鸿蒙提供了在地图上绘制折线的方法:
let polylineOption: mapCommon.MapPolylineOptions = {
       // 折线坐标点
       points: this.location_list,
       clickable: true,
       color: 0xffCC7832,
       startCap: mapCommon.CapStyle.BUTT,
       endCap: mapCommon.CapStyle.BUTT,
       geodesic: false,
       jointType: mapCommon.JointType.DEFAULT,
       visible: true,
       width: 22,
       zIndex: 0,
       gradient: false
     };
     // 在地图上添加一条折线
     let mapPolyline: map.MapPolyline = await this.mapController!.addPolyline(polylineOption);
5、计算距离
我们已经有所有坐标点,遍历数组,将每两个位置的距离相加就能得出此次运动的距离:
let totalDistants:number = 0
    if(this.location_list.length > 1){
      for (let index = 0; index < this.location_list.length; index++) {
        const item1:mapCommon.LatLng = this.location_list[index];
        if(index > 0){
          const item0:mapCommon.LatLng = this.location_list[index - 1];
          let distance = map.calculateDistance(item0, item1);
          console.log(distance.toString())
          totalDistants += distance
        }
      }
    }
这一个案例内容比较复杂,难度也较大,幽蓝君会尝试给大家录制视频教程,敬请期待。

Top comments (0)