![Cover image for How to automate your portfolio website [Part 1]](https://media2.dev.to/dynamic/image/width=1000,height=420,fit=cover,gravity=auto,format=auto/https%3A%2F%2Fcdn.hashnode.com%2Fres%2Fhashnode%2Fimage%2Fupload%2Fv1602674983457%2FQmdYCpVls.png%3Fw%3D1600%26h%3D840%26fit%3Dcrop%26crop%3Dentropy%26auto%3Dformat%26q%3D60)
To have less steps redacting the portfolio every time you publish a blog or push a new project to GitHub, automating it is the right choice.
In this article, I'd like to share how you can automate your portfolio website with the help of some APIs, let me show you how I did it.
What should be achieved with this project
- Automatically display and link my projects from GitHub
- Automatically display and link my blogs from Hashnode
Requirements
- JavaScript
- Vue.js
- fetch API
The steps I took
First of all, I was messing around with the github API and have created a user search application with vuejs. Then the idea struck me! If I can search for users and display them this way, there must be a way to automatically display all the repositories on my website.
So I started looking through the API links until I found what was needed. Afterwards I looked into the Hashnode API which will be explained in the next article so stay tuned.
The GitHub API

Preparing the fetch request
This link will be prepared so we can fetch all the public repositories of the chosen profile.
"https://api.github.com/users/{user}/repos{?type,page,per_page,sort}"
// change {user} with a GitHub username
// remove the curly braces and insert the username
// to retrieve all the public repositories remove everything
// after repos within the quotation marks

// this is how the link looks like in my case
"https://api.github.com/users/ahmedaltaai/repos"
All the work is happening inside a component

Requesting the repositories from the GitHub API with the JavaScript fetch API when the the instance is created.
  created() {
    fetch('https://api.github.com/users/ahmedaltaai/repos')
      .then(res => res.json())
      .then(data =>
        console.log(data)
      })
  }
The response

Afterwards
Analise the returned data by clicking on the triangle next to the indexed links to display the information within the object which is needed to know which data is being returned and which to use for displaying on the website.
I placed a red dot next to the information which I want to display:
- Name
- Language
- Description
- Repository URL
- URL of the project for live preview

Now lets store all the information.
Storing the response into an array
To be able to store the data we first need to create an empty array.
data() {
    return {
      // empty array to store the data
      // coming from the api
      repos: []
    }
  }
Then assign the data to the array.
Populating the empty array which was created prior
  created() {
    fetch('https://api.github.com/users/ahmedaltaai/repos')
      .then(res => res.json())
      .then(data =>
// select the array with this.repos and insert the data into it
        this.repos = data
      })
  }
Looping over the repos
We can use the v-for directive to render a list of items based on an array. The v-for directive requires a special syntax in the form of item in items, where items is the source data array and item is an alias for the array element being iterated on.
v-for="(repo, i) in repos" :key="i"
To give Vue a hint so that it can track each node’s identity, and thus reuse and reorder existing elements, you need to provide a unique key attribute for each item.
This is how my component looks like. I will spare the styling which you can find in my GitHub repo
<template>
  <!-- projects container -->
  <article class="projects__container">
    <!-- card container -->
    <section class="card" v-for="(repo, i) in repos" :key="i">
      <div>
        <!-- card header -->
        <header class="header">
          <div>
            {{ repo.name }}
          </div>
          <div class="lang">
            <span class="tag"></span>
            <div>
              {{ repo.language }}
            </div>
          </div>
        </header>
        <!-- card body -->
        <div class="description">
          {{ repo.description }}
        </div>
        <!-- links / buttons -->
        <footer class="buttons">
          <a :href="repo.svn_url">
            <i class="fab fa-github"></i>
            CODE
          </a>
          <a :href="repo.homepage">
            <i class="fas fa-play-circle"></i>
            DEMO
          </a>
        </footer>
      </div>
    </section>
  </article>
</template>
This is how it looks like in the browser

As you can see it is returning every public repository which I don't want it to; so I will use an if-statement and disclose that it should show only the repos which have a homepage link them.
This is a common scenario as you can imagine, wanting to conditionally loop through objects. Only actually running the loop on objects that match a given criteria. The question is how do you do it?
This is how to do it
Place this if statement after the v-for loop so it has access to the individual item and can figure out if repo.homepage is true or false
v-if="repo.homepage"
We want to loop through this repos array using the v-for directive. With each loop iteration we display another repo. But we only want to loop through repos which have a link to a live demo. If a repo doesn't have anything inside the repo.homepage we basically want to skip over it.
This means if homepage in the individual repo is true then show me the requested details as of name, description and so on.
The result of the if-statement

As you can see this would technically work. But we now have empty div elements around each object which can likely interfere with DOM traversal and phantom CSS styling. In addition, it clutters our app and adds unnecessary structure to our HTML markup.
I should also mention that you are still looping through unwanted repos and running a conditional before breaking and going to the next loop iteration. This might solve the problem visually, but computationally we are still looping through every single repo in the system instead of only the needed ones. Depending on the size of the repos payload, this could lead to performance issues.
The solution: computed properties
Instead of looping through all of the repo objects and then checking mid-loop if they meet our criteria, we could just create a subset of our repos, which only represents the wanted repos, with homepage link, and loop only that subset!
We have the repos as an array so we can use the .filter() method to only return the wanted repositories.
    // this function is made to filter every public
    // repo and return only the ones with a homepage in it
    // to overcome empty divs and phantom CSS styling

computed: {
    wantedRepos: function() {
      return this.repos.filter(repo => {
        return repo.homepage
      })
    }
  }
And now we update the v-for loop
v-for="(repo, i) in wantedRepos" :key="i"
The new outcome with computed properties

90% of the work is done. There is one more thing I want to add to the cards I want to add colored language tags the same as on GitHub.
example

Hold up
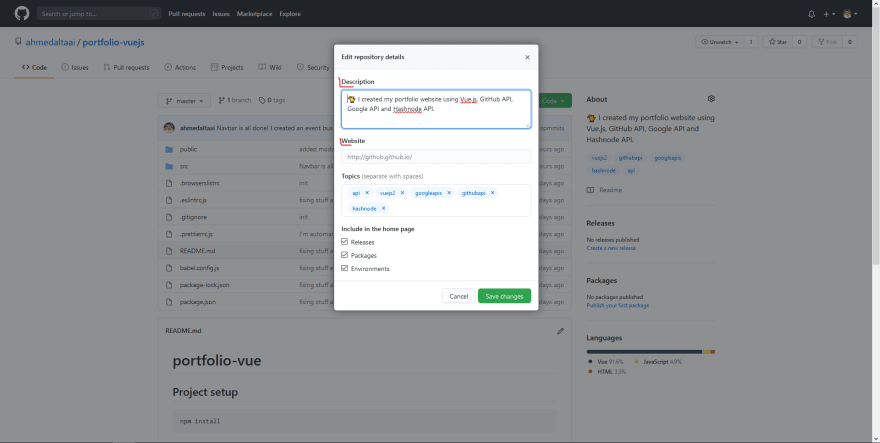
You may be asking: well how can I add a description and a homepage link to my repositories.
Say no more
- Go to the desired repository
- Click the cog icon

- Fill the fields out and click save changes
Now lets go back to the colored language tags
First of all put a class or id on the languages element. I used a class and named it 'lang'
<header class="header">
    <div>
      {{ repo.name }}
    </div>
    <div class="lang">
        <span></span>
      <div>
          {{ repo.language }}
      </div>
    </div>
</header>
I believe everyone is going to have multiple repositories to portray so when you grab the element of the language e.g. class of 'lang' there will be multiple classes with the same value because every repo card has its own language element. So we need to grab them all.
updated() {
    // grab the all element of the language tag
    let lang = document.querySelectorAll('.lang')

    // and cycle through them
    // with a for-of loop then use if and else if statements
    // to decide which language gets which color
    // with 'tag' you can access the individual nodes
    // within the grabed element
    // tag.firstChild is the span element where
    // the colored dot is being displayed

   for (let tag of lang) {
      if (tag.innerText === 'PHP') {
        tag.firstChild.style.backgroundColor = '#4F5D95'
      } else if (tag.innerText === 'HTML') {
        tag.firstChild.style.backgroundColor = '#e34c26'
      } else if (tag.innerText === 'JavaScript') {
        tag.firstChild.style.backgroundColor = '#f1e05a'
      } else if (tag.innerText === 'CSS') {
        tag.firstChild.style.backgroundColor = '#563d7c'
      } else if (tag.innerText === 'C') {
        tag.firstChild.style.backgroundColor = '#f34b7d'
      } else if (tag.innerText === 'C++') {
        tag.firstChild.style.backgroundColor = '#b07219'
      } else if (tag.innerText === 'Java') {
        tag.firstChild.style.backgroundColor = '#b07219'
      } else if (tag.innerText === 'Python') {
        tag.firstChild.style.backgroundColor = '#3572A5'
      } else if (tag.innerText === 'Vue') {
        tag.firstChild.style.backgroundColor = '#2c3e50'
      } else if (tag.innerText === 'TypeScript') {
        tag.firstChild.style.backgroundColor = '#2b7489'
      }
    }
The colored dot is styled in the CSS section and we are only adding the background-color to it.
I grabbed the colors from GitHub with the help of dev-tools inspector.
Congratulations on automating your projects section on your portfolio homepage.
Next: Hashnode API implementation so stay tuned and follow me to not miss it out!

Latest comments (3)
This is amazing, i found it useful. Thank you
This was amazing ... really like the way you planned and handled the process. Great article :)
Thank you very much!