
What is Knex and PostgreSQL?
Knex is a versatile, portable, and enjoyable SQL query builder for PostgreSQL, CockroachDB, MSSQL, MySQL, MariaDB, SQLite3, Better-SQLite3, Oracle, and Amazon Redshift, while PostgreSQL is an open-source object-relational database management system with a high degree of flexibility. It is capable of handling a wide range of use cases, including single machines, data warehouses, and web services with multiple concurrent users. It is a relational database management system that uses and extends SQL (hence the name), and it is broadly extensible to a variety of use cases beyond transactional data.
PostgreSQL stores information in tables (called relations) that contain tuples that represent entities (like documents and people) and relationships (such as authorship). Fixed-type attributes that represent entity properties (such as a title), as well as a primary key, are included in relationships. Attribute types can be atomic (for example, integer, floating point, or boolean) or structured (such as an array, nested JSON, or a procedure).
Why Use Knex?
Most developers use Knex as their query builder for the following reasons.
- It allows them to create queries like they are writing Javascript code, while it handles the translation to SQL.
- It has support for database management systems like PostgreSQL, MySQL, SQLite, and Oracle.
- It supports both traditional node-style callbacks and a promise interface for cleaner async flow control, as well as a stream interface.
- It is full-featured query and schema builders, transaction support (with savepoints), connection pooling, and standardized responses between query clients and dialects.
Prerequisites
As this is a hands-on demonstration tutorial, to get started, ensure your systems meet the following requirements:
- You have Node.js version 14 or later installed
- You have installed and set up Arctype
- You have set up a PostgreSQL database
- Install the Knex CLI (the command to do so is
npm i -g knex)
With the above requirements met, let’s create a new database using Arctype. To get started launch the Arctype client, then choose the database you would like to work with:

Then provide the credentials of the database in question. It's all really simple to do, no hassle here!

If you already have a database set up, you can always create a new one by adding a new data source:

After you're done, you should see tables underneath your database on the left hand side in Arctype.
Create the Node.js Server
Now, create a new folder for your project and initialize a new project with the commands below.
mkdir knex-demo && cd knex-demo
npm init -y
Then install the required packages by running the following command:
npm install pg express knex
With the above command, you have installed the PostgreSQL Node.js module, express, and the knex module.
Now create the following folder structure below in the knex-demo folder.

Then in the app.js file, create a Node.js Express server with the code snippet below.
const express = require("express");

const app = express();

app.use(express.json());

app.listen(3000, () => {
  console.log("Server is running on port 3000");
});
Lastly, modify the package.json file to add the script command.
 "scripts": {
    "start": "node src/app.js"
  },
Setup Knex
Once you’ve created the database, let’s set up Knex and connect to the database. To get started, run the command below on your terminal to initialize knex.
knex init
The above command will create a knexfile.js file in your project root directory with the code snippets to connect your database to different environments (development, staging, production.) By default, it uses the SQLite database in the development environment, you’ll need to modify the code to use your Postgres database.
// Update with your config settings.

/**
 * @type { Object.<string, import("knex").Knex.Config> }
 */
module.exports = {
  development: {
    client: "postgresql",
    connection: {
      database: "blogs",
      user: "postgres",
      password: "1234",
    },
  },

  staging: {
    client: "postgresql",
    connection: {
      database: "<Your Staging DB>",
      user: "username",
      password: "password",
    },
    pool: {
      min: 2,
      max: 10,
    },
    migrations: {
      tableName: "knex_migrations",
    },
  },

  production: {
    client: "postgresql",
    connection: {
      database: "<Your Production DB>",
      user: "username",
      password: "password",
    },
    pool: {
      min: 2,
      max: 10,
    },
    migrations: {
      tableName: "knex_migrations",
    },
  },
};
Your knexfile.js file should look like the code snippet above. You can modify the code to meet any other project requirements you might have.
Creating the Migration File
Now run the command below to create your migration file for the user’s table and define how the table will look like by running the command below.
knex migrate:make users
The above command will create a migrations/timestamp_users file in the root directory of your project. Now let’s define the schema in the ups and down functions.
/**
 * @param { import("knex").Knex } knex
 * @returns { Promise<void> }
 */
exports.up = function (knex) {
  return knex.schema.createTable("users", (table) => {
    table.increments("id").primary();
    table.string("name").notNullable();
    table.string("email").notNullable();
    table.string("password").notNullable();
    table.string("avatar").defaultTo("https://i.imgur.com/Xq2bZCY.png");
    table.string("bio").defaultTo("I am a new user");
    table.timestamp("created_at").defaultTo(knex.fn.now());
    table.timestamp("updated_at").defaultTo(knex.fn.now());
  });
};

/**
 * @param { import("knex").Knex } knex
 * @returns { Promise<void> }
 */
exports.down = function (knex) {
  return knex.schema.dropTable("users");
};
The code in the migrations/timestamp_users.js file should look like the above code snippet. We defined the user’s schema. The first one is an id field with autoincrement set to true and a unique constraint, after that we have the fields we need for the user’s table.
Then in the down function, we are dropping any existing table with the name users before we create our new table.
To create this table in your database you need to run the migrations command again, this time you need to add the latest flag to only commit the new changes in the file.
knex migrate:latest
Next, create the blogs schema by running the migration command below on your terminal.
knex migrate:make blogs
Then add the code below in the up function to define the blog’s schema.
/**
 * @param { import("knex").Knex } knex
 * @returns { Promise<void> }
 */
exports.up = function (knex) {
  return knex.schema.createTable("blog", (table) => {
    table.increments("id").primary();
    table.string("title").notNullable();
    table.string("content").notNullable();
    table.string("image").notNullable();
    table.timestamp("created_at").defaultTo(knex.fn.now());
    table.timestamp("updated_at").defaultTo(knex.fn.now());
  });
};

/**
 * @param { import("knex").Knex } knex
 * @returns { Promise<void> }
 */
exports.down = function (knex) {
    return knex.schema.dropTable("blog");
};
In the above code snippet, we created a blog schema and defined the fields we need in the blogs table. We are also dropping any existing table with the name blogs
Creating the Table Relationships
Now let’s create a relationship between the user’s schema and the blog’s schema. This way we can associate blogs with the users that create them. To do that, we need to update the code in the timestamps_blogs.js file with the following code:
/**
 * @param { import("knex").Knex } knex
 * @returns { Promise<void> }
 */
exports.up = function (knex) {
  return knex.schema.createTable("blog", (table) => {
    table.increments("id").primary();
    table.string("title").notNullable();
    table.string("content").notNullable();
    table.string("image").notNullable();
    table
      .integer("author")
      .unsigned()
      .references("id")
      .inTable("users")
      .onDelete("CASCADE");
    table.timestamp("created_at").defaultTo(knex.fn.now());
    table.timestamp("updated_at").defaultTo(knex.fn.now());
  });
};

/**
 * @param { import("knex").Knex } knex
 * @returns { Promise<void> }
 */
exports.down = function (knex) {
    return knex.schema.dropTable("blog");
};
In the above code snippet, we modified the author field to reference the id of each user in the user’s schema. The OnDelete will ensures the blog is deleted once the user’s account is deleted.
Next, create a db.js file in the config folder and add the code snippet below.
const knex = require("knex");
const config = require("../../knexfile");
module.exports = knex(config.development);
In the above code snippet, we are importing the config from knexfile and initializing the knex object, so since running the application on the development environment we’ll be calling the development config object.
Creating the Service
With our database tables created, let’s create a service that performs CRUD operations in the database tables. Create a userService.js file in the service folder and add the code snippet specified below.
const db = require('../config/db');

module.exports = userService = {
  getAll: async () => {
    const users = await db("users");
    return users;
  },
  getById: async (id) => {
    const user = await db("users").where("id", id);
    return user;
  },
  create: async (user) => {
    const users = await db("users").insert(user);
    return users;
  },
  update: async (id, user) => {
    const users = await db("users").where("id", id).update({
      name: user.name,
      email: user.email,
      password: user.password,
      avatar: user.avatar,
      bio: user.bio,
    });
    return users;
  },
  delete: async (id) => {
    const users = await db("users").where("id", id).del();
    return users;
  },
};
In the above code snippet, we imported the knex config. Then we created userService object and created the methods for the CRUD operations.
Next, create a blogService.js file in the service folder and add the code snippet below.
const db = require("../config/db");

module.exports = blogService = {
  getAll: async () => {
    const blogs = await db("blog")
      .join("users", "users.id", "blog.author")
      .select(
        "blog.*",
        "users.name",
        "users.avatar",
        "users.bio",
        "users.email"
      );
    return blogs;
  },
  getById: async (id) => {
    console.log(id);
    const blog = await db("blog").where({ id });
    return blog;
  },
  create: async (blog) => {
    const blogs = await db("blog").insert(blog);
    return blogs;
  },
  update: async (id, blog) => {
    const blogs = await db("blog").where("id", id).update({
      title: blog.title,
      content: blog.content,
      image: blog.image,
    });
    return blogs;
  },
  delete: async (id) => {
    const blogs = await db("blogs").where("id", id).del();
    return blogs;
  },
};
In the above code snippet, we created the CRUD operations for the service blogService. In the getAll method we are joining the users table with the blogs table, using the select method to select the fields we want to show to the users - if we now call the service we can get the blogs and the users that posted them.
Creating the Controller
Now let’s create the controller to consume the service we just created. Let’s start with the user’s controller. So create a userController.js file in the controller folder and add the code snippet below.
const userService = require("../service/userService");
module.exports = userController = {
  getAll: async (req, res, next) => {
    try {
      const users = await userService.getAll();
      res.json(users);
    } catch (error) {
      next(error);
    }
  },
  getById: async (req, res, next) => {
    try {
      const user = await userService.getById(req.params.id);
      res.json(user);
    } catch (error) {
      next(error);
    }
  },
  create: async (req, res, next) => {
    try {
      const user = await userService.create(req.body);
      res.json(user);
    } catch (error) {
      next(error);
    }
  },
  update: async (req, res, next) => {
    try {
      const user = await userService.update(req.params.id, req.body);
      res.json(user);
    } catch (error) {
      next(error);
    }
  },
  delete: async (req, res, next) => {
    try {
      const user = await userService.delete(req.params.id);
      res.json(user);
    } catch (error) {
      next(error);
    }
  },
};
Now create a blogController.js file in the controller folder to consume the blogService with the code snippet below.
const userService = require("../service/userService");
module.exports = userController = {
  getAll: async (req, res, next) => {
    try {
      const users = await userService.getAll();
      res.json(users);
    } catch (error) {
      next(error);
    }
  },
  getById: async (req, res, next) => {
    try {
      const user = await userService.getById(req.params.id);
      res.json(user);
    } catch (error) {
      next(error);
    }
  },
  create: async (req, res, next) => {
    try {
      const user = await userService.create(req.body);
      res.json(user);
    } catch (error) {
      next(error);
    }
  },
  update: async (req, res, next) => {
    try {
      const user = await userService.update(req.params.id, req.body);
      res.json(user);
    } catch (error) {
      next(error);
    }
  },
  delete: async (req, res, next) => {
    try {
      const user = await userService.delete(req.params.id);
      res.json(user);
    } catch (error) {
      next(error);
    }
  },
};
Creating the API Routes
Next, let’s create the API routes for the controllers. To get started, create a user.js file in the routes folder and add the code snippet below.
const express = require("express");
const router = express.Router();
const userController = require("../controller/userController");

/* GET users listing. */
router.route("/").get(userController.getAll).post(userController.create);
router
  .route("/:id")
  .get(userController.getById)
  .put(userController.update)
  .delete(userController.delete);

module.exports = router;
In the above code snippet, we have imported the userController and created an express router. Using the express router we define the route handlers for the controllers.
Now create another file called blog.js in the routes folder to define the route handlers for the blog controller with the code snippet below.
const express = require("express");
const router = express.Router();
const blogController = require("../controller/blogController");

/* GET home page. */
router.route("/").get(blogController.getAll).post(blogController.create);
router
  .route("/:id")
  .get(blogController.getById)
  .put(blogController.update)
  .delete(blogController.delete);

module.exports = router;
Finally, import the routes in the app.js file and create a middleware for both routes with the code snippet below.
...
const userRouter = require("./routes/users");
const blogRouter = require("./routes/blog");

...
app.use('/users', userRouter);
app.use('/blog', blogRouter);\

...
Testing the API
Now let’s test the project to ensure everything works as expected. First, start y0ur server with the command below.
npm start
Then launch Postman or any API testing tool of your choosing.
The User Endpoint
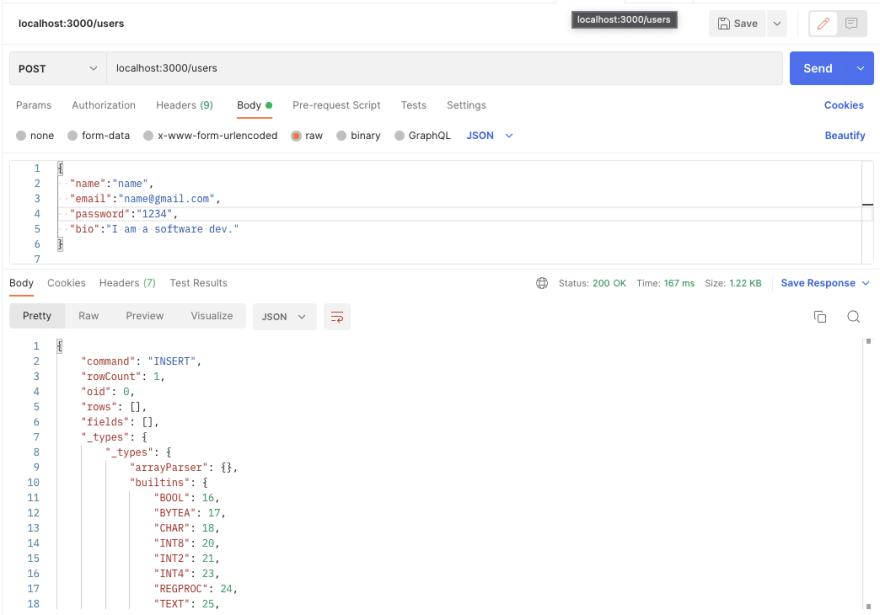
Send a POST request to the endpoint localhost:3000/users with the payload below to create a user.
{
  "name":"name",
  "email":"name@gmail.com",
  "password":"1234",
  "bio":"I am a software dev."
}
Next, send a GET request to the same endpoint to get all the registered users. Go ahead and test out the other user’s endpoints.

The Blog Endpoint
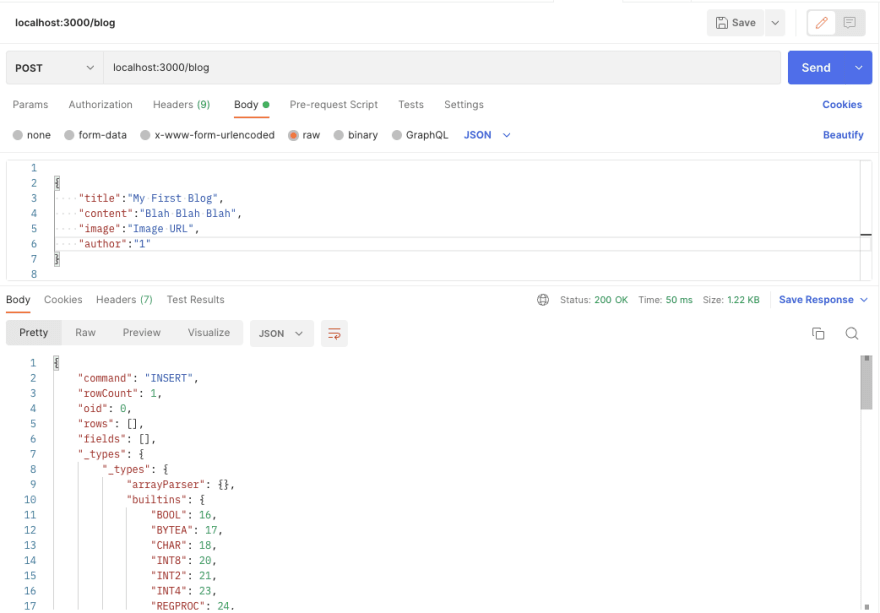
Now send a POST request to the endpoint localhost:3000/blog with the payload below to create a blog for the user with id of 1 denoted by the author field.
{
    "title":"My First Blog",
    "content":"Blah Blah Blah",
    "image":"Image URL",
    "author":"1"
}
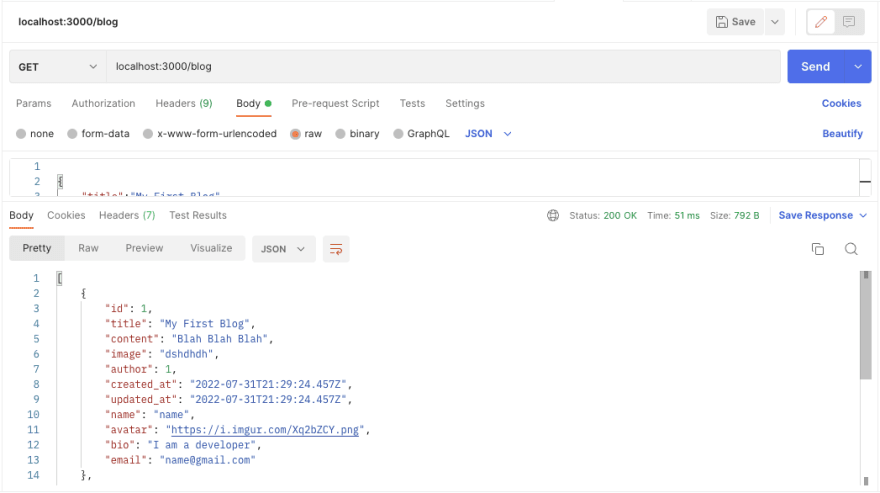
Then send a GET request to the same endpoint to get all the blogs.
Viewing User Data with Arctype
We have now successfully created our Blog application. Now, let’s look at the users’ data with Arctype. To begin, launch Arctype, click the Postgres tab, and enter the following Postgres credentials, as shown in the screenshot below (it's all the same as we did with MySQL at the start):

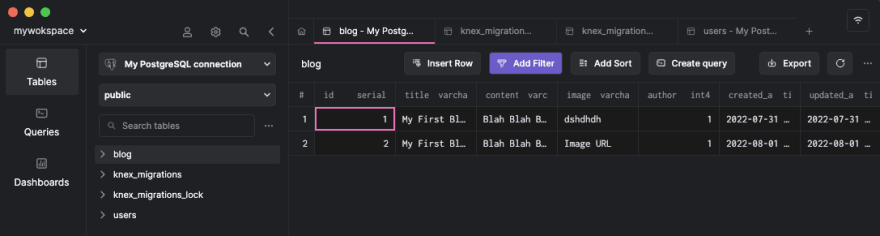
You should see the user, blog table and the knex migrations tables keeping record of the migrations made in the application. Now click on the blogs table to show the user’s blogs, as shown in the screenshot below:
Conclusion
By building a demo project, we’ve learned how to build REST endpoints with Knex and PostgreSQL. We started by introducing PostgreSQL and Knex and why you should use them, then we created a blog project for the demonstration. Now that you’ve gotten the knowledge you seek, how would you use a query builder in your next project? Consider learning more about Knex from their official website and take things even further!

Latest comments (0)