
June 27, 2024: This blog post uses Amplify Gen 1, if you're starting a new Amplify app I recommend trying out Gen 2!
I first used GraphQL on a project right after its launch in 2015, and to be honest I didn't understand why we were using it. Over the years, I've grown to love GraphQL - you can quickly create APIs with managed services such as AWS AppSync and Hasura, and it lessens the friction between frontend and backend development. In this post, we'll chat about what GraphQL is, why to use it as well as when it may not be the best option, and then create a full recipe app using a GraphQL API.
Please note that I work as a Developer Advocate on the AWS Amplify team, if you have any feedback or questions about it, please reach out to me or ask on our discord - discord.gg/amplify!
If you're new to APIs, I would recommend reading this blog post about them first! If you're new to the idea of REST, I'd also recommend reading this first; this post will often compare GraphQL to REST. I'll also be using React for some pieces of the frontend -- I'd recommend skimming a tutorial on that before this post.
Also, a few vocabulary terms we'll be using throughout this post:
- Schema: this is a representation of how data is structured.
- Fields: these are attributes associated with a piece of data.
What is GraphQL?
According to its documentation, "GraphQL is a query language for your API, and a server-side runtime for executing queries using a type system you define for your data." GraphQL itself is a specification, meaning that there's a document outlining what GraphQL queries look like and how client-server interaction works with it; however, it can be used with any programming language or data layer for your app.
In practice, this allows frontend developers to send queries asking for the data they need -- including nested data -- to the backend. This allows backend developers to create one endpoint instead of the many needed for a REST API. You can send mutations to change data and queries to retrieve data all to one place.
Why use GraphQL?
There are a lot of reasons why GraphQL is popular. The first is that it simplifies the communication between frontend and backend developers much less difficult -- instead of frontend developers needing to ask for a new endpoint once their requirements change, they can instead just update their GraphQL query. This becomes even more helpful if you have multiple frontends requiring the same backend data. Frontend developers can get exactly the data they need -- no under or over fetching of fields or items.
Since frontend developers can request nested data using one query, network requests are also minimized -- for example if you query for a blog post, you can also get that post's comments in that one query instead of doing a second request to get them. This also may reduce the amount of frontend code needed and make that code easier to understand.
GraphQL also enforces a typed data schema, so each item's fields will have to match those types. This makes data more consistent and manageable -- instead of having to loop through blog posts and figure out if each title is a string or a boolean, GraphQL will enforce that each title is a string.
When is GraphQL not so good?
As with anything in software engineering, there are also drawbacks to using GraphQL. Firstly, I started using GraphQL way back when it came out in around 2015, and I hated it. I was a fullstack engineer on a small team, and building the backend was more work and the frontend needed to be more verbose. GraphQL queries are often long, whereas with many REST APIs you can just provide a url. In addition, many backend frameworks and languages have much less mature support for GraphQL APIs compared to REST. You may have to do more work and navigate through a less used library to get your GraphQL Api. If you're the one creating the endpoints and consuming them, building a REST API may be quicker -- especially if you're using a programming language or framework with less mature GraphQL support.
GraphQL shines with larger teams where a frontend team is developing the client side and a separate team is developing the server. In addition, there have been more and more managed GraphQL services, like Hasura and AWS AppSync. These allow you to generate a GraphQL backend using their services and then consume it on the frontend -- this usually speeds up the rate of backend development considerably when compared to writing a GraphQL server from scratch.
Finally, many developers are taught how to use and create a REST API from early on in their careers and may have less institutional knowledge around GraphQL. Getting a full team up to speed may be an investment that you need to consider.
Create a GraphQL API
Now for the fun part, let's write some code! We're going to use AWS Amplify to create a GraphQL backend -- this will speed up the process and allow us to just focus on the GraphQL rather than the rest of backend development.
First, I'll create a React app -- there isn't much React code in here, but the setup will be quicker than creating a Vanilla JS app with a bundler.
In your terminal, run:
npx create-react-app graphql-playground
cd graphql-playground
Note: you'll need Node installed for this step.
Next, we'll initialize Amplify in our project.
amplify init
Note: you'll need Amplify installed for this step.
Then, you'll be prompted to answer a few questions. You can type in "y" to get the default React configuration, and then choose your AWS profile (see the above tutorial if you don't have one!)
Project information
| Name: graphqldemo
| Environment: dev
| Default editor: Visual Studio Code
| App type: javascript
| Javascript @framework: react
| Source Directory Path: src
| Distribution Directory Path: dist
| Build Command: npm run-script build
| Start Command: npm run-script start

? Initialize the project with the above configuration? Yes
Using default provider awscloudformation
? Select the authentication method you want to use: AWS profile

For more information on AWS Profiles, see:
https://docs.aws.amazon.com/cli/latest/userguide/cli-configure-profiles.html

? Please choose the profile you want to use default
Now, we'll create a GraphQL API. Run:
amplify add api
You'll again be asked a few questions! First, select GraphQL, then name your API, for example graphql demo. You can then press enter twice to accept the defaults for API keys. Then, you can select no for the GraphQL API and no for the GraphQL schema. Choose the "One-to-many relationship" template and yes to editing the schema now.
? Please select from one of the below mentioned services: GraphQL
? Provide API name: graphqldemo
? Choose the default authorization type for the API API key
? Enter a description for the API key:
? After how many days from now the API key should expire (1-365): 7
? Do you want to configure advanced settings for the GraphQL API No, I am done.
? Do you have an annotated GraphQL schema? No
? Choose a schema template: One-to-many relationship (e.g., “Blogs” with “Posts” and “Comments”)
? Do you want to edit the schema now? Yes
? Choose your default editor: Visual Studio Code
You'll see a pre-generated schema pop up, let's talk about the Blog model.
type Blog @model {
  id: ID!
  name: String!
  posts: [Post] @connection(keyName: "byBlog", fields: ["id"])
}
TODO: add list of scalar types
type - The word type is used to represent a type of object you may get back from your API -- in this case a blog!
Blog - This is the name of the type
@model - The @ sign in GraphQl defines a directive, which means that a field or type has custom logic associated with it. Amplify provides quite a few of these you can use. The @model directive makes it so that the data for the Blog is stored in our database.
id, name, and posts - these are fields or pieces of data that each blog will have
ID and String - these are types, they define that id's will be of the type id and names will be strings. These fields are scalar which means that they are singular pieces of data -- one id and one name rather than having a collection of names for each blog post.
! - The exclamation point after types means that the field is non-nullable, or you always need to provide a value for that field. In this case every blog must have an id and name!
[Post] - Firstly, the [] make it so that it's an array field. Each blog can have an array of posts associated with it. You can also do this with the scalar types as well, so [String] would allow for an array of strings. In this case, we're referring to the Post model which is also declared in this file, so the two data types are related to one another.
@connection - this is another directive, in this case it allows us to relate one model to another. You'll need to provide some data to it, in this case keyName and fields
keyName - This is the name of the index that should be queried to get the related posts. You'll notice on the Post model that a @key directive is defined with a name. The name of that key will match the keyName here. You'll need to define a @key whenever you have a one to many field in Amplify and then use the keyName to reference it.
fields - This is the field that can be queried to get connected objects.
Now let's trade this out for our schema. We'll create a recipe book of sorts. Let's first create three models, Recipe, Ingredient, and Instruction.
type Recipe @model {
}

type Ingredient @model {
}

type Instruction @model {
}
Now, let's add fields to each. Each model will need an id, which will be a mandatory ID field. Then, we'll add names to Recipe and Ingredient. Ingredient will also have a quantity and Instruction will have info.
type Recipe @model {
  id: ID!
  name: String!
}

type Ingredient @model {
  id: ID!
  name: String!
  quantity: String!
}

type Instruction @model{
  id: ID!
  info: String!
}
Now, we need to connect our models. First, we'll add @key directives to both of our child models - Ingredient and Instruction since Recipes will have both! We want to be able to access Ingredients and Instructions by which recipe each belongs to. Each will have a recipeID which will refer to the recipe each belongs to. Then we'll create a connection to the Recipe model based on that recipeID. Finally, we'll set up a @key on each model that will allow us to access the group of ingredients or instructions that belongs to a recipe.
type Ingredient @model @key(name: "byRecipe", fields: ["recipeID"]) {
  id: ID!
  name: String!
  quantity: String!
  recipeID: ID!
  recipe: Recipe @connection(fields: ["recipeID"])
}

type Instruction @model @key(name: "byRecipe", fields: ["recipeID"]) {
  id: ID!
  info: String!
  recipeID: ID!
  recipe: Recipe @connection(fields: ["recipeID"])
}
Finally, we'll add connections from the Recipe model to each of the ingredients and instructions.
type Recipe @model {
  id: ID!
  name: String!
  ingredients: [Ingredient] @connection(keyName: "byRecipe", fields: ["id"])
  instructions: [Instruction] @connection(keyName: "byRecipe", fields: ["id"])
}
Now, we need to deploy our data! Running amplify push will create a GraphQL API in the cloud for us.
amplify push -y
Queries and Mutations!
Okay, we've setup a GraphQL. Now let's interact with it! We'll create data using mutations. We'll also retrieve our data using queries.
From your command line, run:
amplify console api
Then choose graphql. AWS AppSync's console will open in the browser. AppSync is the underlying service we're using to create our GraphQL API, and using its console we can test out queries using a visual interface.
Once you're in the AppSync interface, choose Mutation in drop down, then click the plus button.

Underneath, you'll see some actions to choose from. Select "createRecipe" and then click the checkbox next to name under input.
Type in a name for your recipe. I chose mac n cheese!

Press the orange run button, and you'll have a recipe ✨! You can create a few different ones if you'd like -- change the name of the recipe and press the orange button for each recipe you'd like to make.
Now let's see the recipes we created. Switch the dropdown back to Query instead of Mutation. Then choose listRecipes below it. Select the attributes you'd like to see, like name under items. Also note that you can
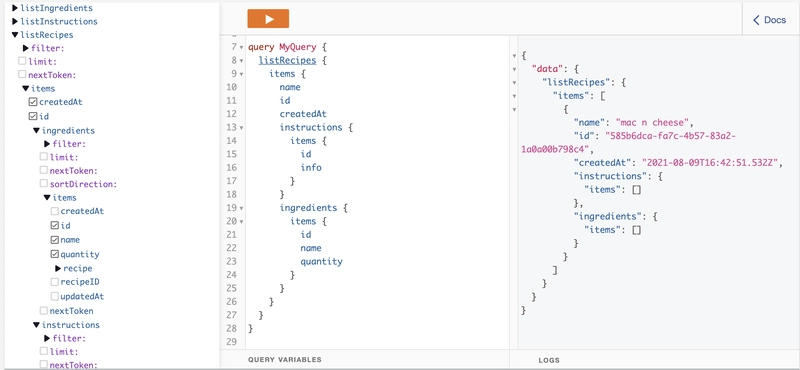
Repeat the same processes you used to create a Recipe to create a few ingredients and instructions. Use your recipe's id for the recipeID (hint: you can get this using the listRecipes query!) You can also create a Recipe with ingredients and instructions in one mutation if you select their fields and populate them as well!
Now, rerun the listRecipes query with the ingredients and instructions and you'll see everything connected. This is the beauty of GraphQL -- you can get whatever data you need back without changing an endpoint, you can just change the fields you interact with!
The Anatomy of a GraphQL Query
We've written GraphQL queries and mutations using this visual interface, but let's also dive into their syntax so you can write and understand them from scratch.
Here's an example query we could use on our API.
query MyQuery {
  # This is a comment!
  listRecipes {
    items {
      name
      id
      createdAt
      instructions {
        items {
          id
          info
        }
      }
      ingredients {
        items {
          id
          name
          quantity
        }
      }
    }
  }
}
query - This is the type of operation we're performing with our data.query is to retrieve data, mutation is to change data, and subscription is to listen for changes in our data. We'll use all three in the rest of this tutorial!
MyQuery - This is the name of the query, ideally these would be descriptive like ListRecipes
listRecipes - AppSync generates GraphQL resolvers which allow us to get data.
items - this syntactically represents that we get multiple recipes back
name, id, createdAt - fields we want to get back about our data. createdAt and updatedAt are added automatically for us.
instructions and ingredients - we also want to get the data about the related instructions and ingredients back! Then their fields are inside their queries to get these back.
You can add or remove whichever fields you want to in the query!
Some queries will also require arguments. For example, if you want to get just one Recipe, you may provide the id of the one you want. The same is true for mutations.
query GetRecipe($id: ID!) {
  getRecipe(id: $id) {
    id
    name
  }
}
Now, let's query our newly created API in our app!
How to run those queries on a frontend
Now we've tried out mutations and queries, how do we integrate these into our app? First, let's try this out without using any libraries. We can use a normal Fetch request that we'd use for a REST API call.
Go to your App.js component. First, import the object from the aws-exports.js file. You can go in and check out that file, but it essentially has all the configuration information your frontend will need about your Amplify-generated backend. Also, import useEffect from React.
import config from './aws-exports'
import { useEffect } from 'react'
Now, we'll create a useEffect hook that will make a fetch request on page load (if you were using vanilla JavaScript you'd most likely write this same code without the useEffect inside a page load event).
Inside the fetch request, we'll need to specify the endpoint, which we can get from the aws-exports object. Then we'll need to customize the request by adding the request method POST. We'll also provide the API key from the aws-exports file. Then the request body will contain the query that we used before! We'll need to use the JSON.stringify method to convert our object to a string. Just like with any other fetch request we'll need to convert the data to JSON, then you can view it!
function App() {
  useEffect(() => {
    const pullData = async () => {
      let data = await fetch(config.aws_appsync_graphqlEndpoint, {
        method: 'POST',
        headers: {
          'Content-Type': 'application/json',
          Accept: 'application/json',
          'X-Api-Key': config.aws_appsync_apiKey
        },
        body: JSON.stringify({
          query: `query MyQuery {
          listRecipes {
            items {
              name
              id
              createdAt
              instructions {
                items {
                  id
                  info
                }
              }
              ingredients {
                items {
                  id
                  name
                  quantity
                }
              }
            }
          }
        }
        `
        })
      })
      data = await data.json()
      console.log(data)
    }
    pullData()
  }, [])

  return <h1>Hello GraphQL!</h1>
}
Okay so now we can get data from our API, but this is a little clunky and a lot of code. If you go into your graphql/ directory that was generated by Amplify, you'll see files that have subscriptions, queries, and mutations in them for all common operations! We'll import these and use them in our code. Also, Amplify provides helper functions to abstract away the HTTP request.
In the root of your project, run:
npm i aws-amplify
This will install the Amplify libraries which will help out with making the GraphQL queries more concise.
We'll configure Amplify tying our frontend and backend together in the index.js file. Add this in at the top:
// index.js
import { Amplify } from 'aws-amplify'
import config from './aws-exports'

Amplify.configure(config)
Now, head back to the App.js file. We'll import a few things from the aws-amplify libraries.
import { API } from 'aws-amplify'
We'll also import the listRecipes query from the Amplify generated queries. You can check out the code for it in the 'graphql/queries.js' file.
import { listRecipes } from './graphql/queries'
Let's revise our useEffect code. Replace your pullData function with the following:
useEffect(() => {
  const pullData = async () => {
    const data = await API.graphql({ query: listRecipes })
    console.log(data)
  }
  pullData()
}, [])
The API.graphql() method runs an API request to our app's configured GraphQL API. We'll pass the query in an object as the argument. Much less code than before!
Now, we'll run a mutation to create a new recipe when a button is clicked. We'll also prompt the user to input the recipe's name. Replace your return statement in the App.js component with the following, a button that runs an event listener on click.
return (
  <div className='App'>
    <button onClick={createNewRecipe}>create recipe</button>
  </div>
)
Make sure to import the mutation we'll need:
import { createRecipe } from './graphql/mutations'
Now, we'll implement the createNewRecipe function. Add this to your component. We'll first ask the user to name the recipe. Then we'll run a GraphQL request, this time with the createRecipe mutation. This mutation also takes variables: in this case the name of the recipe. We'll provide that in an object as well!
const createNewRecipe = async () => {
  const name = prompt('what is the recipe name?')
  const newRecipe = await API.graphql({ query: createRecipe, variables: { input: { name } }}))
  console.log(newRecipe)
}
If you refresh the page, you'll now see that your array of recipes has the new one you created! But how can we make it so the query reruns automatically whenever a new recipe is created? Subscriptions!
Subscriptions
Subscriptions allow you to "subscribe" to events via GraphQL, so whenever your data updates you can run code. In our case, we'll make it so that we refetch all the recipes whenever a new one is created.
First, import the subscription:
import { onCreateRecipe } from './graphql/subscriptions'
Then, we'll update our useEffect. Keep the first few lines that pull the recipes from the API. Below that create a subscription. This looks similar to the other API requests we've made, but in this case we'll add the .subscribe method onto it. We'll pass an object with next and error. Error will run if there's an error with the subscription. Next will run after the subscription triggers. In our case we want to re-run pullData!
Finally, make sure to unsubscribe from updates by returning a function that cleans up the subscription.
useEffect(() => {
  const pullData = async () => {
    const data = await API.graphql(graphqlOperation(listRecipes))
    console.log(data)
  }
  pullData()

  const subscription = API.graphql(
    { query: onCreateRecipe }
  ).subscribe({
    next: (recipeData) => {
      pullData()
    },
    error: (err) => {
      console.log(err)
    }
  })

  return () => subscription.unsubscribe()
}, [])
Conclusion
In this post we learned about GraphQL and it's benefits as well as why you may not want to use it! We also created an API and then used it in a frontend app. If you want to take down your API you can run amplify delete from your CLI and your code will persist locally but it will no longer be deployed to the cloud!

Top comments (9)
Thank you for the detailed post. Screenshots seems to be broken.
Thanks for pointing this out! Fixed!
Thank you.
thanks for the article but screenshots are not working for me
Thanks for pointing this out! Fixed!
greate introduction, awesome 👍
Very useful post GraphQL will be around for a long time worth knowing.
Thanks for the great content!
I watched the video but the article is super useful too, thanks a lot for making this on both mediums!
very helpful thanks!