This is the story of my personal journey to deploying an Angular app as my GitHub Pages website, for some, it may even serve as a guide!
Before we begin
Important Tools
https://cli.angular.io/
https://www.npmjs.com/package/angular-cli-ghpages
https://github.com/features/actions
Source Code:
https://github.com/Bwvolleyball/bwvolleyball-github-io-src
Published Code:
https://github.com/Bwvolleyball/bwvolleyball.github.io
Final Product 🎉:
https://bwvolleyball.github.io
Goal
The primary goal of this story (or guide) is to create a GitHub pages website that requires no maintenance to deploy or keep up to date. One of the promises for a traditional GitHub pages website is that new source code is automatically deployed to the pages website upon commit. The issue with an Angular application is that it needs to be built / compiled / transpiled (in the case of TypeScript) before it can be displayed as a static web page.
Getting Started
First, generate and commit a starter angular application to the source code repository.
To generate a new Angular app, use the Angular Cli:
> ng new bwvolleyball-github-io-src
> git remote add origin git@github.com:Bwvolleyball/bwvolleyball-github-io-src.git
Next, we need to add the angular-cli-ghpages tool to our application.
> cd bwvolleyball-github-io-src/
> ng add angular-cli-ghpages
> git commit -m "Adding Angular GitHub pages plugin"
Finally, we need to add the GitHub Actions deployment job.
create .github/workflows/push-to-gh-pages.yml with the following contents:
name: Build and Deploy Github Pages

on:
  push:
    branches:
      - master # - only push to GitHub pages from the master branch

jobs:
  build:

    runs-on: ubuntu-latest

    strategy:
      matrix:
        node-version: [12.x]

steps:
    - uses: actions/checkout@v1
    - name: Use Node.js ${{ matrix.node-version }}
      uses: actions/setup-node@v1
      with:
        node-version: ${{ matrix.node-version }}
    - name: npm install, build, and test
      run: |
        npm install -g @angular/cli
        npm ci
        ng deploy --repo=https://github.com/bwvolleyball/bwvolleyball.github.io.git --name=bwvolleyball --email=$EMAIL --message="Built from ${GITHUB_SHA} in the source repository." --branch=master
      env:
        CI: true
        GH_TOKEN: ${{ secrets.GithubToken }}
        EMAIL: ${{ secrets.Email }}
The most important parts of this build is that it:
a) installs the angular cli to build the application.
b) installs all dependencies in ci mode (more on that below).
c) deploys the project to my GitHub pages repository, on the master branch, with a commit message that contains the commit sha of the source repo for traceability.
The source file of this build is here.
All this is great, but we have more work to do before this will actually work.
You might have noticed the environment variables at the end of the build file, here’s a breakdown of what they do:
-
CIsets the ci flag for NPM. This is useful in case we accidentally rannpm installas that environment variable will still guarantee that ci mode is on and that the application installs dependencies strictly from thepackage-lock.json. -
GH_TOKENmust be a Github Access Token so that the GitHub pages angular plugin has write access to your pages repo. Assuming your pages repo is public, you need to generate a token (link here) with only thepublic_repopermission (Less is more when it comes to security). This is a password that allows the build to push to the GitHub pages repo as me. This is a requirement of the angular-cli-ghpages tool we are using to publish / deploy our GitHub pages site. -
EMAILthe most straight forward, I placed my email in a secret so that it’s not just sitting in the repository.
How to add the secrets:
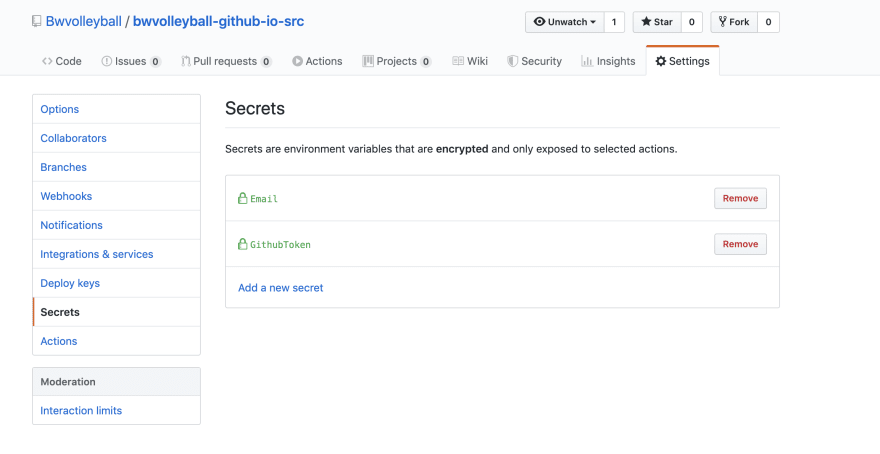
By now you should have also noticed that GH_TOKEN and EMAIL are populated by secrets. In short, this is the mechanism GitHub Actions provides for encrypted build information.
From the repository that you are committing the source code to, select the Settings > Secrets menu, and enter your secrets:
Once the secrets are entered, I can retrieve them directly from my GitHub Actions build as ${{ secrets.[SECRET_NAME] }}. I then inject these secrets into my build environment.
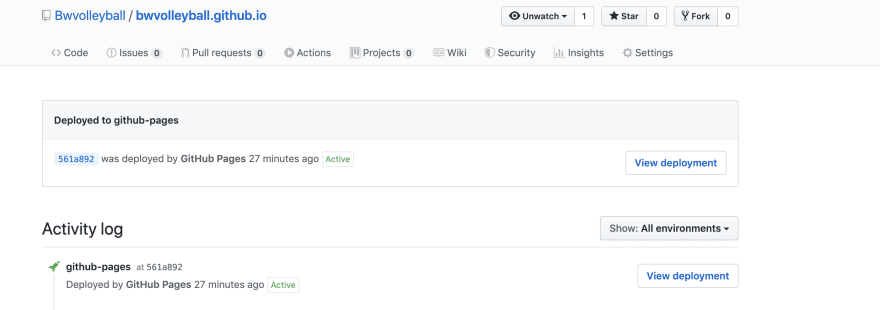
When you have these secrets set up on the source repository, it’s time to push our repo to GitHub and let it build! If everything is configured correctly, you’ll have a new environment tab on your GitHub pages repo after the build, and it’ll show that your pages application was just deployed:
Thanks for coming along on this journey with me! As a reminder, all the source code and tools used to achieve this are listed at the top of this post. I am excited to finally have a zero-maintenance Angular GitHub Pages site!
Editor's Note
This blog originally appeared on Medium, however, I do not appreciate Medium's style of business, see these thoughts. I will not link to the original Medium blog post as I intend to delete it.


Top comments (0)