1. Overview of ADC in MCUs
Most modern microcontrollers (MCUs) integrate Analog-to-Digital Converters (ADCs) for reading analog signals (e.g., sensors, voltages). Below is a guide to implementing ADC sampling.
2. Hardware Setup
2.1 Basic Requirements
- MCU with ADC (e.g., STM32, PIC, AVR, ESP32)
- Analog Signal Source (e.g., potentiometer, temperature sensor)
- Reference Voltage (VREF, usually MCU's VCC or external precision reference)
- Filtering Circuit (RC low-pass filter to reduce noise)
2.2 Example Circuit (STM32)
Potentiometer → PA0 (ADC1_IN0)
        ▲
        │
10kΩ Resistor Divider
        │
        ▼
GND
PA0 = ADC input pin
Decoupling capacitor (0.1µF) near ADC pin improves stability
3. Software Implementation
3.1 ADC Initialization (STM32 HAL Example)
c

#include "stm32f1xx_hal.h"

ADC_HandleTypeDef hadc1;

void ADC_Init() {
    hadc1.Instance = ADC1;
    hadc1.Init.ScanConvMode = DISABLE; // Single channel
    hadc1.Init.ContinuousConvMode = ENABLE; // Continuous mode
    hadc1.Init.DataAlign = ADC_DATAALIGN_RIGHT; // 12-bit right-aligned
    hadc1.Init.ExternalTrigConv = ADC_SOFTWARE_START; // Software trigger
    HAL_ADC_Init(&hadc1);

    // Configure channel
    ADC_ChannelConfTypeDef sConfig = {0};
    sConfig.Channel = ADC_CHANNEL_0; // PA0
    sConfig.Rank = ADC_REGULAR_RANK_1;
    sConfig.SamplingTime = ADC_SAMPLETIME_239CYCLES_5; // Sampling time
    HAL_ADC_ConfigChannel(&hadc1, &sConfig);
}
3.2 Reading ADC Value
c

uint16_t Read_ADC() {
    HAL_ADC_Start(&hadc1); // Start ADC
    HAL_ADC_PollForConversion(&hadc1, 10); // Wait for conversion
    return HAL_ADC_GetValue(&hadc1); // Return 12-bit result (0-4095)
}
3.3 Converting ADC Value to Voltage
c

float ADC_To_Voltage(uint16_t adc_value, float vref) {
    return (adc_value * vref) / 4095.0; // For 12-bit ADC
}
Example: If VREF = 3.3V and ADC_VALUE = 2048, output = 1.65V.
4. Sampling Techniques
4.1 Single Conversion Mode
- Best for low-power applications
- MCU sleeps until ADC conversion completes
4.2 Continuous Sampling Mode
- Best for real-time monitoring
- ADC runs continuously in the background
4.3 Oversampling for Better Accuracy
c

#define OVERSAMPLING 16 // 4 extra bits (√16 = 4)

uint16_t Read_ADC_Oversampled() {
    uint32_t sum = 0;
    for (int i = 0; i < OVERSAMPLING; i++) {
        sum += Read_ADC();
        HAL_Delay(1);
    }
    return sum >> 2; // Divide by 4 for 12+4=16-bit result
}
4.4 DMA-Based ADC (STM32)
- Best for high-speed sampling
- ADC stores results directly in memory without CPU intervention
c

uint16_t adc_buffer[100]; // Stores 100 samples

void ADC_DMA_Init() {
    // Configure ADC in DMA mode
    hadc1.Init.ContinuousConvMode = ENABLE;
    hadc1.Init.DMAContinuousRequests = ENABLE;
    HAL_ADC_Init(&hadc1);

    // Start ADC with DMA
    HAL_ADC_Start_DMA(&hadc1, (uint32_t*)adc_buffer, 100);
}
5. Noise Reduction Techniques
5.1 Hardware Filtering
- RC Low-Pass Filter (Cutoff frequency = 1/(2πRC))
- Shielding for sensitive signals
5.2 Software Filtering
Moving Average Filter
c

#define FILTER_WINDOW 10
uint16_t moving_avg(uint16_t new_sample) {
    static uint16_t buffer[FILTER_WINDOW];
    static uint8_t index = 0;
    static uint32_t sum = 0;

    sum -= buffer[index]; // Remove oldest sample
    buffer[index] = new_sample; // Store new sample
    sum += new_sample; // Add to sum
    index = (index + 1) % FILTER_WINDOW; // Circular buffer

    return sum / FILTER_WINDOW;
}
Exponential Smoothing
c

float alpha = 0.2; // Smoothing factor (0 < α < 1)
float filtered_value = 0;

float exp_smoothing(float new_sample) {
    filtered_value = alpha * new_sample + (1 - alpha) * filtered_value;
    return filtered_value;
}
6. Calibration (Improving Accuracy)
6.1 Offset Calibration
- Short ADC input to GND and measure average offset.
- Subtract offset from readings.
6.2 Gain Calibration
- Apply a known reference voltage (e.g., 2.5V).
- Adjust scaling factor to match expected value.
6.3 Reference Voltage Calibration
Use a precision voltage reference (e.g., LM4040) instead of VCC.
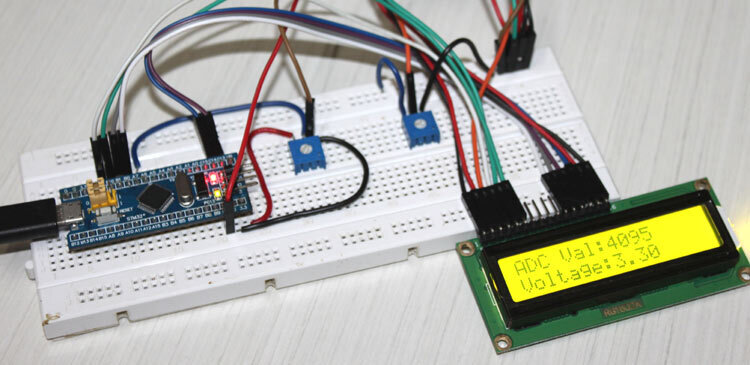
7. Example Applications
7.1 Reading a Potentiometer
c

int main() {
    ADC_Init();
    while (1) {
        uint16_t adc_val = Read_ADC();
        float voltage = ADC_To_Voltage(adc_val, 3.3f);
        printf("ADC: %d, Voltage: %.2fV\n", adc_val, voltage);
        HAL_Delay(100);
    }
}
7.2 Temperature Sensor (LM35)
c

float Read_Temperature() {
    uint16_t adc_val = Read_ADC();
    float voltage = (adc_val * 3.3f) / 4095.0;
    return voltage * 100.0; // LM35: 10mV/°C
}
8. Common Issues & Fixes
Issue Solution
Noisy readings Add RC filter, use oversampling
Inconsistent results Calibrate offset/gain, check VREF
ADC not responding Verify pin configuration, clock setup
Slow sampling Use DMA or reduce sampling time
9. Recommended MCUs for ADC
MCU ADC Resolution Max Sample Rate Key Feature
STM32F103 12-bit 1 MSPS DMA support
PIC16F877A 10-bit 50 kSPS Low-cost
ESP32 12-bit 2 MSPS Dual ADC, Wi-Fi
ATmega328P 10-bit 15 kSPS Arduino-compatible
10. Conclusion
- Basic ADC Setup: Configure ADC, read values, convert to voltage.
- Advanced Techniques: DMA, oversampling, noise filtering.
- Calibration: Improves accuracy significantly.

Top comments (0)