
BattleCode 2021 - Overview

- BattleCode 2021 - Overview
-
Setup your computer, we will cover each item
- Enable Linux on your Chromebook
- Details about your computer and operating system
- Chromebook is Debian
- Digitalocean is Ubuntu
- Handy aliases and abbreviations into .bashrc and .bash_aliases
- Installing Git so you can work with GitHub
- Configuring GitHub git config user.name user.email
- VS Code install for Debian and Ubuntu based distributions
- Installing Visual Studio Code on Ubuntu
- Starting Visual Studio Code
- Connect with vscode in the cloud so your settings persist over devices and sessions
- Setup a password for cloud sync - you will be prompted each time you start vscode
- If you previously have a cloud account you can merge your data
- Updating Visual Studio Code - every month need to do this
- Create .ssh directory and generate SSH public and private keys
- Create a directory for the public keys
- Create SSH Key for Github
- GitHub - set your ssh key and get your GitHub token for vscode
- Get your vscode token from github account settings
- Let vscode know about the GitHub token at the bottom left of vscode click bottom-left and paste github token into the command prompt area in the top menu toolbar
- - End general setup of your computer
- - Begin MIT Content
- Install Java Release 8
-
- Begin Battlecode
- - Clone the Battlecode Scaffold, where you can run your robot
- Changes to .bashrc for your environment variables, PATH and JAVA_HOME
- This update-alternatives is something that may be useful but you probably do not need it
- Validating Java works correctly
- To verify the installation, get the Java version
- 'Which' Java as a validation test
- Cleaning up
- Download (clone) the Battlecode competition scaffold for BATTLECODE
- - Setup editor such as vscode, IntelliJ, Eclipse etc
- Use VSCode
- Install IntelliJ - I usually use vscode, turn it off to preserve memory
-
Using the terminal - Build the game -
./gradlew update - Modify the bot and make it your own
- RUNNING GAME FROM THE TERMINAL
- If you're experiencing memory problems with the client, please try:
- Upload the bot to compete against others
Introduction
This is my scrapbook for the Battlecode 2021 contest, I will attempt to keep it up-to-date for all Battlecode-related things for the duration of the contest. For a general overview of what Battlecode is, visit the Battlecode landing page.
This year's game is a thrilling survival adventure involving 🍲, ▀⛓, 🐮, 🤖, and more. You will write bots in Java.
Why this document is needed
In software it is common to write good documentation. This is so that other members of the team can be equally up-to-date with how things work. This is normal documentation for any well-run organization.
You really don't want to have some production problem and not have written down important details. Everything should be documented that you will need to be successful. Team members who do not document leave behind a technical debt of unfinished work that snowballs up and eventually really disrupts the stability and effectiveness of the organization.
Account and Team Creation
To participate in Battlecode, you need an account and a team. Each team can consist of 1 to 4 people.
Create an account at battlecode.org, and then go to the team section to either create or join a team.
Links and resources for this year's Battlecode
battlecode.org - getting started
Discord
Battlecode Github
Scaffold Repository
Robot properties
Game Specifications for this year
Some tweets about battlecode are on Twitter
A great postmortum from 2020 Team Battlegaode
It is assumed you will be developing on a linux environment, this document provides instructions for Chromebook and also there are some references to Digitalocean, that way you can use the cloud for your development environment, giving access to greater stability and unlimted resources. By developing in Digitalocean you can create specific environments and install and remove software without worrying about it messing up your Chromebook or main computer. Generally I have to wipe and rebuild my chromebook linux environment several times per year, all the various changes end up hurting the stablility of the chromebook, so better to use Digitalocean in the cloud as your messy sandbox.
Setup your computer, we will cover each item
Enable Linux on your Chromebook
In your Chromebook settings, enable the Linux (Beta)
Details about your computer and operating system
Chromebook is Debian
connorstom@penguin:~$ cat /etc/os-release
PRETTY_NAME="Debian GNU/Linux 10 (buster)"
NAME="Debian GNU/Linux"
VERSION_ID="10"
VERSION="10 (buster)"
VERSION_CODENAME=buster
ID=debian
HOME_URL="https://www.debian.org/"
SUPPORT_URL="https://www.debian.org/support"
BUG_REPORT_URL="https://bugs.debian.org/"
Digitalocean is Ubuntu
// this chart would be different on Ubuntu. Here is a Debain example
connorstom@penguin:~$ cat /etc/os-release
PRETTY_NAME="Debian GNU/Linux 10 (buster)"
NAME="Debian GNU/Linux"
VERSION_ID="10"
VERSION="10 (buster)"
VERSION_CODENAME=buster
ID=debian
HOME_URL="https://www.debian.org/"
SUPPORT_URL="https://www.debian.org/support"
BUG_REPORT_URL="https://bugs.debian.org/"
Handy aliases and abbreviations into .bashrc and .bash_aliases
There are some useful aliases in .bash_alias of this repo:
https://github.com/coding-to-music/bash_aliases_docker_alias_cheat_sheet
In this file here .bash_aliases
Edit the file .bash_aliases and put the contents from GitHub
source ~/.bashrc

// in the future, you will just need to type 'sc' and it will source your .bashrc which calls .bash_aliases
Installing Git so you can work with GitHub
Download and install Git
$ sudo apt-get install git
// Now git should be installed. To check use
$ git --version
git version 2.19.1
Configuring GitHub git config user.name user.email
Once the installation has successfully completed, the next thing to do is to set up the configuration details of the GitHub user. To do this use the following two commands by replacing "user_name" with your GitHub username and replacing "email_id" with your email-id you used to create your GitHub account.
git config --global user.name coding-to-music
git config --global user.email connors.tom@gmail.com
The following image shows an example of my configuration with my "user_name" being "akshaypai" and my "email_id" being "abc123@gmail.com"
VS Code install for Debian and Ubuntu based distributions
https://code.visualstudio.com/docs/setup/linux
The easiest way to install Visual Studio Code for Debian/Ubuntu based distributions is to download and install the .deb package (64-bit), either through the graphical software center if it's available, or through the command line with:
sudo apt install ./<file>.deb

download the file from the website to downloads and move it to linux file system then run:

https://code.visualstudio.com/docs/setup/linux
https://github.com/nodesource/distributions/blob/master/README.md#debinstall

# If you're on an older Linux distribution, you will need to run this instead:
# sudo dpkg -i <file>.deb
# sudo apt-get install -f # Install dependencies
connorstom@penguin:~$ code --version
1.51.1
e5a624b788d92b8d34d1392e4c4d9789406efe8f
x64
Installing the .deb package will automatically install the apt repository and signing key to enable auto-updating using the system's package manager. Note that 32-bit and .tar.gz binaries are also available on the VS Code download page.
The repository and key can also be installed manually with the following script:
curl https://packages.microsoft.com/keys/microsoft.asc | gpg --dearmor > packages.microsoft.gpg
sudo install -o root -g root -m 644 packages.microsoft.gpg /usr/share/keyrings/
sudo sh -c 'echo "deb [arch=amd64 signed-by=/usr/share/keyrings/packages.microsoft.gpg] https://packages.microsoft.com/repos/vscode stable main" > /etc/apt/sources.list.d/vscode.list'
Then update the package cache and install the package using:
sudo apt-get install apt-transport-https
sudo apt-get update
sudo apt-get install code # or code-insiders

sudo apt install gnome-keyring
Installing Visual Studio Code on Ubuntu
https://linuxize.com/post/how-to-install-visual-studio-code-on-ubuntu-18-04/
To install Visual Studio Code on your Ubuntu system, follow these steps:
- First, update the packages index and install the dependencies by typing:
sudo apt updatesudo apt install software-properties-common apt-transport-https wget- Next, import the Microsoft GPG key using the following wget command:
wget -q https://packages.microsoft.com/keys/microsoft.asc -O- | sudo apt-key add -- And enable the Visual Studio Code repository by typing:
sudo add-apt-repository "deb [arch=amd64] https://packages.microsoft.com/repos/vscode stable main"- Once the apt repository is enabled, install the latest version of Visual Studio Code with:
sudo apt updatesudo apt install code
That’s it. Visual Studio Code has been installed on your Ubuntu desktop and you can start using it.
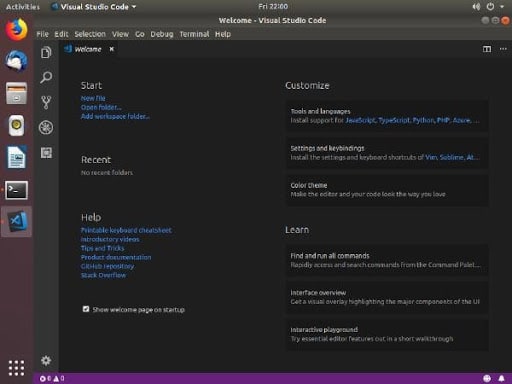
Starting Visual Studio Code
Now that VS Code is installed on your Ubuntu system you can launch it either from the command line by typing code or by clicking on the VS Code icon (Activities -> Visual Studio Code).
When you start VS Code for the first time, a window like the following should appear:
Connect with vscode in the cloud so your settings persist over devices and sessions
vscode->settings->Sync Data
There is a very good set of detailed instructions about vscode cloud settings sync HERE
Setup a password for cloud sync - you will be prompted each time you start vscode
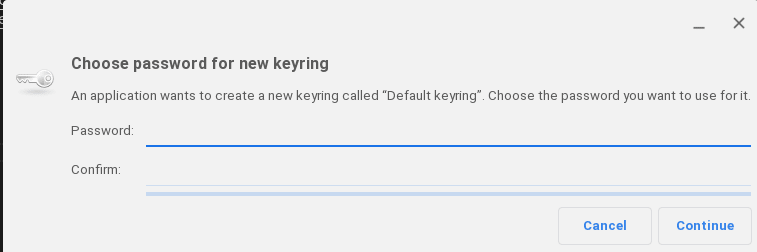
If you previously have a cloud account you can merge your data

You can now start installing extensions and configuring VS Code according to your preferences.
Updating Visual Studio Code - every month need to do this
When a new version is released you can update the Visual Studio Code package through your desktop standard Software Update tool or by running the following commands in your terminal:
sudo apt update
sudo apt upgrade
// or just this
sudo apt update
sudo apt upgrade code
Create .ssh directory and generate SSH public and private keys
Create a directory for the public keys
// In root
Mkdir .ssh
Chmod 700 .ssh
Cd .ssh
// Create SSH public and private keys
// Store them here

Chmod 600 private_key
Create SSH Key for Github
Now you need to create your SSH key for Github
ssh-keygen -t rsa -C “connors.tom@gmail.com”

// It will get saved to
home/tom/.ssh/id_rsa                // this is the private key, very long paragraph
home/tom/.ssh/id_rsa.pub         // this is the public key,         short paragraph
// Copy that key in that file. I would suggest using Win SCP to download the file similar to FTP
file: ssh-rsa
- 7 lines long private key
- a short paragraph
- this is what you will paste into GitHub and Digitalocean e1f0vfsMPOANChLOUWbSJTtf4s4P2x6CAYCOQYcd “connors.tom@gmail.com”
-----BEGIN RSA PRIVATE KEY-----
really big long private key
-----END RSA PRIVATE KEY-----
GitHub - set your ssh key and get your GitHub token for vscode
Once you copy the key,
- sign into Github and
- goto “Settings->SSH and GPG Keys” and
- add and name of the new key

Get your vscode token from github account settings

Let vscode know about the GitHub token at the bottom left of vscode click bottom-left and paste github token into the command prompt area in the top menu toolbar

- End general setup of your computer
- Begin MIT Content
- Java version 8
Install Java Release 8
Installation Instructions for Java JDK using OpenJava - we won't use this but it is another option
If you're unsure how to install the JDK, you can find instructions for all operating systems here (pay attention to PATH and CLASSPATH).
https://docs.datastax.com/en/jdk-install/doc/jdk-install/installOpenJdkDeb.html
http://openjdk.java.net/install/
I am using a chromebook, which is Debian flavor of Linux
There are two related packages
- JRE - Java Runtime Environment
- JDK - Java Development Kit
We will use Oracle's version of Java - Download the correct Java Version 8
Before the file can be downloaded, you must accept the license agreement. The archive binary can be installed by anyone (not only root users), in any location that you can write to. However, only the root user can install the JDK into the system location.
// Change directory to the location where you would like the JDK to be installed, then move the .tar.gz archive binary to the current directory.
That leads to this page here, you are looking for Java SE 8
// Previously I had Java - let's see if it works
// Oops, I ran into a problem and got this error
connorstom@penguin:$ java -version
bash: /usr/local/jdk1.8.0_271/bin/java: No such file or directory
// yet I appeared to have java installed
connorstom@penguin:$ find /usr -name java
/usr/bin/java
/usr/lib/jvm/jdk1.8.0_271/bin/java
/usr/lib/jvm/jdk1.8.0_271/jre/bin/java
/usr/local/jdk1.8.0_271/bin/java
/usr/local/jdk1.8.0_271/jre/bin/java
/usr/share/bash-completion/completions/java
/usr/share/code/resources/app/extensions/java
From this video How To Install Oracle Java 8 JDK on Linux - Ubuntu 20.04 / 18.04 / 16.04 LTS / Debian
// You will need to log into Oracle and agree to the conditions to start the download
// ok lets try this one
- Linux x64 Compressed Archive
- 136.51 MB
- jdk-8u271-linux-x64.tar.gz
// I downloaded this and left it in my root home directory, it is just a temporary file we will delete it later
jdk-8u271-linux-x64.tar.gz
// you may not need to make this next directory, you may already have it
sudo mkdir /usr/lib/jvm
cd /usr/lib/jvm
// untar the file that is located in your home dir
sudo tar -xzvf ~/jdk-8u271-linux-x64.tar.gz
The Java Development Kit files are installed in a directory called jdk1.8.0_version in the current directory.
// this directory was just created
/usr/lib/jvm/jdk1.8.0_271
- Set environment variables PATH and CLASSPATH JAVA_HOME etc
- Begin Battlecode
- Clone the Battlecode Scaffold, where you can run your robot
Changes to .bashrc for your environment variables, PATH and JAVA_HOME
Paste thise into your Path in your .bashrc
export JAVA_HOME="/usr/lib/jvm/jdk1.8.0_271"
export PATH=$PATH:/usr/lib/jvm/jdk1.8.0_271/bin:/usr/lib/jvm/jdk1.8.0_271/jre/bin

// then at the command line in root:
$ source .bashrc

// then in the future you just need to source .bashrc by using the alias 'sc'
sc
This update-alternatives is something that may be useful but you probably do not need it
// probably not needed
sudo update-alternatives --install "/usr/bin/java" "java" "/usr/lib/jvm/jdk1.8.0_271/bin/java" 0
sudo update-alternatives --install "/usr/bin/javac" "javac" "/usr/lib/jvm/jdk1.8.0_271/bin/javac" 0
sudo update-alternatives --set java /usr/lib/jvm/jdk1.8.0_271/bin/java
sudo update-alternatives --set javac /usr/lib/jvm/jdk1.8.0_271/bin/javac
// you can test this but it did not work for me
update-alternatives --list java
update-alternatives --list javac
Validating Java works correctly
To verify the installation, get the Java version
connorstom@penguin:~$ env | grep JAVA
JAVA_HOME=/usr/lib/jvm/jdk1.8.0_271
// test to find the java version
connorstom@penguin:~$ java -version
java version "1.8.0_271"
Java(TM) SE Runtime Environment (build 1.8.0_271-b09)
Java HotSpot(TM) 64-Bit Server VM (build 25.271-b09, mixed mode)
'Which' Java as a validation test
This will print the version of the java tool, if it can find it.
If the version is old or you get the error java: Command not found, then the path is not properly set.
Determine which java executable is the first one found in your PATH
connorstom@penguin:~$ which java
/usr/lib/jvm/jdk1.8.0_271/bin/java
Cleaning up
Delete the .tar.gz file if you want to save disk space.
This may also be useful but I have not tested it yet
% . /.profile
// Verify that the path is set by repeating the java command
% java -version
// Modify build.gradle to view the Java version
task version {
    group 'battlecode'
    doLast{
        println("\nJDK version: ${System.properties['java.home']}")
        println("\nVersion: " + versions.battlecode + "\n")
    }
}
Download (clone) the Battlecode competition scaffold for BATTLECODE
Next, you should download the Battlecode 2021 scaffold. To get up and running quickly, you can click "Clone or download" and then "Download ZIP," and move on to the next step.
We recommend, however, that you instead use Git to organize your code. If you haven't used Git before, read this guide (or wait for our lecture covering it). On the scaffold page, click "Use this template." Importantly, on the next page, make your new repo private (you don't want other teams to steal your code!). You can then clone your newly created repo and invite your team members to collaborate on it.
connorstom@penguin:~/aprojects$ git clone https://github.com/battlecode/battlecode21-scaffold.git
Cloning into 'battlecode21-scaffold'...
remote: Enumerating objects: 50, done.
remote: Counting objects: 100% (50/50), done.
remote: Compressing objects: 100% (30/30), done.
remote: Total 50 (delta 17), reused 36 (delta 10), pack-reused 0
Unpacking objects: 100% (50/50), done.
- Setup editor such as vscode, IntelliJ, Eclipse etc
Download IntelliJ IDEA
The JetBrains website to downlowd Intellij IDEA is located Here
Choose windows/mac/linux
then, below that,
Choose the Community button
Idea Installation Instructions
Note: A new instance MUST NOT be extracted over an existing one. The target folder must be empty.
// install into a new directory
cd /usr
// untar the file that is located in your home dir
sudo tar -xzvf ~/ideaIC-2020.3.1.tar.gz

// to clean up, remove the original tar file
rm ~/ideaIC-2020.3.1.tar.gz
The Java Development Kit files are installed in a directory called idea-IC-203.6682.168 in the current directory.
// this directory was just created
/usr/idea-IC-203.6682.168
Changes to .bashrc for your PATH variable
Paste thise into your Path in your .bashrc
export PATH=$PATH:/usr/idea-IC-203.6682.168/bin
Now run IntelliJ!
Run idea.sh from the bin subdirectory.
Use VSCode
some white text
some white text
some yellow text
some yellow text
some green text
some green text
some red text
some red text
some blue text
some blue text
Install IntelliJ - I usually use vscode, turn it off to preserve memory
Battlecode 2020 uses Gradle to run tasks like run, debug and jarForUpload (but don't worry about that — you don't need to install it).
Install IntelliJ IDEA Community Edition from here.
In the Welcome to IntelliJ IDEA window that pops up when you start IntelliJ, select Import Project
In the Select File or Dictionary to Import window, select the build.gradle file in the scaffold folder.
Hit OK.
We need to set the jdk properly; open the settings with File > Settings (IntelliJ IDEA > Preferences on Mac) or ctrl+alt+s. Navigate to Build, Execution, Deployment > Build Tools > Gradle and change Gradle JVM to 1.8
When IntelliJ IDEA first starts it may take 12 minutes for the full build on a Chromebook

Time for a first build!
On the right side of the screen, click the small button that says gradle and has a picture of an elephant. Navigate to battlecode20-scaffold > Tasks > battlecode and double click on build. This will install the client and engine for you.
If you haven't seen any errors, you should be good to go.
There should now be a folder called client in your scaffold folder; if you go in there, and double click the Battlecode Client application, you should be able to run and watch matches. (Please don't move that application, it will be sad.) If you're on Linux, navigate to the client folder and run ./battlecode-visualizer to launch the client.
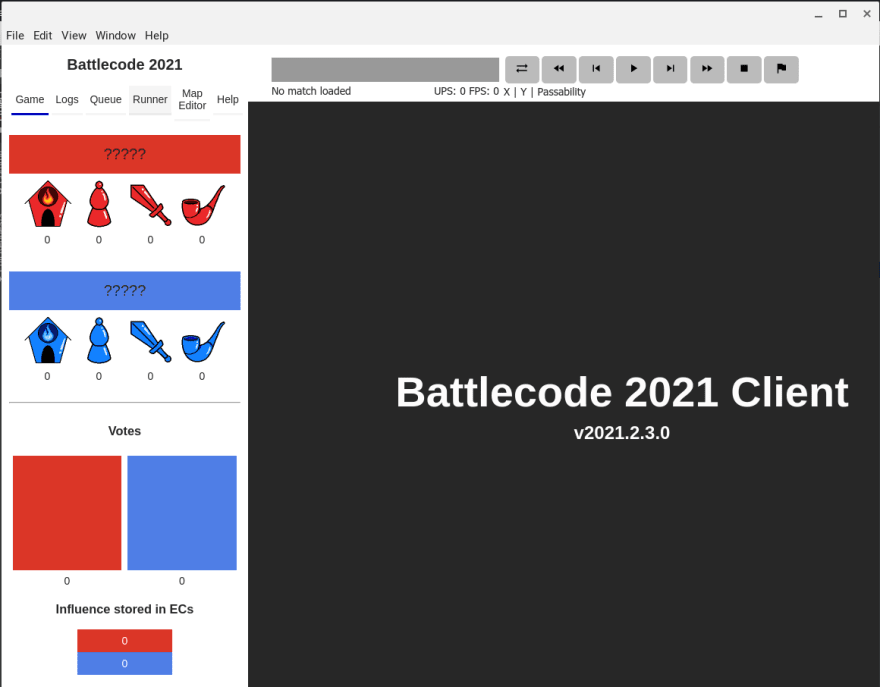
Now execute the runner and run the default example robot
Using the terminal - Build the game - ./gradlew update
Open a terminal in the scaffold you just downloaded. Run the commands ./gradlew update and ./gradlew build
// Now run "./gradle update"
connorstom@penguin:~/aprojects/battlecode21-scaffold$ ./gradlew update

Welcome to Gradle 6.0.1!

Here are the highlights of this release:
 - Substantial improvements in dependency management, including
   - Publishing Gradle Module Metadata in addition to pom.xml
   - Advanced control of transitive versions
   - Support for optional features and dependencies
   - Rules to tweak published metadata
 - Support for Java 13
 - Faster incremental Java and Groovy compilation
 - New Zinc compiler for Scala
 - VS2019 support
 - Support for Gradle Enterprise plugin 3.0

For more details see https://docs.gradle.org/6.0.1/release-notes.html

Starting a Gradle Daemon (subsequent builds will be faster)

> Task :update
Updated to 2021.2.3.0

BUILD SUCCESSFUL in 23s
1 actionable task: 1 executed

Build the gradle
connorstom@penguin:~/aprojects/battlecode21-scaffold$ ./gradlew build

> Task :compileScala
Scala Compiler interface compilation took 38.592 secs

> Task :compileTestScala
Scala Compiler interface compilation took 38.471 secs

Deprecated Gradle features were used in this build, making it incompatible with Gradle 7.0.
Use '--warning-mode all' to show the individual deprecation warnings.
See https://docs.gradle.org/6.0.1/userguide/command_line_interface.html#sec:command_line_warnings

BUILD SUCCESSFUL in 3m 16s
8 actionable tasks: 8 executed

each robot you build lives in it's own src directory
Run a Match
Player code is in the src directory of the scaffold: each package inside src corresponds to one distinct player. We have provided examplefuncsplayer, and you can create your own player by either modifying it or copying and renaming it. The only restriction is that each player must have a file named RobotPlayer.java which implements a run(RobotController rc) method.
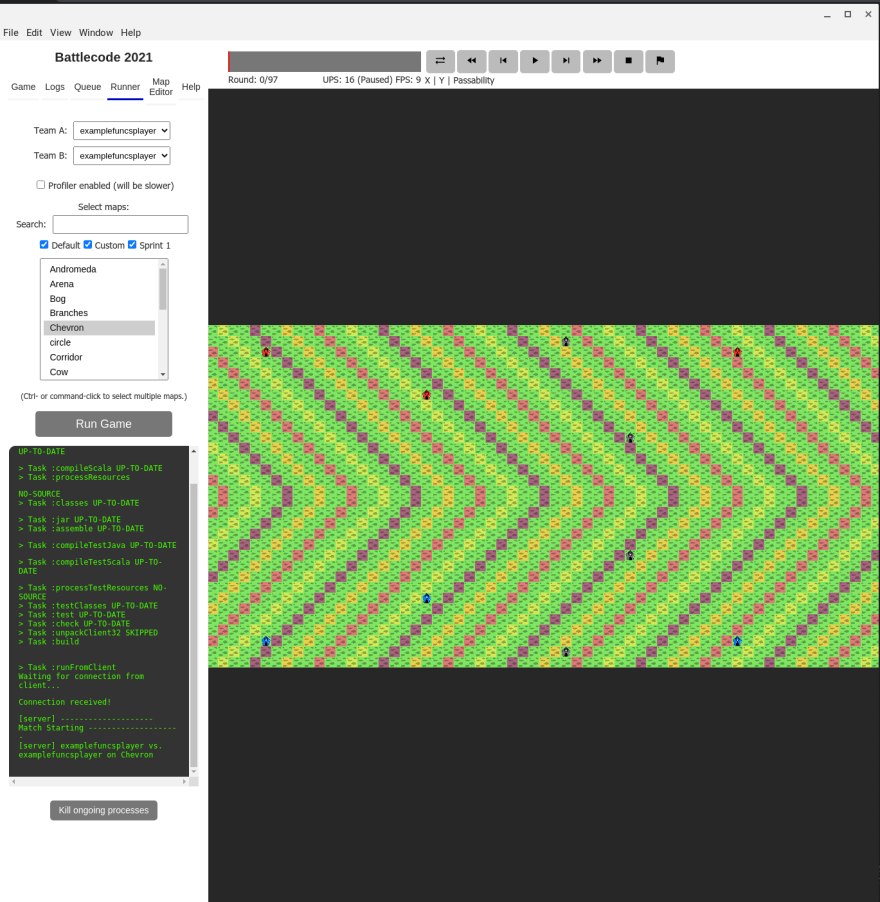
You should have a client application in the client folder. Launch it, and go to the Runner section. There, you can specify which players to run against each other, and on which map, and you can view the match as it is running.
// run at the command line - need to verify
./client/runner
You can also run a match without the client, by invoking the Gradle task run. For example, gradle run -PteamA=examplefuncsplayer -PteamB=examplefuncsplayer -Pmaps=FourLakeLand runs examplefuncsplayer against itself on the FourLakeLand map. This produces a replay file in the matches directory of the scaffold, which you can upload to the client to view.
// run the game as defined in the gradle.properties - but to the console, it is huge
connorstom@penguin:~/aprojects/battlecode21-scaffold$ ./gradlew run

// this went on forever I needed to kill it with ctrl-C ^C
[A:SLANDERER#11514@68] I am trying to move NORTH; false 9.072361313166404 false
[A:POLITICIAN#10475@68] I'm a POLITICIAN! Location [10007, 23925]
[A:POLITICIAN#10475@68] I am trying to move NORTHEAST; false 1.6308742204463966 false
[B:POLITICIAN#11218@68] I'm a POLITICIAN! Location [10027, 23928]
[B:POLITICIAN#11218@68] I am trying to move SOUTHEAST; false 2.282011952169438 false
[A:MUCKRAKER#13908@68] I'm a MUCKRAKER! Location [10005, 23927]
[A:MUCKRAKER#13908@68] I am trying to move EAST; true 0.0 true
[A:MUCKRAKER#13908@68] I moved!
[B:SLANDERER#10110@68] I'm a SLANDERER! Location [10025, 23927]
[B:SLANDERER#10110@68] I am trying to move NORTHEAST; false 2.5545705508935868 false
[B:SLANDERER#13348@68] I'm a SLANDERER and I just got created!
[B:SLANDERER#13348@68] I'm a SLANDERER! Location [10026, 23927]

// run the game as defined in the gradle.properties - but output it to a junk.txt file - add that to the .gitignore
connorstom@penguin:~/aprojects/battlecode21-scaffold$ ./gradlew run > junk.txt

// find out how many lines of output are in the console output
connorstom@penguin:~/aprojects/battlecode21-scaffold$ wc -l junk.txt
309508 junk.txt

// there are 310,000 lines in the output of doing a run
// it took about 30 or 60 seconds to run the game itself
Modify the bot and make it your own
Place each version of your robot in a new subfolder in the src folder. Make sure every version has a RobotPlayer.java
RUNNING GAME FROM THE TERMINAL
Open a terminal in the scaffold. Run the commands ./gradlew run -Pmaps=[map] -PteamA=[Team A] -PteamB=[Team B]
gradle.properties file is what will be run
// gradle.properties
// modify this file to change project properties
teamA=examplefuncsplayer
teamB=examplefuncsplayer
maps=maptestsmall
source=src
gpr.user=battlecodedownloadpackage
profilerEnabled=false
If you're experiencing memory problems with the client, please try:
Client Tips
Making fewer logs and/or disabling log processsing in the client (toggled with "L").
Making .bc21 files with the engine directly and uploading them to the client's match queue, rather than using the client's runner. With this method, you can just use the web version at 2021.battlecode.org/visualizer.html rather than the desktop application.
Upload the bot to compete against others
Upload Your Bot and Scrimmage
Create a zip file containing only your robot code (only 1 package), and uploaded it to the submissions page.
Your bot will automatically be ran against other players to determine your ranking. You can also request scrimmages with other teams, and see the replays.

Top comments (0)