Introduction
Controlling your home devices via the cloud can be so cool and not stressful. With you just picking up your phone and controlling your home device is something you should know much about. In this tutorial, we are going to learn how to control your DVD/ Home theater(Works the same way) via Tuya link SDK and ESP 32.
What we will be building
In this tutorial, we will learn how to control our DVD/ Home theater via Tuya link SDK and ESP32.
Hardware component
- ESP32
- Infrared led transmitter
- Transistor Bc457
- Ac/dc 5v power supply
Software Component
- Tuya IoT platform
- Tuya smart App
- Arduino IDE
- Command Prompt
GitHub Link: https://github.com/Folksconnect123/DVD-CONTROL
What is Tuya
Tuya Smart (NYSE: TUYA) is a global IoT development platform that creates interconnectivity standards to connect brands, OEMs, developers, and retailers across a variety of smart devices and industries. Tuya integrates many intelligent scenarios and smart devices by providing hardware development tools, integrating public cloud services, and giving an intelligent business development platform, all of which are based on the global public cloud.
What is Tuya link Sdk?
Tuya link SDK makes life a lot easier. It facilitates the creation of cloud development projects involving OpenAPI or message subscription capabilities.
Tuya Link SDK is one such SDK that encapsulates fundamental services like device activation, DP (Data-Points) upstream and downstream, and firmware OTA (Over-The-Air) upgrading into an interface. It is appropriate for connecting the logic services of a self-developed gadget to the cloud by developers.
What is ESP32?
The ESP32 is a low-cost Wi-Fi microchip by Espressif Systems that has built-in TCP/IP networking software and a microprocessor/ Microcontroller capability.
Setting up the environment
Before we get started let me give you a heads up that if you haven’t created a tuya account before do create because you will be given a free device license to create a hands-on project.
To use Tuya Link SDK, we will need to make a product to interact and connect to Tuya IoT Cloud. Go to your Tuya IoT account and log in, if you haven't registered for an account register one click here.
Step 1: Create a product by clicking on Create button on the home page
Step 2: A page will appear where you will need to select a category for your project or product, since we are using Esp32 as a custom device so we will need to click on “Can’t find the category” and enter the details as shown below.
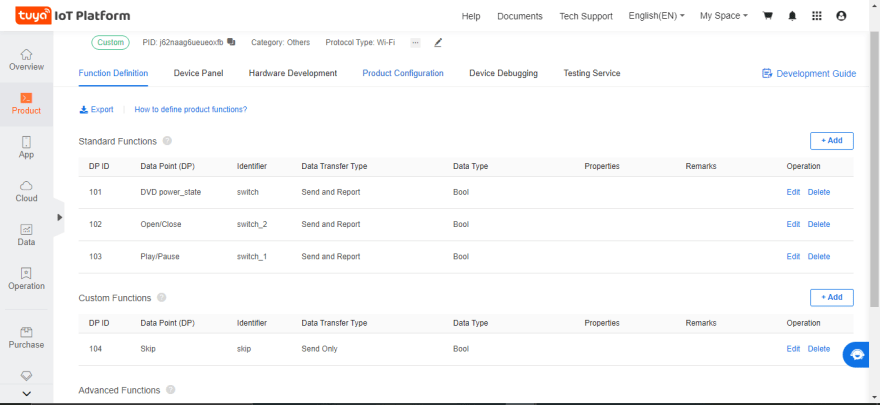
Step 3: We need a standard function for the power state of the DVD (On/Off) and a custom function to be able to control the DVD like (open and close, Skip, Play, etc.). To create a standard function to either switch the DVD on/ off. Click on add and search for Switch then click Ok. Now you have to edit the name of the Switch for more clarity. You can rename it to DVD power _state. If done click on add again and search for Switch 2, then click ok. Also, rename it to Open/close. We also need to create a standard function for Play/pause. Click on add again. And search for switch then rename to Play/Pause. We need to create a custom function for skip (Note that we can also create a standard function for Skip.). On the custom function tab click on add, then set the Data-point to (SkipFor), the identifier to (skipfor) Datatype to (Bool), Data transfer type (Send only). Do the rest for the other function To know more about creating custom functions click on this link. Keep note of the PID we will need it later.
Step 4: To interact with the device we need to have a beautiful Panel with all required functionalities, although you can drag and drop UI design in the Tuya design panel since we are working on a prototype and debugging I like to have things very quick I would click on the tuya DIY Style Panel. You can change it to your preference as soon as you are done.
Step 5: Go to the Hardware Development Section of your product and click on Link SDK. You will need a license to be able to use link SDK, but don’t bother Tuya issues free licenses for new tech hobbyists.
For ESP32 we are going to use General CPU as a hardware type, also you would see an option to generate a free license if you are new to the platform. Click place the order and download the License list. The** license is composed of tuya UUID and AuthKey** which is needed to authorize the device to receive and send data to the Tuya Cloud.
Now we are done with the major part of the software development for our Tuya IoT platform now we move to the setting up of the hardware and the implementation of our code.
Installing Tuya Link SDK
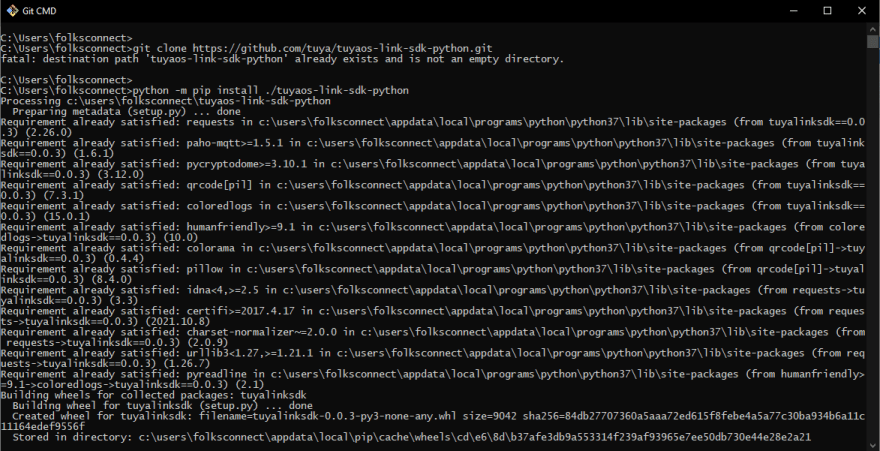
Now is time to install Tuya link SDK to be able to connect our just completed application above with ESP32. To do that we have to type this code on our command prompt in order to clone the GitHub repository and install tuya link SDK.
Note: make sure you have Git installed on your pc. If you don’t you can download and install the application.
The first step is to type this code on the command prompt.
git clone https://github.com/tuya/tuyaos-link-sdk-python.git
The second step is to install the tuya link SDK. Note you have to have wheel installed on your machine if you don’t have one. Install it using this line of code. If done, you can finally type the below code.
pip install wheel
python -m pip install ./tuyaos-link-sdk-python
Now we are done with the installation of the Tuya link SDK you should have this pop-up on your screen if due procedures are followed.
Hardware setup:
Grab your ESP32 and other required hardware projects we are ready to get our hands dirty.
Make sure the required hardware items are complete. Follow the schematics of the hardware and make sure everything is connected properly.
For receiving the address use this schematic
You connect the Signal/Data pin of the infrared to D15 on the ESP. The anode of the reciever to 5v and the cathode to the ground.
For sending the Address to the DVD use this schematic
You connect the base pin of the transistor to pin D4 on the ESP 32. The Collector pin of the transistor to ground. Then the Emitter to the cathode of the LED.Then the Anode of the led must be connected with 220 ohms resistor to Vin.
Implementing your Program
Getting the address from the remote.
Now that we have gotten to this level, the next step to be done is to implement the code. Download the IRremote_decode file from the Git hub account.
Now run the IRremote_decode file and open the Serial monitor to get the address from your Remote after that you can now modify the DVD_control file to input the address.
This is the hardware schematics for the remote decoder address.
For ESP32 connect the Signal pin of the IR receiver to 15 and the Positive pin to 5v, the last pin to the ground.
This is the address from my remote controller. Then I have inserted the address into the DVD code.
Modifying the DVD_Control file
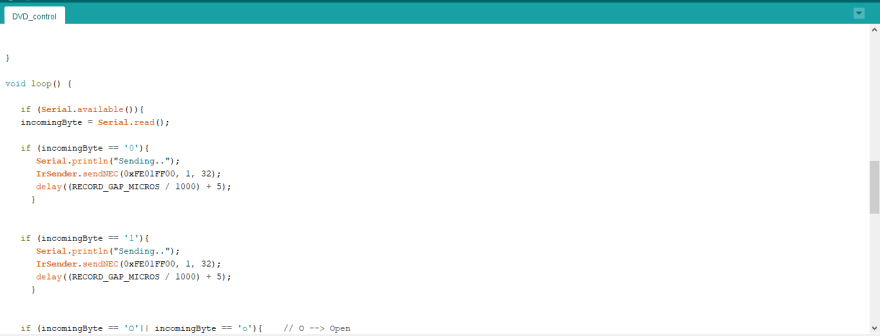
After you’ve gotten the address you can now modify the DVD_control file from GitHub to your own address like this.
You can run the file and test the code via the serial monitor with your DVD on to see if everything is going perfectly.
Finalizing our work
After you’ve successfully uploaded and run the above code it is time to control our microcontroller via the cloud. Now Download the TuyaLinkSDk file from GitHub and modify the code for your PID, Auth key and UUID, and the COM port of your microcontroller. After those are done then you can now run the code on your command prompt by using the cd method. Like in my own case I copied the file to the desktop, then I typed this on my command prompt
cd desktop
Then you type the name of the file. In my own case TuyaLinkSDK.py
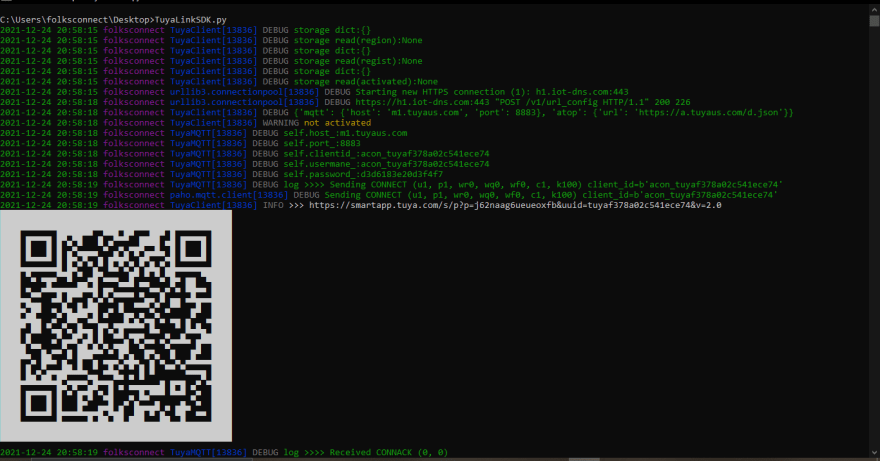
You should have this after you’ve successfully run the code. Now you can download the Tuya smart app from Playstore and click on add new device, then scan the code to add the device.
Here is the video to the output. https://youtu.be/VcfcegE9fgk. Thank you for reading.









Latest comments (3)
Is there a way do add the authorization files into the esp32 project so it can run standalone without a PC or another esp board running dedicated to the authorization code?
Wao. This is awesome bro!
This is the least boss. Thanks to you for all the support.