
Google Cloud Platform is a set of services that Google offer to customers providing different type of computing functionality, for example, Virtual Machines, Databases, Message Queues etc. These services are running on the same global infrastructure that Google uses for its products. In this article, I’ll show how to create and connect to a Virtual Machine running on the Google Cloud.
To complete the actions in this article, you’ll need a Google Cloud Platform account. These can be created at https://cloud.google.com. There is a charge for using the Google Cloud Platform, but when you sign up you get $300 off free credit. There are also several services that are always free as long as you are within the free usage tier. Information about GCP pricing can be found at https://cloud.google.com/pricing/
Creating a VM
The easiest way of creating a VM within GCP is from within the Web Console. Navigate to https://console.cloud.google.com/ to display the web console. Along the top of the page, you see the menu and the name of the project you have selected. When signing up, GCP creates an initial project for you. If you do not have one created, navigate to https://console.cloud.google.com/projectcreate to create a new project and then return to the console home page.

The screenshot above shows the GCP console together with the My First Project selected.
From within the console, press the menu button at the top left. A menu is displayed down the left hand side of the page showing all of the different options that can be managed from within the console.

For this article, we’re interested in creating a new Virtual Machine. VM’s are part of the GCP Compute Engine, so select the option Compute Engine from the menu.
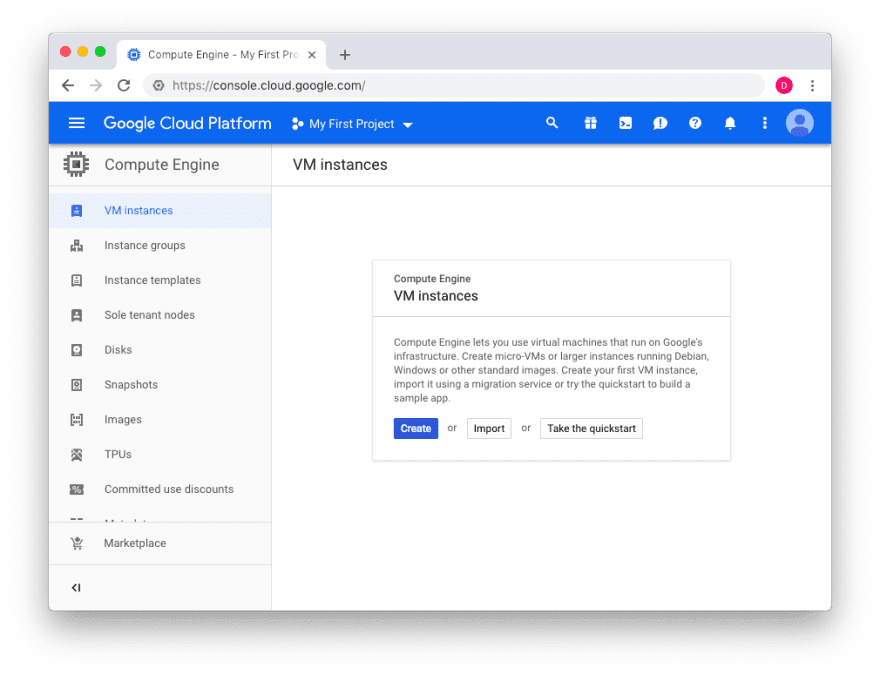
On the Compute Engine page, a list of VM’s is displayed that you have previously created. If this is the first VM you are creating, you will see the welcome page and be presented with the option of creating a new VM. Simply press the Create button to continue.
In the following page, we can enter details of the VM we want to create, e.g. we can name it, select the region to create it in, select the amount of RAM and disk space it has as well as all the other options that go to define a VM. For this article, since we’re just creating a basic VM, we’ll go through the common options that are needed to create a VM.

Name
This is the name of both the VM when it is running, and the name that is displayed in the console where you manage your instances. The name must be in lowercase but can include numbers or hyphens.
Region / Zone
This defines the geographic location of where the VM is created. This defaults to us-east1 which is in South Carolina. For the purposes of this article, we will leave the default region as us-east1 and the default Zone as us-east1-b
Machine Type
This option allows us to configure the number of cores, memory and GPUs that the VM will possess. Note that GPUs are not presently available in all regions, so if you select a region other than us-east1, the options may be different from those shown here.
Selecting the CPU drop down, allows the number of CPUs used by the VM to be defined. Obviously, the more CPUs you select, the higher the cost of the VM per month. The estimated cost of the VM is always displayed on the right hand side of the page whilst customising the VM.
For this article, select the Machine Type as Micro. This defaults the VM to 1 shared CPU with 0.6Gb RAM and no GPU. This is the smallest of the VMs that can be created, and this VM type can be run in the free-tier. For more information about the Free Tier, and what you can run in it, see https://cloud.google.com/free/docs/gcp-free-tier?hl=en_GB&_ga=2.180966501.-319154563.1548685428#always-free
Boot Disk
Next, we get to define the Boot disk and operating system for the VM.

Within this section, we can select the OS, the size of the boot disk and a number of different image types. The default option is to use Debian Linux 9 (stretch) with a 10 GB boot disk. This is fine for demonstration purposes, but can be changed to whatever is best for your use case. A variety of different Linux and Windows operating systems can be selected from here if required.
Identity and api access

The Identity and api access section allows us to define what account, and therefore what security, the applications running on the VM will use. For this article, we aren’t running any applications on the VM, so we can leave the default settings.
Firewall

The next section allows us to define whether HTTP and HTTPS traffic are allowed to the instance. Since we’re not deploying a web server, we can leave these settings unchecked.
ssh access
Once our VM is running, we’ll want to connect to it via SSH so that we can see that everything is there as expected. To be able to do this, we need to add our SSH public key onto the Virtual Machine. Your public key is usually stored within the ~/.ssh/id_rsa.pub file. If you don’t have a public / private key, now would be a good time to create one :)
Take a copy of your public key and paste it into the keydata box on the Security tab. If you’re on a Mac, you can copy your public key into the clipboard with
cat ~/.ssh/id_rsa.pub | pbcopy

Starting the VM
That’s all that’s needed to get a basic VM up and running. Of course, there are many other options available which I’ll go through in another article. For the moment though, let’s start the VM by clicking the Create button.
Upon pressing this button, GCP will start to provision the VM. This will take up to a minute, however when it’s complete, you will see a list of VM’s that you’ve created along with tools to manage the VMs.
Connecting to the VM
In the list of VMs, you can see the name (webserver1 in this example) along with its internal and external ip addresses. To connect to the VM, we need to ssh using the username we defined previously and the public IP address.
From the terminal:
david$ ssh david@104.196.139.230
The authenticity of host '104.196.139.230 (104.196.139.230)' can't be established.
ECDSA key fingerprint is SHA256:cxuubyAwHqGG6SDyGdHHlVtPLnQsYJNpT57E2mok4Dg.
Are you sure you want to continue connecting (yes/no)? yes
Warning: Permanently added '104.196.139.230' (ECDSA) to the list of known hosts.
Linux webserver1 4.9.0-8-amd64 #1 SMP Debian 4.9.130-2 (2018-10-27) x86_64

The programs included with the Debian GNU/Linux system are free software;
the exact distribution terms for each program are described in the
individual files in /usr/share/doc/*/copyright.

Debian GNU/Linux comes with ABSOLUTELY NO WARRANTY, to the extent
permitted by applicable law.
david@webserver1:~$
Destroying the VM
That’s all there is to it. We’ve created a Debian VM, and connected to it. We can now use the VM for whatever we need.
Finally, to delete the VM (and ensure there are no recurring costs), select the VM in the list of instances and press the Trash Can Icon. Remember, VMs are charged by usage, so if you’re not using it, delete it to stop recurring costs.
Credits
Photo by Jordan Harrison on Unsplash

Top comments (0)