Do you have an application hosted on a VPS? In that case, every time you push your code to version control, you will have to somehow make the server pull it and restart the process. Now, you could do it the chimp way, which is SSH'ing in every time and running the necessary commands youself. Or, you can automate it!
A week or two ago, I had the realization that I don't necessarily need to SSH in and run the deploy script every time I push my changes to GitHub, if I could somehow automate it. That is when my search for a simple solution to this problem began.
My first stop was the post-receieve git hook, but it never worked for me. I read a lot of articles on it and tried various times, but the script simply never ran.
Next, I tried the git-hooks plugin for pm2 (the process manager I knew). That, however, also didn't work and mentioned non-existent file conflicts.
At this juncture, I could have tried a CD service like Jenkins or Travis, but I decided to write my own solution instead. This aims to be easy to set up and run, and provide a lot of flexibility. Being my first proper project in Go, I also learnt a lot of things along the way.
How it works
github-deploy-inator starts a webserver on the specified path which listens for webhooks from GitHub. When a webhook (or any POST request in general) is received, it gets the required information and runs a command specified in a specified directory. You might wonder from where it gets the information?
Enter config.json
All the required information is specified in a config.json file, which should be present alongside the executable. You can check out its format here.
Basic structure:
the config must contain fields for port, endpoint and listeners.
An example:
{
  "port": ":80",
  "endpoint": "/github/webhook",
  "listeners": [
    {
      "name": "example-listener",
      "repository": "DeathVenom54/github-deploy-inator",
      "directory": "/home/dv/projects/docs-website",
      "command": "yarn deploy",
      "notifyDiscord": true,
      "discord": {
        "webhook": "webhook-goes-here",
        "notifyBeforeRun": true,
        "sendOutput": true
      }
    }
  ]
}
Setting it up
Installation and configuration
To get started, grab a release from here. If you are on a VPS, you can download it using curl. Copy the link for your OS and architecture and run this:
curl -L [release link] > github-deploy-inator.zip && unzip github-deploy-inator.zip
This will unzip the executable, as well as an example config file. Edit the config as per your requirements, and test it by running the executable.
./github_deploy-inator_linux_x64
This will load and verify the config. If something is wrong, it will exit. If you see the message "Listening for Github webhooks on port :PORT", the config is valid.
Note that this does not verify if the provided Discord webhook url is valid or not, so take care of it.
Run it
You will need to use a process manager to run the executable, and restart if it fails. You could use systemd, but I prefer use pm2 as I find it simpler to use.
An Example
Let's host a simple API using this!
First of all, I cloned a super simple express API (writted in Typescript).
$ git clone https://github.com/DeathVenom54/example-node-api.git
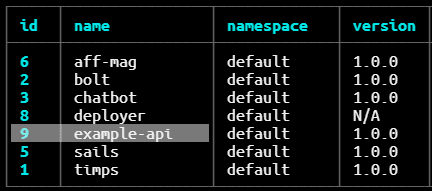
I used pm2 to run this API.
yarn build
pm2 start dist/main.js --name example-api
Now, to set up the deployer...
Assuming that you have already downloaded the correct build, let's edit the config. Here is what I ended up with:
{
  "port": "80",
  "endpoint": "/webhook/github",
  "listeners": [
    {
      "name": "my-api",
      "repository": "DeathVenom54/example-node-api",
      "directory": "/home/dv/projects",
      "command": "curl localhost:80",
      "notifyDiscord": true,
      "discord": {
        "webhook": "https://discord.com/api/webhooks/937660913748697088/wK8NGFKUT09ToiQRxMX83asMnaCxn47sagE7Hg1bcba7Nb7dEQm6zxag4K0S_3iLBLCw",
        "notifyBeforeRun": true,
        "sendOutput": true
      }
    }
  ]
}
Port 80 is a privileged port, which represents HTTP. To run this code, run this command first:
sudo setcap CAP_NET_BIND_SERVICE=+eip /path/to/binary
To check if the config is valid, run the executable once.
Oops, I forgot the colon before the port, let's fix it.
...
  "port": ":80",
...
Now, it should succeed...
Great! Now let's set it up with pm2
pm2 start ./github_deploy-inator_linux_x64 --name deployer
This should have it running, let's check the logs to verify
pm2 logs deployer
Perfect! The last step is to add a webhook on your repository. Make sure the Content-Type is application/json. You should also set a secret, and specify it in the config.
The deployer might throw an error when GitHub sends a ping webhook once you set it up. This is a known issue I haven't been able to fix. You should ignore the error.
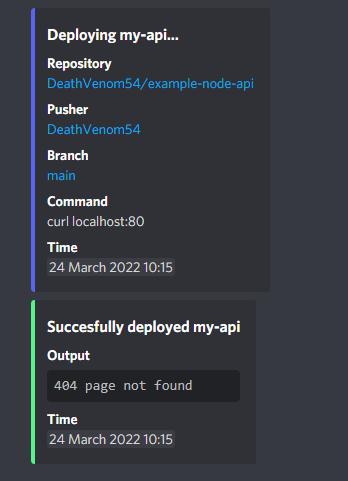
Now let's push something and try... It works!
2022/03/24 04:45:51 Successfully executed webhook from DeathVenom54/example-node-api
Next steps
If you face any bug or difficulty while using this program, or have a suggestion for it, feel free to open an issue on Github, or let me know in my Discord server.
Happy devving!


Top comments (0)