Hello everyone! I hope you all are doing great. Today, I am going to show you step by step on how you can set up a GitHub enterprise server on AWS.
1: GET THE GITHUB ENTERPRISE AMI
To Install Github Enterprise on AWS, you must launch an EC2 instance first.
To launch any instance on EC2, you need an AMI. Well, what is an AMI?
An AMI (Amazon Machine Image) is a special type of virtual appliance that provides all the required information to launch an instance on Elastic Compute Cloud (EC2).
Now, follow these steps to get the Github Enterprise AMI:
- Login to your Github Enterprise account, and go to
Downloadpage
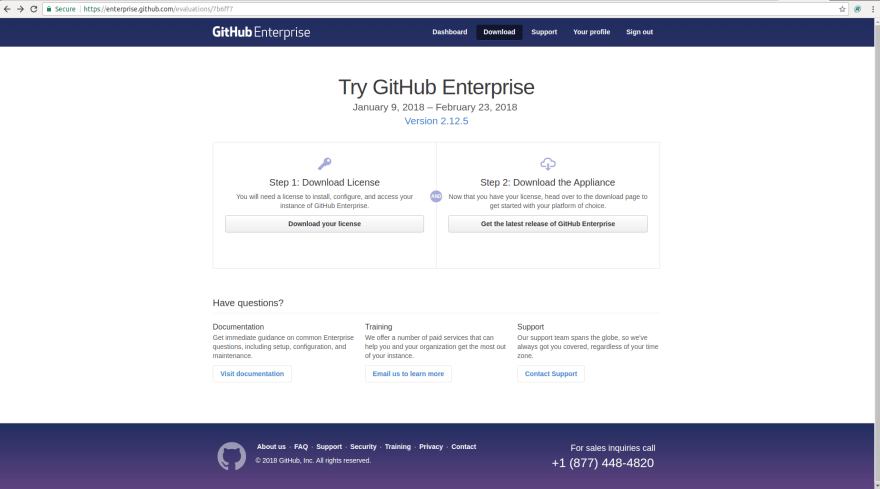
- Now click on
Get the latest release of Github EnterpriseunderDownload the Appliancesection.

- Now, select
Amazon Web Servicesas the platform underGithub in the Cloudsection. And then underSelect your Amazon region, select a region where you want to set up Github Enterprise. I am selectingus-east-2. As soon as you select the region, AMI ID will be displayed in the same section.

Take note of the AMI ID, as it is required to launch instance.
2. CREATE EC2 INSTANCE
As now we have the AMI ID, let's create the EC2 instance. For that, at first login to AWS console. Go to EC2 service dashboard and click on Launch Instance. Make sure that you create an instance in the same region where you have selected while getting AMI ID of Github Enterprise.
As soon as you click on Launch Instance, it will ask you to choose an AMI.
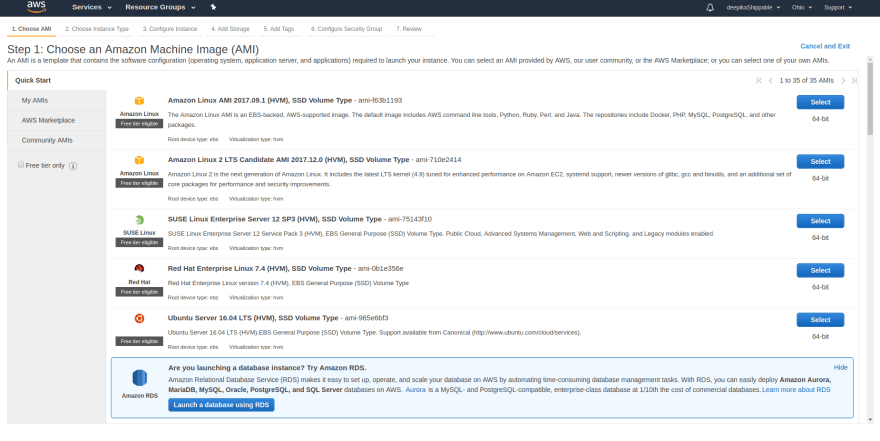
Now, go to Community AMIs section to search for the AMI ID which you got in first step:
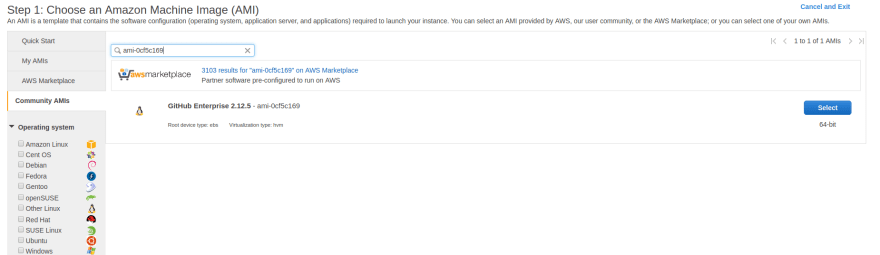
Select the AMI and continue.
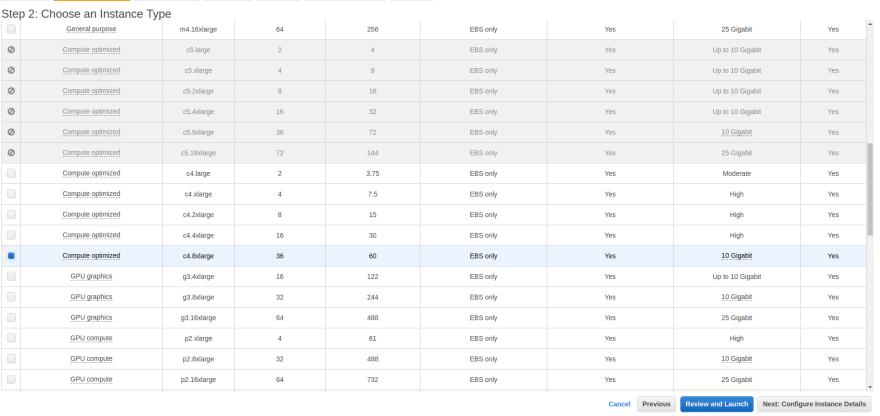
Now you need to choose the Instance Type. Github Enterprise is supported on the following EC2 instance types:
| C3 | C4 | M3 | M4 | R3 | R4 | X1 |
| c3.2xlarge | c4.2xlarge | m3.xlarge | m4.xlarge | r3.large | r4.large | x1.16xlarge |
| c3.4xlarge | c4.4xlarge | m3.2xlarge | m4.2xlarge | r3.xlarge | r4.xlarge | x1.32xlarge |
| c3.8xlarge | c4.8xlarge | m4.4xlarge | r3.2xlarge | r4.2xlarge | ||
| m4.10xlarge | r3.4xlarge | r4.4xlarge | ||||
| m4.16xlarge | r3.8xlarge | r4.8xlarge | ||||
| r4.16xlarge |
Select one of the instance type based on your seat count. And click on Next: Configure Instance Details
Now, if you want to customize instance configuration details then you may change it here:
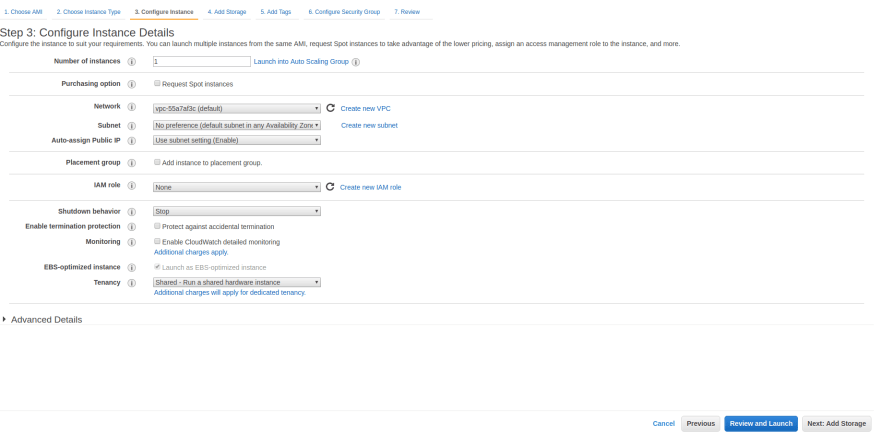
As I don’t want any changes, I am skipping this and moving forward by clicking on Next: Add Storage.
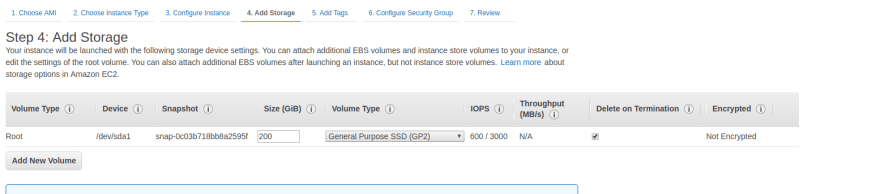
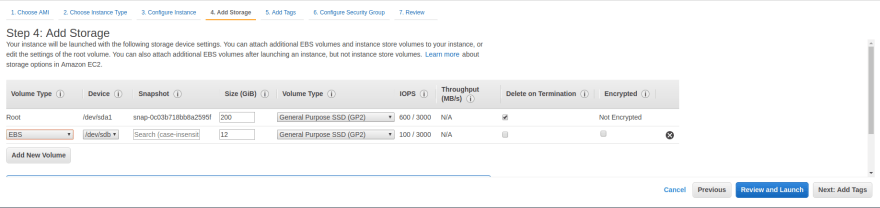
Now, Github Enterprise needs a separate EBS volume of at least 10 GiB for git data and user data. So, click on Add New Volume and create an EBS volume of size > 10 GiB and move forward to Next: Add tags.
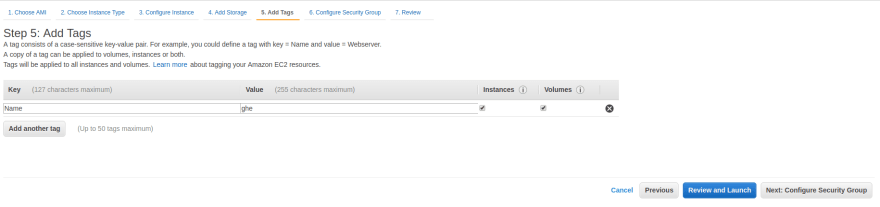
Now, you can create a Tag for this instance by adding name and value. Adding a tag helps you in identifying the instance in the dashboard.
Move on to Next: Configure Security Group and add a security group for the instance. Basically a security group is a set of firewall rules that control the traffic for your instance. While creating the security group add rules for each port in the table below:
| Port | Service | Description |
|---|---|---|
| 22 | SSH | Git over SSH access. Clone, fetch and push operations to public/private repositories supported. |
| 25 | SMTP | SMTP with encryption (STARTTLS) support. |
| 80 | HTTP | Web application access. All requests are redirected to the HTTPS port when SSL is enabled. |
| 122 | SSH | Instance shell access. The default SSH port (22) is dedicated to application git+ssh network traffic. |
| 161/UDP | SNMP | Required for network monitoring protocol operation. |
| 443 | HTTPS | Web application and Git over HTTPS access. |
| 1194/UDP | VPN | Secure replication network tunnel in High Availability configuration. |
| 8080 | HTTP | Plain-text web-based Management Console. Not required unless SSL is disabled manually |
| 8443 | HTTPS | Secure web-based Management Console. Required for basic installation and configuration. |
| 9418 | Git | Simple Git protocol port. Clone and fetch operations to public repositories only. Unencrypted network communication. |
Add rules for each of the port mentioned above in the table.

Now, Click on Review and Launch button. Make sure, everything is correctly configured. And click on Launch when you are ok with it.
Create key-value pair which can be used to ssh into that machine.
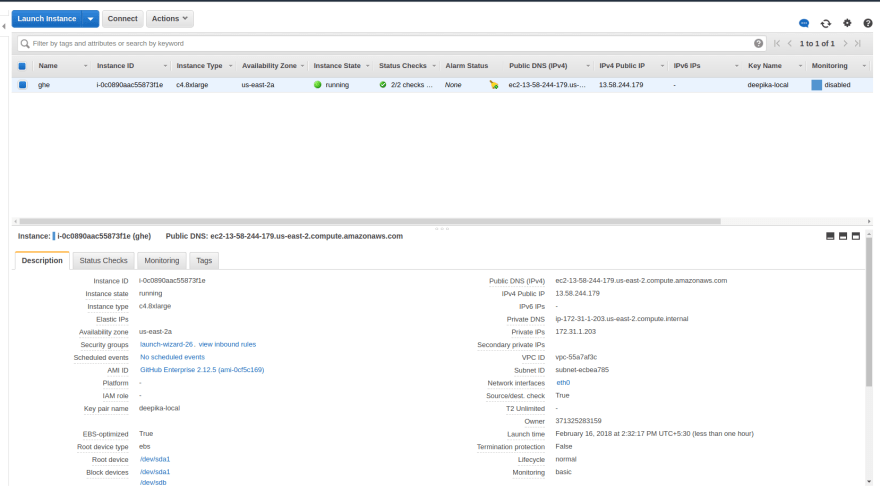
Now click on View Instances. And copy the Public DNS of the newly created GHE instance and open it in a new tab of your web browser. It is located at the bottom right.
Once you put the public DNS in your browser you will see:
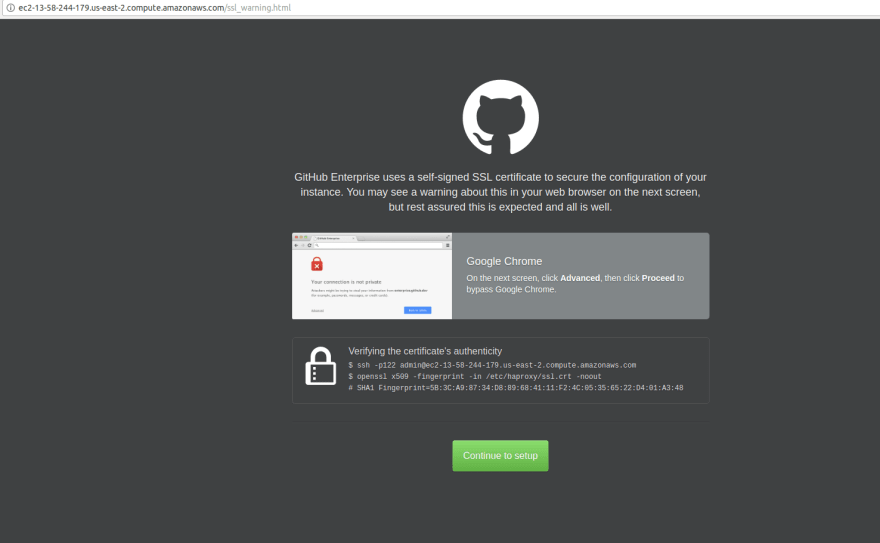
This is because, Github Enterprise have a self-signed SSL certificate, because of which you might be prompted on the next screen with a warning. We can get past that screen based on which browser you are using. If you want to double-check, you can verify by ssh into the machine and following the steps as written on your screen. Now click on Continue to setup.
If you are on safari, you will get an alert box asking to continue or not. You can click on continue.
If you are on chrome, this will redirect you to a page, where you can click Advanced under it click on Proceed to ec2-13-58-244-179.us-east-2.compute.amazonaws.com.
After that, you will be asked to upload your license files. If you don’t have one, you can get them from Github Enterprise Download page.
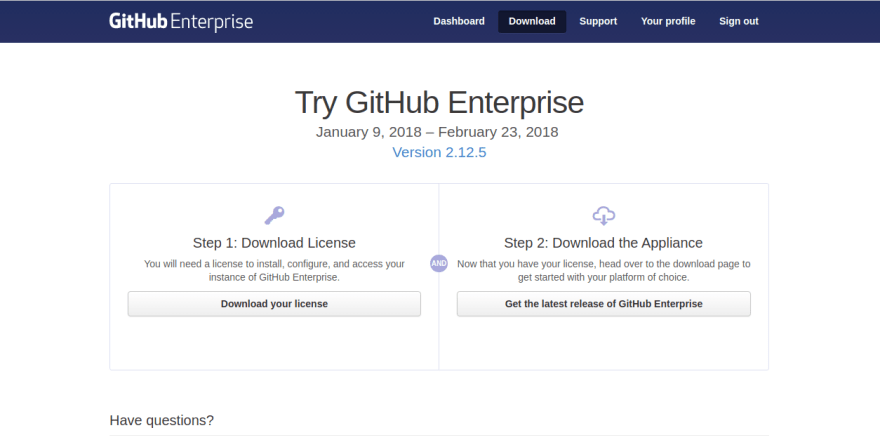
Click on Download your license and upload it here on your machine.
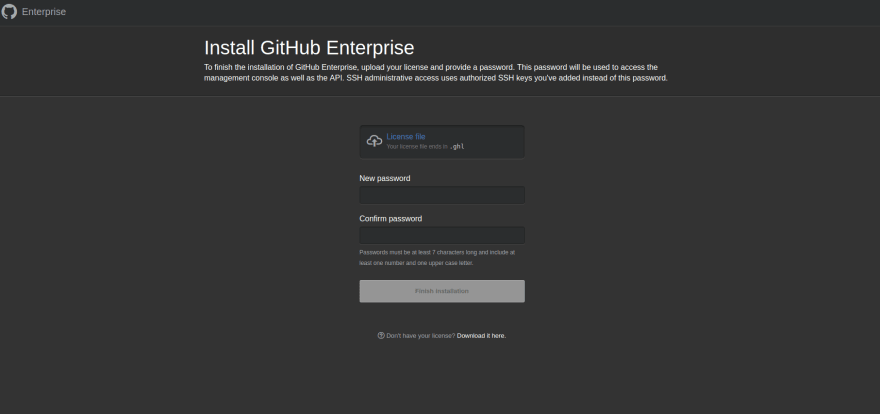
You have to create a new password for authentication. And click on Finish Installation once you are done uploading and creating a password.
Now you will be asked to choose the installation type. I will be choosing New Install.

You will be redirect to Admin settings page, where you can configure the GHE instance. Click on Save Settings once you are done.

Now it will configure the settings to your instance, it might take some time. Once all the checks are done you can click on Visit your Instance.
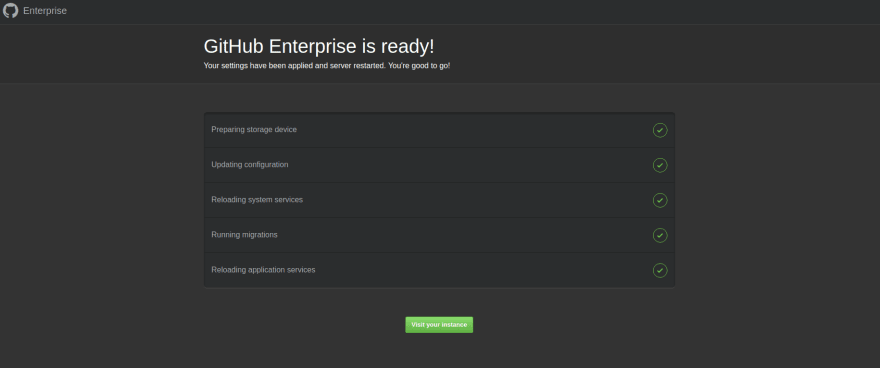
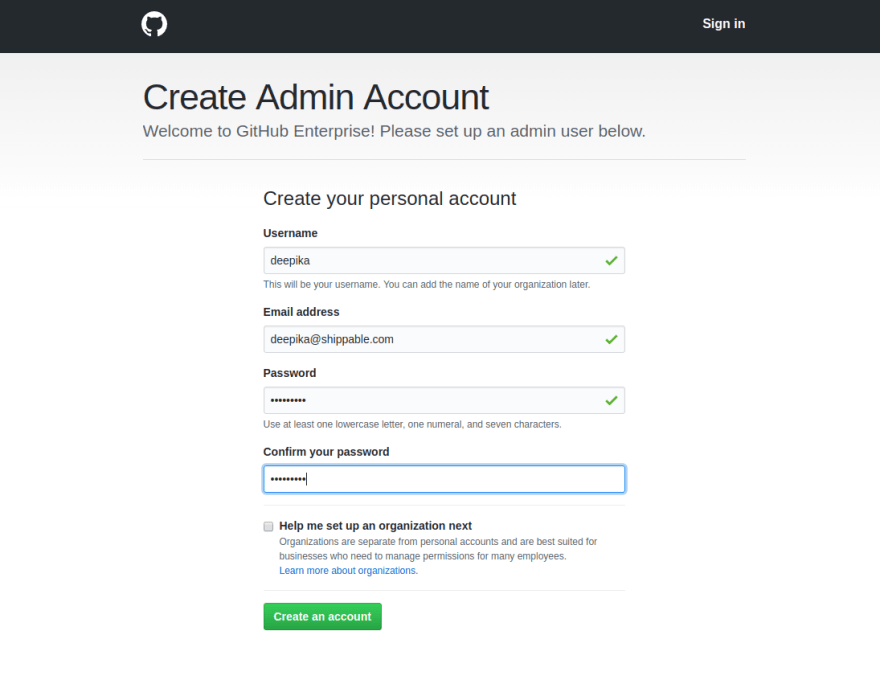
And that’s it Github Enterprise is installed on your machine, you can create an admin account and later you can create or export projects.
I hope you find this tutorial helpful.

Top comments (0)