GastbyJS is fast and great. Though I can't make it greater but surely can make it faster, want to see how? Join me and see how I use BunnyCDN to make Gatsby super fast.
In 2020 I moved Devxify to Gatsby. As most of people do, I too used Netlify for it. Though Netlify worked fine but as I was on free tier so the performance of CDN wasn't great for me and the paid plan started from 19USD per month, too high for a single project.
I looked for ways to improve the infrastructure. The best option which I found was bringing my own CDN into the game. I had been using BunnyCDN from it's early days so I knew the team, they are great and specially the founder Dejan is very helpful and committed to add new updates. Also with BunnyCDN I get the guarantee that my site is being served by comparatively expensive zone like Asia and Oceania (whenever required), I can't assure that in Netlify or Cloudflare. Now the intro is done and let's begin with the context.
So if you are too willing to switch to BunnyCDN↗ then just to be clear you can't switch completely, you still will need to use Netlify as you backed build engine. Let's start with all the steps you need to follow.
1. Configure BunnyCDN
Go to BunnyCDN and create a new pull zone. It would ask for name and origin URL, in name choose anything you like; for example site-cdn then in origin URL enter the URL given by Netlify. It should look like site-hash.netlify.app, keep rest settings as it is.
Then add these cdn.site.com, site.com & www.site.com to BunnyCDN. It's completely your choice to use www or no-www, I would still suggest you to use www for your website. In our setup Netlify will not serve any of your domain so you need not add any domain there, we will use the site-hash.netlify.app for the whole setup.
2. Add CDN to Gatsby
Now the first and most basic step to integrate a CDN into Gastby is to use it as asset prefix↗. What this does is, it changes all the asset path from site.com to cdn.site.com , by doing this all of your assets will start routing from BunnyCDN instead of Netlify. To do this you need to follow 2 simple steps.
First, add asset prefix to Gatsby config file
module.exports = {
  assetPrefix: `https://cdn.site.com`,
}
Second, go to Netlify setting and find menu called build & deploy. Then simply change the build command.
# Old Build Command
gatsby build
# New Build Command
gatsby build --prefix-paths
Once done, do a test build and see if everything work fine.
Issue: If you use .svg type images in your in your website markdown then this might break it. Issue↗ has been opened. Temporary solution can be to offload then to an external provider like BunnyCDN storage.
3. Enable Perma-Cache
Perma cache is a new technology implemented by BunnyCDN↗. According to my knowledge, they are the first one to do so. You won't find much about it but I will try to explain. When you enable perma cache, BunnyCDN collects all your resources (upon requested) and store it into a Geo-replicated storage. The main benefit of this is that even if CDN cache misses, you'll still get the benefit of asset being served from nearby location. Though it's hard for me to explain but you'll understand when you setup it yourself. Also BunnyCDN will soon add a blog post explaining this, keep an eye. Follow these steps to enable perma cache.
First, go to BunnyCDN dashboard and add a storage zone.
There it would ask you for name of storage zone, main storage region and geo replicated zones. To make your task easier, I have added an image of things you need to enable here, have a look.
Second, enable perma cache for pull zone.
Now go to the pull zone you created, on the left hand side you would find a menu mentioning perma cache. Click on it and choose the storage zone you just created. I have added an image again for making it easier.
Now most of the part is done, your site has already become faster but still there is one last change we need to do. When you enable perma cache, then it by defaults set's cache-control header to max. We now need to tell the browser to not cache our .json and .html files. This is essential for of our content to be fresh on updates. Gatsby official documentation↗ on caching.
4. Set Cache-Control Headers
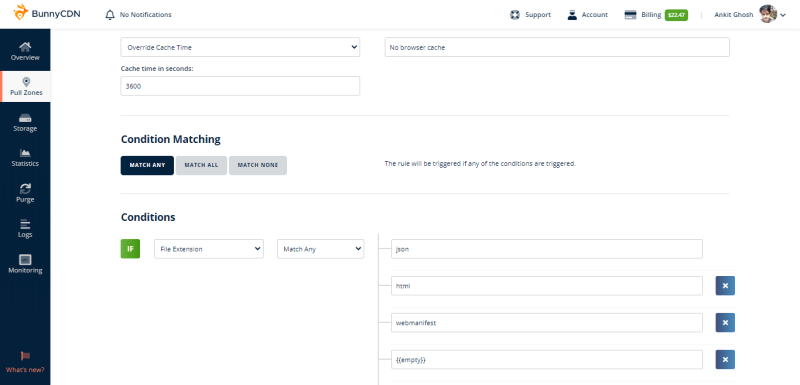
Setting this up is very necessary if you don't wish to server stale content to your visitors. BunnyCDN provides a neat tool for this, it's called edge rules. You will find this option in the same menu where you found perma cache. Once you are there, click on the button which says "add edge rule".
The there would be an dropdown option named as "action", choose "override cache time" in the menu. In description you can write anything for your understanding. Then there would be another input box named with title "cache time in seconds", ideally you should put 0 seconds but I would suggest you to put 3600 seconds there. So your mentioned resources will be cached for only 5 minutes in your browser.
Then scroll down choose "match any" in condition matching section. Next in the condition part choose if > File Extension > Match Any, then add json, html, manifest and {{empty}}. Look at images below to have clear understanding. Just to let you know {{empty}} is to tell browser to not cache resources with no extension, this is generally your html file.
Another thing you might want to do is, adding CORS header. To do this simply go to headers section in the menu for the pull zone and add the below values.
eot, ttf, woff, woff2, css, json, js, svg, jpg, png, ico
Conclusion
Though I have tried and tested this solution but Netlify doesn't suggest this. They say so because they because they don't want you to add a proxy between Netlify and your user but this setup only uses Netlify as a build engine nothing else.
If you really liked the article then do share it with your friends and colleagues. If you find a error or just want to do addition to this post then feel free to drop a message on Twitter↗, also do follow us for quick updates. For weekly updates on web performance and optimization do subscribe to our newsletter. If you wish to support my work (which I do here for free) then you can do so by buying me a coffee↗ or two, I'll be thankful.
Disclosure: Some link might be affiliate link but those don't make the post biased.


Top comments (0)