This week we are focusing on all things hosting: making our next.js application available to the world wide webs; setting up automatic deploys when we change code; and configuring a custom domain!
Build app
We can build a production version of our application by running the build script - this is what our hosting platform will use too!
npm run build
ERROR!
This is giving us the following error.
Error: connect ECONNREFUSED 127.0.0.1:80
And that's because I made a small blunder in our first week! We are trying to load data from a serverless function, but that serverless function is also built when we build a new version of our application. This would be fine if the "building the serverless functions" step came before the "build our next app" step, but unfortunately that is not the case!
This worked locally because next does some performance magic and rebuilds the page when we request it by refreshing the browser.
Looks like we can't read data for our pre-rendered/statically generated pages from our serverless functions, but that is okay! Every one of our getStaticProps functions is actually a little chunk of server-side logic so we can just build our Prisma queries there!
Let's create a new utils folder at the root of our project and add a db.js file with the following content.
// utils/db.js

import { PrismaClient } from '@prisma/client'
const prisma = new PrismaClient()

const getCourses = () =>
  prisma.course.findMany({
    include: {
      lessons: true,
    },
  })

export { getCourses }
Now we can import our getCourses function and call it in our getStaticProps function.
// pages/index.js

import CourseList from 'components/CourseList'
import { getCourses } from '../utils/db'

const Index = ({ courses }) => {
  return (
    <div>
      <h1>Courses</h1>
      <pre>
        {JSON.stringify(courses, null, 2)}
      </pre>
    </div>
  )
}

export const getStaticProps = async () => {
  const data = await getCourses()

  return {
    props: {
      courses: data,
    },
  }
}

export default Index
Let's run that build again!
npm run build
MORE ERRORS!
Error: Error serializing `.courses[0].createdAt` returned from `getStaticProps` in "/".
Reason: `object` ("[object Date]") cannot be serialized as JSON. Please only return JSON serializable data types.
Okay, this is a weird one but basically when the createdAt date comes back from Prisma, Next.js attempts to turn it into a string (serializing) and is not happy.
A quick trick we can use here is manually stringify the courses we get back from Prisma and then parse them back into json.
// pages/index.js

import { getCourses } from '../utils/db'

// other component stuff

export const getStaticProps = async () => {
  const data = await getCourses()

  return {
    props: {
      courses: JSON.parse(JSON.stringify(data)),
    },
  }
}
Our whole component should look something like this.
// pages/index.js

import { getCourses } from '../utils/db'

const Index = ({ courses }) => {
  return (
    <div>
      <h1>Courses</h1>
      <pre>
        {JSON.stringify(courses, null, 2)}
      </pre>
    </div>
  )
}

export const getStaticProps = async () => {
  const data = await getCourses()

  return {
    props: {
      courses: JSON.parse(JSON.stringify(data)),
    },
  }
}

export default Index
And run that build one last time!
npm run build
NO ERRORS!
Yay! Our application is building properly! We can run npm start to run the production build locally and make sure it looks good in the browser.
This is now hostable! But where to host?!?
Vercel
We need to actually host our application to get a public URL that we can give to someone with an internet connection, so they can see our super dope site!
There are many serverless hosting providers to choose from. My two favourites are Netlify and Vercel. They are both super focused on developer experience and have exceptional free tiers! Absolutely free to get started and you would need to have a pretty successful app to get to the point where you need to pay! Next.js can be hosted on either of these platforms, however, I find Vercel tends to implement new Next.js features a little ahead of Netlify (probably because they're also the creators of Next.js!), so I am going to use them for this SaaS project.
You will need to create an account with Vercel and install the CLI tool with the following command.
npm i -g vercel
Now you can login.
vercel login
And deploy your application.
vercel --prod
This will step you through a few questions about the project. You can just accept all the default options, since Vercel is very much optimised to host Next.js applications!
That's it! Super simple!
Add a secret in Vercel
When running locally we have specified an environment variable (or secret) for connecting to our Supabase DB instance. We need to tell Vercel about this so our application can connect to the DB in prod.
This is a good article about the different types of environment variables and how to configure them in Vercel.
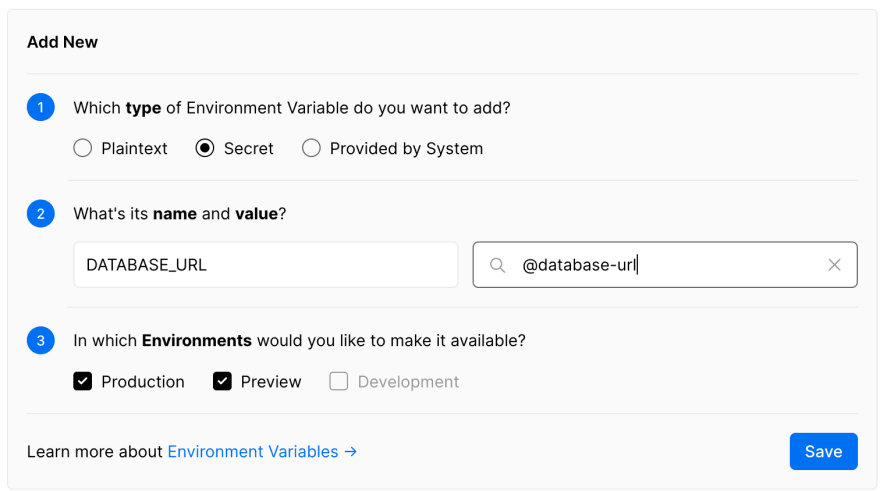
Head over to the Vercel dashboard for you application and go to Settings > Environment Variables. Select "secret" for the type of variable, enter "DATABASE_URL" as the name and then dropdown the value input to "Create a new Secret for null".

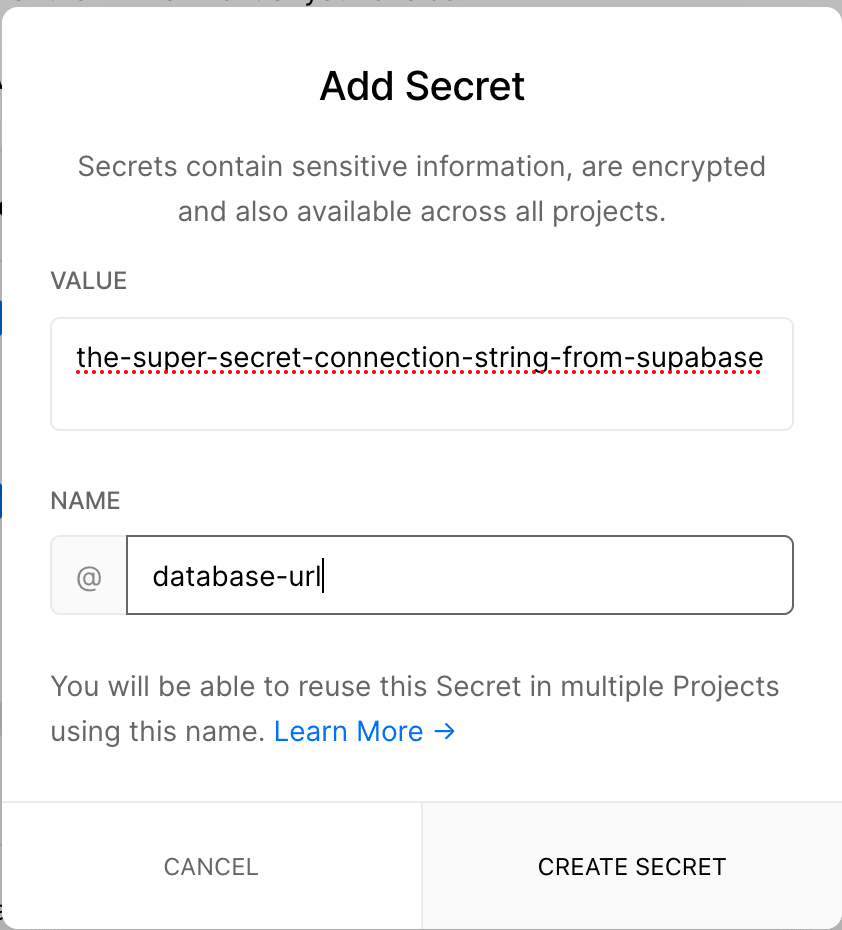
Now enter your connection string from Supabase as the value, and make the name "@database-url". Secrets always start with "@" in Vercel.
Now we can select this secret from the dropdown to link it to our DATABASE_URL environment variable.
This distinction of environment variable separate from secret allows you to share environment variables across different projects.
Automatic deploys from GitHub
Next we want to tell Vercel to automatically deploy our application anytime we make changes. To do this we are going to use GitHub. Initialise the repo as a git project.
git init
Now create a new GitHub repo. You can do this through the GitHub UI, however, the gh CLI allows you to stay in your terminal!
brew install gh

gh repo create courses
Now we need to create a .gitignore file so we don't end up pushing a whole bunch of unnecessary stuff to GitHub - node_modules, easily generated files etc.
// .gitignore

node_modules/
.next/
.DS_Store
out/
Now we can add, commit and push to GitHub.
git add .
git commit -m 'create initial project'
git push origin master
Now we have some code in GitHub, let's tell Vercel about it.
Login to Vercel and navigate to your project dashboard.
Now navigate to Settings > Git and click Connect git repository.
This will require you to authenticate with GitHub and allow Vercel access to your repos.
Select your project repo and your production branch - mine is master.
Now Vercel will automatically deploy a new version of your application anytime you push changes to that branch. Give it a go!
Make a small change to your home page, commit and push to GitHub. You should see this kicks off a new deployment in your Vercel Dashboard. Once this is done your changes should be live on your deployed site!
Custom domain
The last thing I am going to setup this week is a custom domain. This is the only part of this series that is going to cost money, but it is entirely optional! Vercel will give us a public URL that we can use to share our application with the world. A custom domain just allows us to customise things a little more, which may be important for your branding.
Vercel offer a super easy way to purchase domains through their dashboard, however, I have found that other services often have the same domain names a little bit cheaper. I have a few domains registered with hover.com and have had a really good experience with them so far, but any domain registration service will do. They should all let you add DNS records and change name servers, which is what we need to do.
Now that you have purchased your amazingly custom domain name, you need to add two DNS records. There should be a menu item for DNS somewhere and it should contain fields for type, hostname and IP address.
Create one with this info:
Type: A
Hostname: @
IP Address: 76.76.21.21
And one with this info:
Type: A
Hostname: *
IP Address: 76.76.21.21
The @ means anything looking for this domain, send to Vercel's IP address, and the * does the same for subdomains - such as www.
This is what this should look like in Hover.

Lastly, we need to point the nameservers to Vercel. In Hover this is located on the Overview page.
Update these to the following values.
ns1.vercel-dns.com
ns2.vercel-dns.com
Again, this is what it looks like in Hover.

Now we need to tell Vercel that this is the domain name we would like to use for our project. Head on over to the Vercel dashboard for your project and navigate to Settings > Domains, and in the Domains input box enter your new custom domain and click Add.
This will send a request to your domain and make sure it is configured correctly. If everything is all good it will look like this.

If there is a problem it will look something like this.

Sometimes it can take a little bit of time to propagate DNS changes through, so don't panic straight away! Maybe grab a coffee or have a nap. If it is still not working, double check that configuration above.
If everything is green ticks your application will now be available at your custom domain! Great work!
Wrapping up
Awesome! Our application is hosted, we have automatic deploys setup for anytime we push changes to GitHub, and we have (maybe) configured our own custom on-brand domain!

Top comments (0)