Introduction

In this article, I'm describing how to create the "blow kiss" emoji with only 4 HTML classes!
The emoji will have a head, eyes, brows, a mouth and a heart! In the end, we'll add some animation in the heart!
Tools and resources:
- I'm using
codepen - Great source for animations animista.net
- CSS gradient color generator cssgradient.io
- CSS box shadow generator cssgenerator.org
You'll learn:
- How to create circles
- How to use
shadow-ban How to write pseudo-classes, and specifically we'll use
::beforeand::afterHow to rotate shapes
How to create a heart shape
How to add simple animations
The final result:

This image is my inspiration:

Note : If you're curious about what CSS art is, in this article I have a short explanation.
Why did I choose the "blow kiss" or "kiss" emoji?
I asked on Twitter:
And some of you suggested this -> 😘
Also, Valentine's day is approaching (or has already passed, depending on when you're reading the article), so I thought to recreate it using only CSS and in fact as few CSS classes as possible.
Ok, let's start!
The base 🖼
The html code is very simple.
<div class="container">

</div>
I'll start with creating the background in CSS. To do so, I'll use the body.
/* CSS Custom Properties */
:root { --bg-color: pink }

body {
  background-color: var(--bg-color);
  height: 100vh;
  display: grid;
  place-items: center;
  margin: 0;
}
Here is what I did:
The first line sets the background color of the entire page to a variable named
--bg-color. Variables in CSS are declared using thevar()function and can be used to store values that will be reused throughout the stylesheet. In this case, the variable is used to set the background color of the entire page.The second line sets the height of the
bodyelement to 100% of the viewport height using thevhunit (1vh is equal to 1% of the height of the viewport).The third line sets the
displayproperty of thebodyelement togrid. This tells the browser to lay out the child elements of thebodyelement as a grid.The fourth line sets the
place-itemsproperty of thegridcontainer tocenter. This tells the browser to align the grid items along the horizontal and vertical center of the grid container.The fifth line sets the margin of the
bodyelement to 0, this will remove any default margin that the browser may have added to the body
After the body, I have the .container
.container {
  display: flex;
  justify-content: center;
  position: relative;
}
This block of code is a class selector for an element with the class .container.
The first line sets the
displayproperty of the.containerelement toflex. This tells the browser to lay out the child elements of the.containerelement as a flex container.The second line sets the
justify-contentproperty of the flex container tocenter. This tells the browser to align the flex items along the horizontal center of the flex container.The third line sets the
positionproperty of the.containerelement torelative. This allows you to position the container relatively to its initial position, for example, you can usetop,right,bottom,leftproperties to move it around.
Note : body and container are 2 classes I love to use as templates. I usually copy-paste them from previous projects. 😉
Create the head 🫥
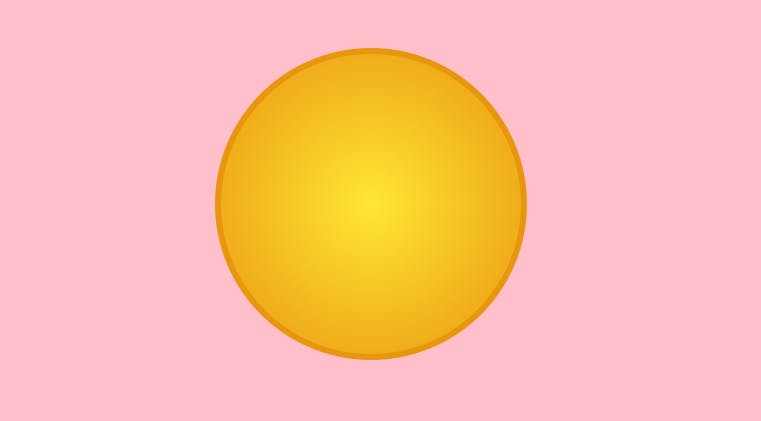
Let's start our CSS art by creating a round head.
<div class="container">
  <div class="head">

  </div>
</div>
We will create:
a circle
add color to it
position it relative
.head {
  /* create a circle */
  width: 300px;
  height: 300px;
  border-radius: 50%;

  /* add color */
  border: 6px solid #e9960f;
  background: radial-gradient(circle, rgba(255,230,53,1) 0%, rgba(233,150,15,1) 100%);
  box-shadow: 4px 4px 36px 24px rgba(244,126,28,0.7) inset;

  /* we need the position 'relative' b/s we're going to have a few elements inside the head. The elements will be positioned "absolutely" in releationship with the parent class (which is .head) */
  position: relative;

/* we also need these 3 lines for the elements that are coming inside the .head (eyes, brows, etc) */
  justify-content: center;
  display:flex;
  align-items: baseline;
}
For the background , I used the cssgradient.io.
background: radial-gradient(circle, rgba(255,230,53,1) 0%, rgba(233,150,15,1) 100%);
For the inner box-shadow, I used cssgenerator.org
box-shadow: 4px 4px 36px 24px rgba(244,126,28,0.7) inset;
The box-shadow property applies a drop shadow effect to the .head element. The specific value used 4px 4px 36px 24px rgba(244,126,28,0.7) inset creates an inner shadow effect with the inset keyword.
The shadow is 4px horizontally and vertically from the element, with a blur radius of 36px and spread distance of 24px.
The color is rgba(244,126,28,0.7).
Reminder : The "a" value in rgba stands for "alpha" and it specifies the opacity of the color, with 0 being completely transparent and 1 being completely opaque.
Here is an image of the result:
Create the mouth 👄
To create the mouth, we will not add a new class, instead, we'll use the pseudo-class ::before. Here is how the code looks:
The process:
I was a bit skeptical about which is the best approach to design the mouth.
I experimented with creating 2 half-circles on top of each other and adding a shadow ban (but it wasn't looking very good) or adding the number "3" which kinda looks like the mouth of this 😘 emoji. Since I'd add 3 as a span in the HTML part, I thought it was "cheating" as I want everything to be with CSS.
Hence, I concluded to the solution you can see below (it doesn't include circles or numbers!)
The solution:
.head::after {
  content: "";
  position: absolute;

  /* add mouth: https://bennettfeely.com/clippy/ */
  width: 80px;
  height: 80px;
  clip-path: polygon(49% 0%, 100% 10%, 65% 48%, 100% 74%, 51% 100%, 77% 72%, 57% 46%, 81% 13%);
  margin-top: 170px;
  border-radius: 50%;
  background-color: #492a0d;
}
Let's examine the first two lines of .head::after:
.head::after{
  content: "";
  position: absolute;
}
This CSS code targets an element with the class of .head, and it uses the ::afterpseudo-element to insert some content after the element (in our case this is going to be a shadow).
The
content: ""property sets the content of the pseudo-element to an empty string, which means it will not display any content.The
position: absolutesets the position of the pseudo-element to be absolute, which means it will be positioned relative to the nearest positioned ancestor element instead of the viewport.
The shape of the mouth was created with clippy and that's how I got:
clip-path: polygon(49% 0%, 100% 10%, 65% 48%, 100% 74%, 51% 100%, 77% 72%, 57% 46%, 81% 13%);
I wanted to look a bit smoother that's why I added the border-radius:
border-radius: 50%;
💡 Tip : Feel free to experiment with the colors and the sizes in width, height, margin-top, etc.
Here is an image of the result:

Create the eyes 👀
We'll add 2 classes in the HTML part (one for the left eye and one for the right eye). The eyes will look different but they'll also share some common properties.
<div class="container">
  <div class="head">
    <div class="left"></div>
    <div class="right"></div>
  </div>
</div>
I will start by writing the 2 classes .left and .right where I basically create a circle with some color and a border.
.left, .right {
  /* Common properties for both eyes */
  background: rgba(98,47,2,1);
  border-radius: 50%;
  border: 1px solid #492a0d;
  position: absolute;
  box-shadow: 1px 2px 8px 8px #492a0d inset;

  /* I'll keep these only for the left eye... */
  width: 50px;
  height: 70px;
  margin-top: 80px;
  margin-left: -100px;
}
Nothing new ~ We have created 2 round eyes and added a shadow.
But now we want to change the right eye...
.right {
  width: 65px;
  height: 30px;
  margin-top: 100px;
  margin-left: 100px;
}
Perfect! Eyes are ready!

Create the brows 🤎
Time to create the brows. The brows will look different for each eye and I'll follow the concept I mentioned above. (Meaning, I'll create two identical brows and then I'll change the right one.)
To make the brows I'm using the .left::after and .right::after pseudo-classes:
.left::after, .right::after {
  content: "";
  position: absolute;

  clip-path: ellipse(50% 22% at 50% 100%);

  width: 70px;
  height: 60px;
  background: rgba(98,47,2,1);
  border: 1px solid #492a0d;
  box-shadow: 1px 2px 8px 8px #492a0d inset;
  margin-top: -80px;

  /* I'll keep these only for the left eyebrow... */
  margin-left: -50px;
  transform: rotate(-25deg);
}
I used clippy to create a shape looking like a brow (something like an ellipse) an that's how I got the code below.
clip-path: ellipse(50% 22% at 50% 100%);
I also rotated the brows:
transform: rotate(-25deg);
Note : You can find more info about rotation here.
Ok, at this point we have the 2 brows, but as I mentioned above we don't want them to look the same...

So I'll override some properties for the right brow:
.right::after {
  margin-left: 20px;
  transform: rotate(10deg);
}
Perfect, now the brows are ready!

Create the heart
To make the heart I had a few options. One of them was simply to use the heart emoji in a span but again that would be consider cheating, wouldn't it?! 😁
So I followed another approach which is based on creating a few basic shapes. In particular, it's based on creating a square and 2 circles!
Let's create one more class, .heart, which by the way, is the 4th and last one.
<div class="container">
  <div class="head">
    <div class="left"></div>
    <div class="right"></div>
  </div>
  <div class="heart"></div>
</div>
Now I'll create a square, position it on the edge of the head and rotate it.
.heart {
   /* Create the square and rotate it */
   width: 80px;
   height: 80px;
   transform: rotate(75deg);
   transform-origin: center;
   position: relative;
   background: #c51f22;
   margin-top: 190px;
   margin-left: -90px;
}
Here's an image of what I got so far:

Cool! But I need to create 2 circles next to each other and on top of the square. To do so, I'll use the pseudo-classes .heart::before, .heart::after.
.heart::before, .heart::after {
   content: '';
   position: absolute;

   width: 80px;
   height: 80px;
   border-radius: 50%;
   background: #c51f22;
}
Pretty simple, right?! Just keep in mind to use the same width and height as in the square (for me this is 80px) and then of course position the circles correctly:
.heart::before { left: -40px; }
.heart::after { top: -40px; }
💡Tip* : Use half the value of width and height for left and right in the .heart pseudo-classes. For me that is* 40px.
Note : You can find more info about creating a heart here.
Yes!!! We're done with all the classes and the shapes!
Here is an image of the result:

Bonus: Add animation to the heart
If you want something extra in your CSS art why not add adding an animation?! I decided to use an animation for the heart.
We don't need any extra classes on the HTML part. We'll just add a few lines in the CSS part.
In the .heart I'll add the animation:
.heart {
  .
  .
  .

   animation: heartbeat 1.5s ease-in-out 2 both;
}
The name of the animation is heartbeat with a duration of 1.5s, an easing effect of ease-in-out, and 2 iterations.
💡 Tip : You can find many more animations in animista.net
I'll continue by defining the animation:
@-webkit-keyframes heartbeat {
  from {
    -webkit-transform: scale(1);
            transform: scale(1);
    -webkit-transform-origin: center center;
            transform-origin: center center;
    -webkit-animation-timing-function: ease-out;
            animation-timing-function: ease-out;
  }
  10% {
    -webkit-transform: scale(0.91);
            transform: scale(0.91);
    -webkit-animation-timing-function: ease-in;
            animation-timing-function: ease-in;
  }
  17% {
    -webkit-transform: scale(0.98);
            transform: scale(0.98);
    -webkit-animation-timing-function: ease-out;
            animation-timing-function: ease-out;
  }
  33% {
    -webkit-transform: scale(0.87);
            transform: scale(0.87);
    -webkit-animation-timing-function: ease-in;
            animation-timing-function: ease-in;
  }
  45% {
    -webkit-transform: scale(1);
            transform: scale(1);
    -webkit-animation-timing-function: ease-out;
            animation-timing-function: ease-out;
  }
}
@keyframes heartbeat {
  from {
    -webkit-transform: scale(1);
            transform: scale(1);
    -webkit-transform-origin: center center;
            transform-origin: center center;
    -webkit-animation-timing-function: ease-out;
            animation-timing-function: ease-out;
  }
  10% {
    -webkit-transform: scale(0.91);
            transform: scale(0.91);
    -webkit-animation-timing-function: ease-in;
            animation-timing-function: ease-in;
  }
  17% {
    -webkit-transform: scale(0.98);
            transform: scale(0.98);
    -webkit-animation-timing-function: ease-out;
            animation-timing-function: ease-out;
  }
  33% {
    -webkit-transform: scale(0.87);
            transform: scale(0.87);
    -webkit-animation-timing-function: ease-in;
            animation-timing-function: ease-in;
  }
  45% {
    -webkit-transform: scale(1);
            transform: scale(1);
    -webkit-animation-timing-function: ease-out;
            animation-timing-function: ease-out;
  }
}
This block of code creates a keyframe animation named heartbeat and it has five stages. For more information about animations check animista.net.
Codepen ->https://codepen.io/EleftheriaBatsou/pen/GRBVVGo
💡 Tip : To see this effect, reload your page!
Sum up💫
In this article, I described how to create an emoji using only CSS and HTML. More specifically, we created the emoji with just 4 classes (.head, .left, .right and .heart). We used the pseudo-classes ::before and ::after to achieve things such as the mouth, the brows, etc. The heart could be done simply by adding a read-made emoji but instead we focused on creating it with basic shapes, like a square and 2 circles. In the end, we also added an animation for the heart.
If you have any questions feel free to ask them in the comments!
Before you start creating something similar, it'd be good to know how:
- positions work (mainly position absolute, relative)
- some basic flex-box properties work
- to play around with
box-shadow - to use the
::beforeand::after - Extra: animations
Feel free to tag me if you try something similar. I'd love to see your art!
Thank you for reading! Find the code on Codepen.
👋 Hello, I'm Eleftheria, developer & public speaker.
🥰 If you liked this article consider sharing it.

Top comments (0)