A web applicaton using Django Framework to manage a library
My goal with this project is to show the different aspects of django framework for models, urls, template, view, settings, using of packages, admin control panel.
I will show this creating a web application to manage a library database. Here a brief description:
• The project consists in reproducing a part of an application for the management of the database of a library
• There are three entities: book, author and genre
• Genre attributes: name
• Author attributes: name, surname, country, photo author
• Book attributes: title, author, genre, isbn, image for the cover
• Each Book can belong to multiple genres (many-to-many relationship)
• A book is associated with only one author
• It is possible to view a list of books in the library from the website homepage; all the details are shown for each book
• It is possible to access a "author profile" page which shows all the books present for that author, and his country of origin
• Books, Genres and Authors are added from the Administration Panel
Prerequisites
Having installed python on your system, the version used for this project is python 3.7.7
The operating system on which the project was run is Windows 10.
Django Framework version: 3.0.5
1. I create a virtual development environment (which I call library_env) for this project:
- a. I create a virtual environment
python -m venv library_env
- b. The virtual environment is active
library_env / Scripts / activate.bat
- c. Django installation
pip install Django
- d. I create a directory for the project
mkdir library-project
2. I create a Django project which I call libraryproject:
- a. In the library-project folder I run the command
django-admin startproject libraryproject
- b. The previous command creates a project called libraryproject and inside it another folder called libraryproject, which turns out to be the main app of the whole project. The folder tree will look like this:

c. Check that everything is working by starting the web server made available by Django
python manage.py runserver
d. From browser, navigate to URL 127.0.0.1:8000 and the default homepage of the project will be shown
3. I create the library application:
- a. Inside the path library-project \ libraryproject I run the command
python startapp library
- b. The tree looks like this:

- c. I register the app library in the settings.py of the app libraryproject

4. Creation of models
I edit the library \ models.py file:
- a. Genre Model:

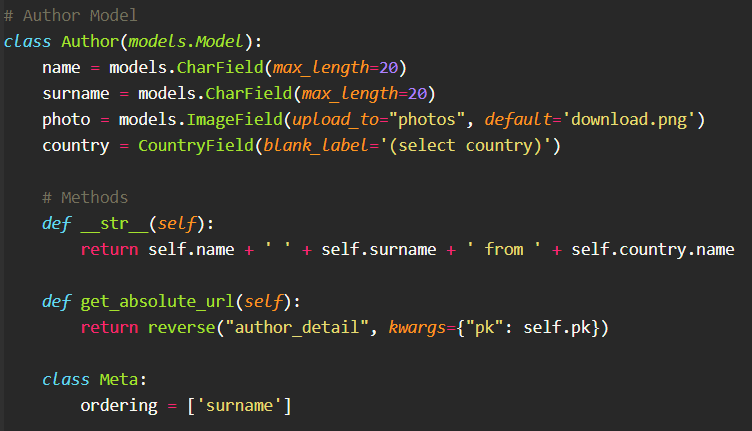
- b. Author Model - since the Author model has the country field among the attributes, I decided to import a python package that would already make the list of countries available, in order to make it easier to create an author from the administrator panel (via selection)
-- i. I import the package using the command
pip install django-countries
-- ii. I add django_countries in INSTALLED_APPS in the settings.py file
-- iii. For the Author model, the reverse method must be imported:
from django.urls import reverse. This is he Author model
c. Book template. For this model I imported the pillow package to have available the type of ImageField field to use for the cover field
pip install pillow
This is the Book model:

To allow the image files to be uploaded, I modify the project settings.py file by inserting, just under the definition of BASE_DIR
MEDIA_URL = "/media/"
MEDIA_ROOT=os.path.join(BASE_DIR, 'media')
And also edit the urls.py file of the project by inserting:
from django.conf import settings
from django.conf.urls.static import static # new
if settings.DEBUG: # new
urlpatterns += static(settings.MEDIA_URL, document_root=settings.MEDIA_ROOT)
5. We migrate the newly created models
- a. I run the python command
python manage.py makemigrations
From the command line I have this result:
Migrations for 'library':
  library\migrations\0001_initial.py
    - Create model Author
    - Create model Category
    - Create model Book
-
b. I run from the command line
python manage.py sqlmigrate library 0001and I get the result of executing the sql commands for the creation of the tables with the related fields -
c. I make sql commands effective, by running them on the database using the command
python manage.py migrate
6. I create a superuser account to access the django Admin panel:
a. I run the python command
python manage.py createsuperuser
b. Enter a username when prompted
c. An email when requested (optional)
d. Password and password confirmation when requested
e. Start the django web server using the python command
python manage.py runserver
f. Browse to the URL 127.0.0.1:8000/admin
g. Enter the username and password of the superuser created in step a.
h. The administrator panel will be shown like this:

That is, I have the management of groups and users, which are created by default by django, let's see how to make the resources of our app available.
7. I make the CRUD of the models available directly from the Admin section:
- a. I register the models in the library\admin.py file

- b. In the administration panel I now manage the resources for the app Library:

From this administrator panel I can add new genres, books and authors, edit and delete.
8. Implementation of the "homepage" request or navigation to the URL 127.0.0.1:8000:
a. I create the urls.py file in the app's library folder
b. I edit the file libraryproject \ urls.py:

- c. In the library \ urls.py file I write this:

That is, I am saying that the url "" is managed by the view home that we are now going to define
-
d. I define the view home:
the. I modify the library \ views.py file going to define the home method in this way:

So I added the home view which renders the home page via the homepage.html template, which I am now going to create
- e. I create the template homepage.html:
-- i. I take advantage of the inheritance between the templates. I therefore define a base.html template where I define the skeleton of an html page that will be inherited from all the other templates. All other templates will only load the necessary content. Also I want to give the pages of my site some bootstrap-style css
-- ii. I create the templates directory within the library-project \ libraryproject \ templates project
-- iii. I create the base.html file in the templates folder. The base.html will look like this:
<!doctype html>
<html lang="en">
  <head>
    <!-- Required meta tags -->
    <meta charset="utf-8">
    <meta name="viewport" content="width=device-width, initial-scale=1, shrink-to-fit=no">

    <!-- Bootstrap CSS -->
    <link rel="stylesheet" href="https://stackpath.bootstrapcdn.com/bootstrap/4.4.1/css/bootstrap.min.css" integrity="sha384-Vkoo8x4CGsO3+Hhxv8T/Q5PaXtkKtu6ug5TOeNV6gBiFeWPGFN9MuhOf23Q9Ifjh" crossorigin="anonymous">

    <title>{% block head_title %}Library | {% endblock head_title %}</title>
  </head>
  <body>

    <div class="container">
      <h1>Library Store</h1>

        {% block content %}

        {% endblock content %}

    </div>

    <!-- Optional JavaScript -->
    <!-- jQuery first, then Popper.js, then Bootstrap JS -->
    <script src="https://code.jquery.com/jquery-3.4.1.slim.min.js" integrity="sha384-J6qa4849blE2+poT4WnyKhv5vZF5SrPo0iEjwBvKU7imGFAV0wwj1yYfoRSJoZ+n" crossorigin="anonymous"></script>
    <script src="https://cdn.jsdelivr.net/npm/popper.js@1.16.0/dist/umd/popper.min.js" integrity="sha384-Q6E9RHvbIyZFJoft+2mJbHaEWldlvI9IOYy5n3zV9zzTtmI3UksdQRVvoxMfooAo" crossorigin="anonymous"></script>
    <script src="https://stackpath.bootstrapcdn.com/bootstrap/4.4.1/js/bootstrap.min.js" integrity="sha384-wfSDF2E50Y2D1uUdj0O3uMBJnjuUD4Ih7YwaYd1iqfktj0Uod8GCExl3Og8ifwB6" crossorigin="anonymous"></script>
  </body>
</html>
-- iv. I create homepage.html in the templates folder. The template shows the title of the current page in the head_title block, the list of all books with details in the content block and the list of all authors, each one will be a link to the info details page for that author. The template will look like this:
{%  extends 'base.html' %}
{% block head_title %}
    {{ block.super }}
    Homepage
{% endblock head_title %}
{% block content %}
    <h4>Books:</h4>
    <div class="row">
        {% for book in books %}
        <div class="col-6">
          <div class="card mb-3" style="max-width: 540px;">
            <div class="row no-gutters">
              <div class="col-md-4">
                <img src="{{ book.cover.url }}" class="card-img" alt="...">
              </div>
              <div class="col-md-8">
                <div class="card-body">
                  <h5 class="card-title">{{ book.title }}</h5>
                  <p class="card-text">ISBN: {{ book.isbn }}</p>
                  <p class="card-text">Author: <a href="{{ book.author.get_absolute_url }}">{{ book.author }}</a></p>
                  <p class="card-text">
                      <small class="text-muted">
                          Categories: {{ book.categories.all|join:", " }}
                      </small>
                  </p>
                </div>
              </div>
          </div>
        </div>
      </div>
    {% endfor %}
    </div>

    <h4>Authors list</h4>
    <ul>
    {%for author in authors %}
        <li><a href="{{ author.get_absolute_url }}">{{ author }}</a></li>
    {% endfor %}
    </ul>
{% endblock content %}
-
f. Start the django web server
python manage.py runserverand browse from browser to url 127.0.0.1:8000 to see the result
9. Implementation of the author profile page:
- a. I edit the urls.py of the app library and add a new path
path ("author / <int: pk>", AuthorDetailViewCB.as_view (), name = "author_detail"),
by importing the AuthorDetailViewCB view that I now create
- b. I create the AuthorDetailViewCB view in the library\views.py file:
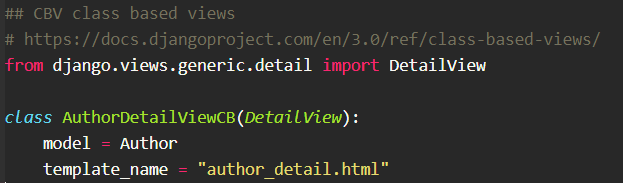
The view in question extends Django's DetailView class, where I am telling the view to respond to the "author / pk" request by rendering the author_detail.html template, where pk is the primary key of the author resource (ie the id) and to use the Author model.
- c. I create the templates directory in the library folder
- d. I create the author_detail.html file under the library\templates folder
{%  extends 'base.html' %}
{% block head_title %}
    {{ block.super }}
    Author {{ author.name }}
{% endblock head_title %}
{% block content %}
        <h4>Author Info:</h4>
          <div class="card mb-3" style="max-width: 540px;">
            <div class="row no-gutters">
              <div class="col-md-4">
                <img src="{{ author.photo.url }}" class="card-img" alt="...">
              </div>
              <div class="col-md-8">
                <div class="card-body">
                  <h5 class="card-title">Name: {{ author.name }}</h5>
                  <p class="card-text">Surname: {{ author.surname }}</p>
                  <p class="card-text">State: {{ author.country.name }}</p>
                  <p class="card-text">
                      Libri scritti:
                      {{ author.books.all|join:", "}}
                  </p>
                </div>
              </div>
          </div>
      </div>
      <a href="{% url 'library-home' %}">Return To Home</a>
{% endblock content %}
- e. I modify the settings.py file of the project in order to set the possibility of using the templates folder that I created in the library directory. I edit the settings file by going to set DIRS like this:
'DIRS': [os.path.join(BASE_DIR, 'templates')],
-
f. Start the django web server
python manage.py runserverand browse from browser to url 127.0.0.1:8000 to see the result
You can find all project source code on my

Latest comments (1)
It was a great start. Then what about the full application. Is there any update about the features?