Telegram has around one billion active users per month and is a very important part of dApps and Web3 interfaces and communities. However, many Telegram bots still use insecure interaction methods.
By completing this guide, you’ll learn a better way to connect users to decentralized applications via Telegram. This tutorial shows how to authenticate Telegram users using their Web3 wallets, without ever accessing their private keys.
In this tutorial you’ll learn how to:
- Create a secure Telegram bot: Build a bot that authenticates users via Web3 wallet signatures without storing private keys.
- Implement ERC-712 signatures: Create an authentication flow where the user signs human-readable messages.
- Enable flexible authentication: Users can interact with any type of application via Telegram, from secret groups to DeFi transactions or airdrops.
To see the full project, check out the complete code.
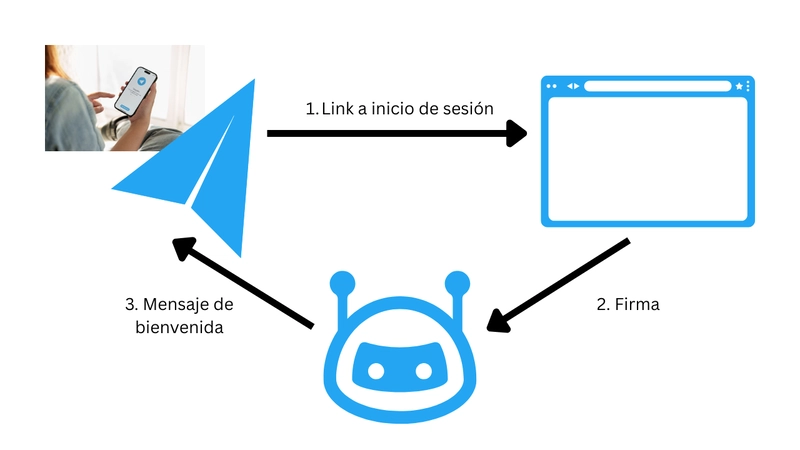
Application flow.
1. Create a New Telegram Bot
Creating a Telegram bot is very simple. Just send a direct message to the Telegram account @BotFather. Send the command /newbot, follow the instructions, and you’ll receive a token that we’ll use to interact with the Telegram library in the next step.
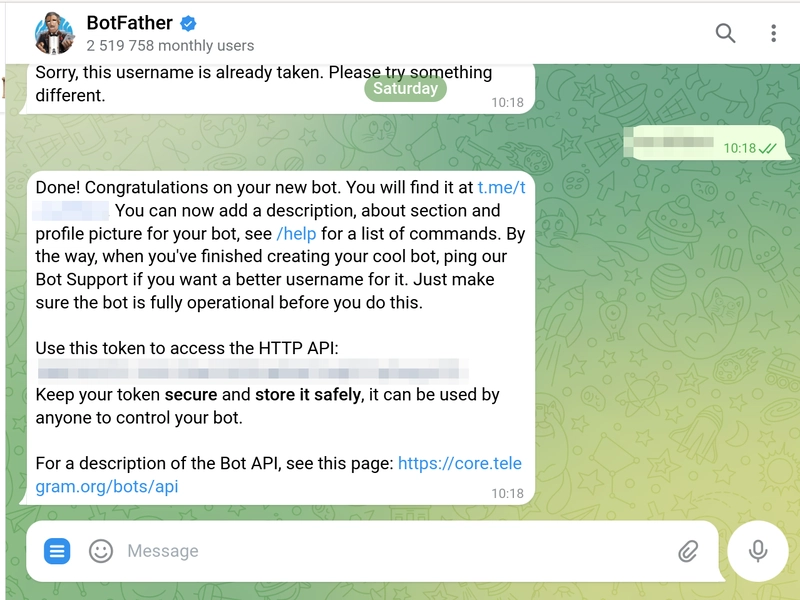
Send /newbot to @botfather to create a new Telegram bot.
2. Launch the Telegram Bot Backend
First, install the dependencies. Make sure you have Node.js installed, I recommend via nvm.
Once Node.js is installed, run:
npm install node-telegram-bot-api ethers dotenv express cors
Now, create a .env file with the following:
.env
BOT_TOKEN=your_telegram_bot_token
CHAIN_ID=1
WEB_DAPP_URL=http://localhost:3000
Edit the CHAIN_ID depending on the chain your dApp or community is. You can use Chainlist to figure out the chain id of the blockchain you're using. If your bot is chain agnostic use 1 as id, this is the Ethereum chain id.
Don’t forget to create a .gitignore file to avoid uploading .env to public repositories:
.gitignore
.env
node_modules
This is the bot.js file. It launches a bot that listens to Telegram messages and verifies wallet signatures. Telegram bots use polling to get messages locally, for production, consider using a webhook and hosting the server remotely.
For this tutorial, we’ll use polling. Learn more about webhooks in the Telegram Bot API docs.
When a user sends message with the authenticate text, the bot replies with a link to the web dApp. The dApp will sign a message and send it to the bot, which verifies the signature and welcomes the user.
// We'll use the official telegram bot library and ethers to verify the user's signature
const TelegramBot = require("node-telegram-bot-api");
const { ethers } = require("ethers");
require("dotenv").config();
const express = require("express");
const cors = require("cors");

const bot = new TelegramBot(process.env.BOT_TOKEN, { polling: true });
const CHAIN_ID = process.env.CHAIN_ID;
const WEB_DAPP_URL = process.env.WEB_DAPP_URL;

const app = express();
app.use(cors());
app.use(express.json());

// Initializes the Telegram bot
(async () => {
    try {
        bot.botInfo = await bot.getMe();
        app.listen(8080, () => {
            console.log("\nServer is running on port 8080");
            console.log("Bot is running...");
        });
    } catch (error) {
        console.error(error);
        process.exit(1);
    }
})();

// The /verify enpoint is used to verify the signature and send a welcome message to the user
app.post("/verify", async (req, res) => {
    const { userId, message, signature } = req.body;
    try {
        const signerAddress = await getAuthenticationSigner(userId, message, signature);
        await bot.sendMessage(
            Number(userId),
            `Welcome! You're authenticated as ${signerAddress}.\n\nEnjoy your welcome gift! 🎁`
        );
        res.json({ success: true, signerAddress });
    } catch (error) {
        console.error("Verification error:", error);
        res.status(400).json({ success: false, error: error.message });
    }
});

// getAuthenticationSigner returns the signer address
function getAuthenticationSigner(userId, message, signature) {
    // accessRequest es el esquema de datos real del mensaje que queremos verificar
    const accessRequest = {
        userId: userId,
        message: message,
    };
    // domain is your dApp general information, this should be the same for every message
    const domain = {
        name: "Telegram Group Access",
        version: "1",
        chainId: CHAIN_ID,
    };
    // types is your data schema, the structure of the data we want to verify
    const types = {
    AccessRequest: [
            { name: "userId", type: "uint256" },
            { name: "message", type: "string" },
        ]
    };
    // verifyTypedData check if the signature in the ERC-712 format and returns the signer address through ecrecover, this is done internally by the ethers library
    return ethers.verifyTypedData(domain, types, accessRequest, signature);
}

// This is the main function, it gets executed when the bot receives a message
bot.on("message", async (msg) => {
    const text = msg.text || "";
    // Verifica si el mensaje es "authenticate" y si es así, envía un mensaje al usuario para que visite el sitio web
    if (text.toLowerCase() === "authenticate") {
        // userId es el id del usuario en Telegram
        const userId = msg.from.id;
        // Enviamos el usuario a la dapp web para autenticarse
        bot.sendMessage(userId, `Please visit: ${WEB_DAPP_URL}?userId=${userId}`);
        return;
    }
});

console.log("\nBot is running...");
Run the bot:
node bot.js
Your bot is now running on http://127.0.0.1:8080.
Next, we’ll create the web dApp that interacts with it.
3. Create a Web dApp to Sign Messages
We’ll create 3 files:
-
index.html: The HTML page with the wallet connection and sign button -
signature_messaging.js: Handles signing and sending the message -
wallet_connection.js: Manages wallet connection
The dApp is a simple HTML page with a Sign button that opens the user’s wallet to sign a message.

Clicking the Sign button opens the ERC712 signature modal.
index.html
<!DOCTYPE html>
<html lang="en">
<head>
  <meta charset="utf-8">
</head>
<body>
  <div>
    <!-- Connect Wallet button, only visible is wallet is not connected -->
    <input id="connect_button" type="button" value="Connect" onclick="connectWallet()" style="display: none"></input>
    <h1>Telegram Bot Authentication</h1>
    <p id="web3_message"></p>
    <h3>Sign Authentication Request</h3>
    <!-- This is the authentication button, will pop up the wallet signature modal -->
    <button type="button" id="sign" onclick="_signMessage()">Sign</button>
    <p id="signature"></p>
  </div>
    <!-- In this tutorial we'll use web3.js, you can have the same results with ethers.js or viem -->
  <script type="text/javascript" src="https://cdnjs.cloudflare.com/ajax/libs/web3/1.3.5/web3.min.js"></script>
  <script type="text/javascript" src="wallet_connection.js"></script>
  <script type="text/javascript" src="signature_messaging.js"></script>
</body>

  <script>
    // The signMessage function is called when the user clicks the sign button
    function _signMessage()
    {
      const urlParams = new URLSearchParams(window.location.search);
      const userId = urlParams.get('userId');
      signMessage(userId, "I'm requesting access to the Telegram group.")
    }
  </script>
</html>
signature_messaging.js signs the message using the ERC712 standard and sends it to the bot backend via eth_signTypedData_v4.
signature_messaging.js
const BOT_API_URL = 'http://localhost:8080'
// Signs the message using the ERC-712 format
async function signMessage(userId, message)
{
  // ERC-712 expects you to send the message in a very specific format
  const msgParams = JSON.stringify({
    types: {
      EIP712Domain: [
        { name: 'name', type: 'string' },
        { name: 'version', type: 'string' },
        { name: 'chainId', type: 'uint256' },
      ],
      AccessRequest: [
        { name: 'userId', type: 'uint256' },
        { name: 'message', type: 'string' }
      ],
    },
    primaryType: 'AccessRequest',
    domain: {
      name: 'Telegram Group Access',
      version: '1',
      chainId: NETWORK_ID,
    },
    message: {
      userId: userId,
      message: message,
    },
  });

  // ERC-712 introduced the eth_signTypedData_v4 method, now is widely adopted by wallets
  const signature = await ethereum.request({
    method: "eth_signTypedData_v4",
    params: [accounts[0], msgParams],
  });

  document.getElementById("signature").textContent="Signature: " + signature;

  // Send the message to the telegram bot
  await sendSignature(userId, message, signature);
}

// Send the signature to the Telegram bot
async function sendSignature(userId, message, signature) {
  // We start by grouping the data to be sent to the bot
  const requestData = {
    userId: userId,
    message: message,
    signature: signature
  };

  try {
    // Now we send the data to the Telegram bot at the /verify POST endpoint
    // If all is correct, the bot will send a welcome message to the user
    const response = await fetch(BOT_API_URL + '/verify', {
      method: 'POST',
      headers: {
        'Content-Type': 'application/json',
      },
      body: JSON.stringify(requestData)
    });

    if (!response.ok) {
      throw new Error(`HTTP error! status: ${response.status}`);
    }
    alert("Message sent successfully!");
  } catch (error) {
    console.error('Error:', error);
    alert("Failed to send message: " + error.message);
  }
}
Then, wallet_connection.js handles connecting to the wallet and updating the UI:
If you target a specific network id, edit NETWORK_ID.
wallet_connection.js
// Constants
const NETWORK_ID = 1
var accounts
var web3

// Automatically refreshes the browser if your wallet changes
function metamaskReloadCallback() {
  window.ethereum.on('accountsChanged', (accounts) => {
    document.getElementById("web3_message").textContent="Account changed, refreshing...";
    window.location.reload()
  })
  window.ethereum.on('networkChanged', (accounts) => {
    document.getElementById("web3_message").textContent="Network changed, refreshing...";
    window.location.reload()
  })
}

// Get a new Web3 instance
const getWeb3 = async () => {
  return new Promise((resolve, reject) => {
    if(document.readyState=="complete")
    {
      if (window.ethereum) {
        const web3 = new Web3(window.ethereum)
        window.location.reload()
        resolve(web3)
      } else {
        reject("must install MetaMask")
        document.getElementById("web3_message").textContent="Error: Please connect to MetaMask";
      }
    }else
    {
      window.addEventListener("load", async () => {
        if (window.ethereum) {
          const web3 = new Web3(window.ethereum)
          resolve(web3)
        } else {
          reject("must install MetaMask")
          document.getElementById("web3_message").textContent="Error: Please install Metamask";
        }
      });
    }
  });
};

// Loads the dApp and gets a Web3 object instance
async function loadDapp() {
  metamaskReloadCallback()
  document.getElementById("web3_message").textContent="Please connect to Metamask"
  var awaitWeb3 = async function () {
    web3 = await getWeb3()
    web3.eth.net.getId((err, netId) => {
      if (netId == NETWORK_ID) {
        var awaitContract = async function () {
          document.getElementById("web3_message").textContent="You are connected to Metamask"
          web3.eth.getAccounts(function(err, _accounts){
            accounts = _accounts
            if (err != null)
            {
              console.error("An error occurred: "+err)
            } else if (accounts.length > 0)
            {
              onWalletConnectedCallback()
              document.getElementById("account_address").style.display = "block"
            } else
            {
              document.getElementById("connect_button").style.display = "block"
            }
          });
        };
        awaitContract();
      } else {
        document.getElementById("web3_message").textContent="Please connect to Scroll";
      }
    });
  };
  awaitWeb3();
}

// Connect the user wallet
async function connectWallet() {
  await window.ethereum.request({ method: "eth_requestAccounts" })
  accounts = await web3.eth.getAccounts()
  onWalletConnectedCallback()
}

// Callbacked called when the user connected his wallet, you would typically read the user state on-chain here
const onWalletConnectedCallback = async () => {
}

// Starts the dApp
loadDapp()
Install a web server like lite-server:
npm install -g lite-server
Then, in the same directory as index.html:
lite-server
Your dApp is now running at http://127.0.0.1:3000.
4. Test Your Bot
Now let’s test it:
- Send
authenticateto the bot. - Visit the site the bot replies with, connect to Scroll Mainnet, and sign the message.
- Check the bot’s reply in Telegram.

This flow securely authenticates users and enables actions on their behalf without storing private keys.
Next Steps
In this tutorial, we authenticated Telegram users via a Web3 wallet. We used the ERC712 standard and the eth_signTypedData_v4 method, and the Telegram API to send and receive messages.
In the next tutorial, we’ll use this authentication to control access to a Telegram group.
Thanks for reading this article!
Follow Filosofía Código on dev.to and in Youtube for everything related to Blockchain development.

Top comments (1)