
We are living in a world where everything is automated, so why publish Chrome extension manually?🤔
Let’s automate our process of publishing the chrome extension that we set up in the previous article.
This article is going to be long but in the end, you will have great things in your hand.
In this article I will be going to focus mainly on the following topics:
- Let’s change our extension folder structure
- Setup package.json file to install required NPM packages
- Setting up Github actions to automate deployment on code push
- Let’s set up Google credentials to allow uploading extension
- Write a script to publish an extension to web-store
- Include required packages
- Setup build path
- Update extension version
- Generate a zip file to upload to store
- Initialize webstore with client Id and client secret
- Generating new refresh token
- Upload extension zip to store
- Publish Extension
Let’s change our extension folder structure
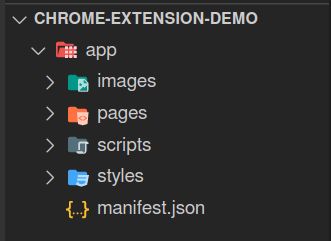
Before we start let’s rearrange our extension folder structure that we created in Getting started with the chrome extension.
This will help us to manage our code and to create extension zip in upcoming steps. To do this create a new folder in our project directory [app] and move all the extension files into the [app] folder.
You can change this according to your need if you are using any build tool like webpack.
Setup package.json file to install required NPM packages
Now it's time to use some npm packages which will help us to automate our process.
Using these packages will reduce our efforts and make things easier.
Packages that we need:-
- jsonfile - npm -> This will help us to read the manifest.json file to update the version of our extension.
- zip-local - npm -> We will use this to generate a zip file of our code.
- fs-extra - npm -> fs-extra will help us to read our zip file into the buffer
- chrome-webstore-manager - npm -> This is the most important package we need to automate our process.
- path - It is by default provided by Node.js so no need to install it explicitly.
Now let’s make the way to get it done using package.json
What is the package.json file?
The file holds various metadata relevant to the project. This file is used to give information to npm that allows it to identify the project as well as handle the project's dependencies.
To know more click here
To create and initialize the package.json file run the following command in terminal:
npm init
Use default options or add details according to your need.
Once you've created package.json, it’s time to install our dependencies that I mentioned above.
To do so run the following command:-
npm install jsonfile zip-local fs-extra chrome-webstore-manager --save-dev
Save-dev - This option will save our dependencies in package.json under the devDependencies property.
Here is the final structure of the package.json
Setting up Github actions to automate deployment on code push
GitHub action allows us to add an automated task. This task will run when specific actions get triggered on the GitHub repo.
In our case, we need to run some npm commands to deploy our extension by running our node.js script.
To know more about git hub actions click here
Here is the example of GitHub action that we need.
Add this file as it is to GitHub action.
Where to add this file?🤔
Create the following folder structure to add an action workflow file.
-> Chrome-extension-demo
    -> app  //Our extension code
    -> .github
        -> workflows
            -> action.yml
Let’s set up Google credentials to allow uploading extension
To automate publishing, you need to enable the Chrome Web Store API for your project in the Google Developers Console.
- Visit the Google Developers Console.
- Create a new project or select an existing one.
- In the sidebar on the left, select APIs & auth.
- In the displayed list of available APIs, set the status of the Chrome Web Store API to ON.
- Accept the Terms of Service.
- In the sidebar on the left, select Credentials.
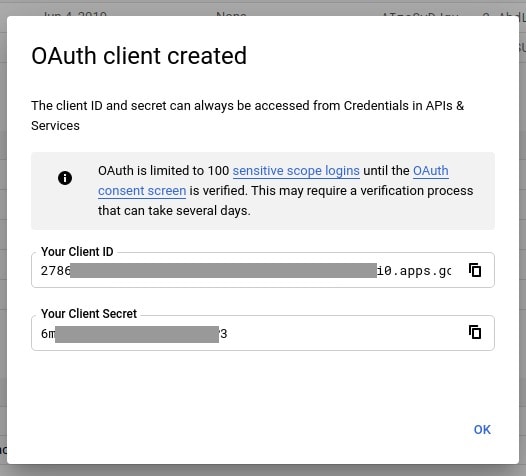
- To create the client ID and client secret
- Click on Create Credentials
- Select OAuth client ID
- Desktop App under application type
- Enter the name of your application
- Click on the Create button.
🥳 Yeah! We got the client Id and client secret
Get an access token:
Once you have the client ID and client secret, you can retrieve an access token and refresh token. The access token is responsible for authorizing our script to upload and publish an extension.
Note:- Access token gets expired after 40 minutes. So, we will always need to create a new one while deploying our extension in a continuous deployment process.
To create new access_token we will use refresh_token.
Let’s generate access_token and refresh_token:
- Use the following URL to generate code which is used to generate access_token
https://accounts.google.com/o/oauth2/auth?response_type=code&scope=https://www.googleapis.com/auth/chromewebstore&client_id=$CLIENT_ID&redirect_uri=urn:ietf:wg:oauth:2.0:oob
Replace $CLIENT_ID with the client Id that we generated in the previous step.
Paste the updated URL in the browser and hit enter.
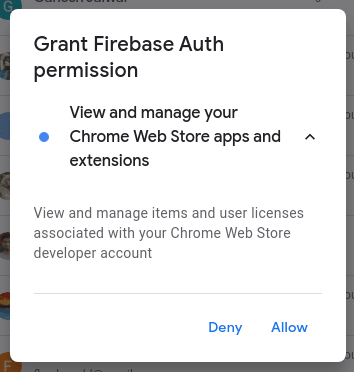
Select the same google account where you have an extension uploaded.
Grant permission to view and manage your chrome extension and apps.
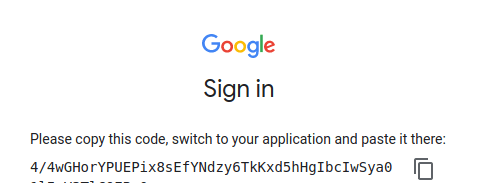
- After granting permission we get the authorization code. Copy that code to generate access_token.
- Open your terminal to execute the next curl request. Use above code to request an access token. For example, using curl, you can get an access token by executing the following command (replacing the values of $CLIENT_ID, $CLIENT_SECRET, and $CODE with the values from above):
curl "https://accounts.google.com/o/oauth2/token" -d \
"client_id=$CLIENT_ID&client_secret=$CLIENT_SECRET&code=$CODE&grant_type=authorization_code&redirect_uri=urn:ietf:wg:oauth:2.0:oob"
This will return a result such as:
{
  "access_token" : "ya29...",
  "token_type" : "Bearer",
  "expires_in" : 3600,
  "refresh_token" : "1/rwn..."
}
Note down the refresh token we will use this token in our deploy script.
Write a script to publish an extension to web-store
Create a new JavaScript file at the root level of our extension and name it as deploy.js
- Include the required packages Import packages that we installed using NPM.
const fs = require('fs-extra');
const zipper = require("zip-local");
const jsonfile = require('jsonfile');
const path = require('path');
const ChromeWebstore = require('chrome-webstore-manager');
- Setup build path
const itemId = "EXTENSION_ID";
var buildLocation = path.join(__dirname, "app");
Replace EXTENSION_ID with Id of the extension that uploaded in the previous article
Id may look like:- ecjchthpmtdecenmykiuipbibkhcijlj
- Update extension version While uploading a new package to the store add a new version. Google does not allow uploading a new package with the same version. Read manifest file Generate new version Update with the new version Write manifest file with an updated version
// read manifest file
var manifest = jsonfile.readFileSync(path.join(buildLocation, "manifest.json"));
function getNewVersion() {
       var ver = parseInt(manifest.version.split('.')[0]);
       ver++;
       return `${ver}.0.0`;
}
var version = getNewVersion();
// replace version
manifest.version = version;
// save manifest file
jsonfile.writeFileSync(path.join(buildLocation, "manifest.json"), manifest);
- Generate a zip file and read that file to upload to store
// create zip
zipper.sync.zip(buildLocation).compress().save(path.join(buildLocation, "build.zip"));
const fileBin = fs.readFileSync(path.join(buildLocation, "build.zip"));
- Initialize webstore with client Id and client secret
// Initialize with ClientID and ClinetSecret
const chromeWebstore = new ChromeWebstore("<CLIENT_ID>", "<CLIENT_SECRET>");
Replace CLIENT_ID and CLIENT_SECRET with values that we created before.
- Generating new access_token Use the following function to create new access_token.
chromeWebstore.getRefreshToken("<REFRESH_TOKEN>")
Replace REFRESH_TOKEN with refresh_token that we generated in the previous process.
- Upload extension zip to store
chromeWebstore.updateItem(newToken, fileBin, itemId)
In the 6th step, we will get a promise, which returns an object containing new access_token.
Use this access token to upload extension zip with the update method of chromeWebstore.
- Publish Extension
chromeWebstore.publishItem(newToken, itemId)
Once the upload is done we are ready to publish our extension.
To publish we are going to use chromeWebstore’s publishItem method.
Let’s keep the last 3 steps together to complete our script.
// Get new token with refresh_token
chromeWebstore.getRefreshToken("<REFRESH_TOKEN>").then(function (data) {
   const json = JSON.parse(data)
   const newToken = json.access_token
   chromeWebstore.updateItem(newToken, fileBin, itemId).then((data) => {
       console.log(data);
       chromeWebstore.publishItem(newToken, itemId).then((data) => {
           console.log(data);
       });
   });
});
console.log("Deployed version is " + version);
Hoorayyyyy! 🎉🎉
Finally, we are done with creating our deploy script.
Now once we push our extension code into the repo, Github Action will get triggered.
In our workflow file, we wrote a command that triggers the deploy script, and the extension will get updated using the deploy script automatically.
This was a long article as I had a lot of explaining to do.
Hope you liked it.
Thanks for your time.
Hope you like it, if yes **like & share.**
Happy coding….

Oldest comments (0)