
Photo by Markus Winkler on Unsplash
I have recently been playing around with Fathom to gather visitor stats on my websites. I really like its promise of being a "simple, light-weight privacy-first alternative to Google Analytic".
It was also appealing that they offer a lite version for those who wish to self host. Seeing they provided a pre-built Docker image made it a no-brainer to want to give it a spin. It took a bit of configuration to get everything working and I've documented the steps here in case it's helpful for anyone else (AKA me in 6 months).
So before diving into the details, this is the overall picture of the setup:
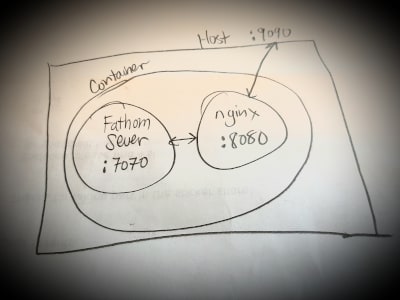
- The Fathom server is running on port 7070.
- The nginx server is running on port 8080.
- The container's port 8080 is bound to the host's port 9090.
On my host machine as root:
mkdir /opt/fathom
Create a fathom.conf file in /opt/fathom.
server {
    server_name your.domain.name;

    location / {
        proxy_set_header X-Real-IP $remote_addr;
        proxy_set_header X-Forwarded-For $remote_addr;
        proxy_set_header Host $host;
        proxy_pass http://127.0.0.1:7070;
    }
}
We will be mapping above fathom.conf file to a directory in the container to be used by nginx.
Create an .env file (also in /opt/fathom):
FATHOM_SERVER_ADDR=":7070"
FATHOM_DATABASE_NAME="/app/config/fathom.db"
This .env file will start the fathom server on port 7070 and place the sqlite db file in /app/config in the Docker container.
Ok, let's start our Docker container:
sudo docker run -d -v /opt/fathom:/app/config -p 9090:8080 -p 80:80 --name fathom usefathom/fathom:latest ./fathom --config /app/config/.env server
Woah!! Woah!! Woah!! I know what you're thinking. What the heck is going on here??!!!
Let's break down in this docker command:
sudo docker run -d - This runs the Docker container.
-v /opt/fathom:/app/config - This maps a volume from our host machine (/opt/fathom) to a directory in our Docker container (/app/config).
-p 9090:8080 -p 80:80 - This exposes the container's port 8080 as the host's port 9090. The second argument exposes port 80 as itself. This will be needed for generating a Let's Encrypt SSL certificate.
--name fathom - This names the container so we can easily reference it.
usefathom/fathom:latest - This pulls down the pre-built Docker container provided by Fathom.
./fathom --config /app/config/.env server - This starts the fathom server using the .env file we just created and mapped into the container.
Now that we have created a running Docker container, we can access it with an interactive bash shell with the following:
sudo docker exec -it fathom /bin/bash
NOTE: I didn't give docker the permissions needed to run it without sudo.
Once in the container, you should be in the /app directory.
Let's create a fathom user:
fathom --config /app/config/.env user add --email="your@email.com" --password="strong-password"
Install nginx, certbot and the certbot/nginx plugin:
apk add certbot certbot-nginx nginx
NOTE: The pre-built Docker container is based on the Alpine Linux distribution. Coincidentally, the host machine I'm using is a Linode that is also Alpine Linux.
Symlink the previously created fathom.conf so nginx can use it:
ln -s /app/config/fathom.conf /etc/nginx/conf.d/fathom.conf
Create certs from Let's Encrypt:
mkdir /run/nginx
certbot --nginx -d your-site.com
There will be a series of questions you will need to answer and once done there be updates to your conf file.
Open up /etc/nginx/conf.d/fathom.conf and find the updated section. It should looks something like this (excerpt):
    listen 80; # managed by Certbot

    listen 443 ssl; # managed by Certbot
    ssl_certificate /etc/letsencrypt/live/yoursite.com/fullchain.pem; # managed by Certbot
    ssl_certificate_key /etc/letsencrypt/live/yoursite.com/privkey.pem; # managed by Certbot
    include /etc/letsencrypt/options-ssl-nginx.conf; # managed by Certbot
    ssl_dhparam /etc/letsencrypt/ssl-dhparams.pem; # managed by Certbot
Replace 443 to 8080, the final content should look like this:
server {
    server_name your.domain.name;

    location / {
        proxy_set_header X-Real-IP $remote_addr;
        proxy_set_header X-Forwarded-For $remote_addr;
        proxy_set_header Host $host;
        proxy_pass http://127.0.0.1:7070;
    }

    listen 80; # managed by Certbot

    listen 8080 ssl; # managed by Certbot
    ssl_certificate /etc/letsencrypt/live/yoursite.com/fullchain.pem; # managed by Certbot
    ssl_certificate_key /etc/letsencrypt/live/yoursite.com/privkey.pem; # managed by Certbot
    include /etc/letsencrypt/options-ssl-nginx.conf; # managed by Certbot
    ssl_dhparam /etc/letsencrypt/ssl-dhparams.pem; # managed by Certbot
}
Run nginx:
nginx -t
nginx
Whew! That was a lot! Now go to https://yourdomain.com:9090 to see your freshly installed Fathom Lite dashboard!

Oldest comments (0)